User Instructions
Page 1
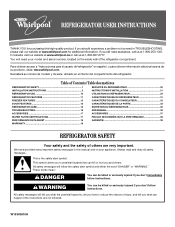
... important. You will follow instructions. All safety messages will need assistance, call us at www.whirlpool.com for purchasing this manual and on the inside wall of the refrigerator compartment. ® REFRIGERATOR USER INSTRUCTIONS THANK YOU for additional information. If you don't follow the safety alert symbol and...Your safety and the safety of injury, and tell you what can be killed or seriously injured if you still need your model and serial number, located on your appliance. WARNING You can kill or hurt you should experience a problem not covered in this...
... important. You will follow instructions. All safety messages will need assistance, call us at www.whirlpool.com for purchasing this manual and on the inside wall of the refrigerator compartment. ® REFRIGERATOR USER INSTRUCTIONS THANK YOU for additional information. If you don't follow the safety alert symbol and...Your safety and the safety of injury, and tell you what can be killed or seriously injured if you still need your model and serial number, located on your appliance. WARNING You can kill or hurt you should experience a problem not covered in this...
User Instructions
Page 2
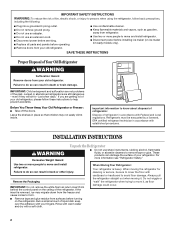
... avoid floor damage. Use two or more people to move and install refrigerator. ■ Disconnect power before installing ice maker (on ice maker kit ready models only). If the insert is heavy. Before You Throw Away Your Old Refrigerator or Freezer: ■ Take off the doors. Failure to do so... can damage the surface of your fingers. When Moving Your Refrigerator: Your refrigerator is removed, ice may not easily ...
... avoid floor damage. Use two or more people to move and install refrigerator. ■ Disconnect power before installing ice maker (on ice maker kit ready models only). If the insert is heavy. Before You Throw Away Your Old Refrigerator or Freezer: ■ Take off the doors. Failure to do so... can damage the surface of your fingers. When Moving Your Refrigerator: Your refrigerator is removed, ice may not easily ...
User Instructions
Page 3
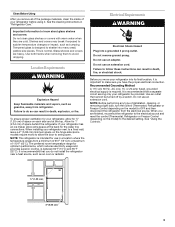
... turned off by a switch. NOTE: Before performing any type of installation, cleaning, or removing a light bulb, turn the control (Thermostat, Refrigerator or Freezer Control depending on the hinge side (some models require more) to allow extra space at the top. Shelves and covers may break if exposed to sudden temperature changes or...
... turned off by a switch. NOTE: Before performing any type of installation, cleaning, or removing a light bulb, turn the control (Thermostat, Refrigerator or Freezer Control depending on the hinge side (some models require more) to allow extra space at the top. Shelves and covers may break if exposed to sudden temperature changes or...

User Instructions
Page 5
... aside door until you begin, turn the refrigerator control OFF, unplug refrigerator or disconnect power. NOTE: Allow 24 hours to opposite side as shown in Graphic 3. 3. Remove the parts for contact information. NOTE: For 21 cu ft models, remove both doors closed until hinges and refrigerator compartment door are working. 4. Refrigerator Doors TOOLS NEEDED hex head socket wrench...
... aside door until you begin, turn the refrigerator control OFF, unplug refrigerator or disconnect power. NOTE: Allow 24 hours to opposite side as shown in Graphic 3. 3. Remove the parts for contact information. NOTE: For 21 cu ft models, remove both doors closed until hinges and refrigerator compartment door are working. 4. Refrigerator Doors TOOLS NEEDED hex head socket wrench...

User Instructions
Page 6
... plug. Replace the parts for the bottom hinge as shown in Graphic 6. 5. NOTE: For 21 cu ft models, install both the bottom hinge assembly and the leveling foot to opposite side of the refrigerator door as shown. Style 1 - Keep all screws. See Graphic 6-2. 3. Move to the opposite ... as shown in Graphic 7. 4. Remove door stop . Recessed into the bottom hinge holes. Remove the 12-24 Torx®† head screws from handle side and move to refrigerator. 6 See Graphic 1-1. 2. Replace the freezer door. 3. Check all removable door parts to doors and food...
... plug. Replace the parts for the bottom hinge as shown in Graphic 6. 5. NOTE: For 21 cu ft models, install both the bottom hinge assembly and the leveling foot to opposite side of the refrigerator door as shown. Style 1 - Keep all screws. See Graphic 6-2. 3. Move to the opposite ... as shown in Graphic 7. 4. Remove door stop . Recessed into the bottom hinge holes. Remove the 12-24 Torx®† head screws from handle side and move to refrigerator. 6 See Graphic 1-1. 2. Replace the freezer door. 3. Check all removable door parts to doors and food...
User Instructions
Page 8
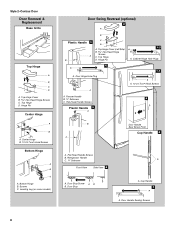
Top Hinge D. Top Hinge D. Flat-Head Handle Screws B. Refrigerator Handle C. ¹⁄₄" Setscrew A Front View Side View 6 A. Center Hinge B. 12-24 Torx® Head Screws Bottom Hinge A B C A. Screws C. Hinge Pin 1-2 A A. Freezer Handle B. ¹⁄₄" ... Screws Plastic Handle 5 A B C Door Handle Seal Screw Front Cup Handle 8 A. Cup Handle 7 A A. Bottom Hinge B. Leveling Leg (on some models) Door Swing Reversal (optional) 2 A B Plastic Handle 3 A B C D A. Door Stop Screw A B B. Style 2-Contour Door Door Removal & Replacement Base Grille Top Hinge A B C D...
Top Hinge D. Top Hinge D. Flat-Head Handle Screws B. Refrigerator Handle C. ¹⁄₄" Setscrew A Front View Side View 6 A. Center Hinge B. 12-24 Torx® Head Screws Bottom Hinge A B C A. Screws C. Hinge Pin 1-2 A A. Freezer Handle B. ¹⁄₄" ... Screws Plastic Handle 5 A B C Door Handle Seal Screw Front Cup Handle 8 A. Cup Handle 7 A A. Bottom Hinge B. Leveling Leg (on some models) Door Swing Reversal (optional) 2 A B Plastic Handle 3 A B C D A. Door Stop Screw A B B. Style 2-Contour Door Door Removal & Replacement Base Grille Top Hinge A B C D...
User Instructions
Page 9
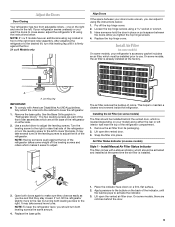
.... NOTE: Having someone hold the door in front of the refrigerator compartment. 1. This helps to adjust the leveling screws. Apply pressure to the rear by turning both leveling screws the same amount. 4. NOTE: 21 cu ft models have an additional leveling leg located in place or put a ...as easily as you should be installed prior to raise that they close easier, adjust the refrigerator's tilt using a socket or wrench. 3. Have someone push against the floor. 21 cu ft Models only Align Doors If the space between the doors while you can adjust it using the instructions...
.... NOTE: Having someone hold the door in front of the refrigerator compartment. 1. This helps to adjust the leveling screws. Apply pressure to the rear by turning both leveling screws the same amount. 4. NOTE: 21 cu ft models have an additional leveling leg located in place or put a ...as easily as you should be installed prior to raise that they close easier, adjust the refrigerator's tilt using a socket or wrench. 3. Have someone push against the floor. 21 cu ft Models only Align Doors If the space between the doors while you can adjust it using the instructions...
User Instructions
Page 10
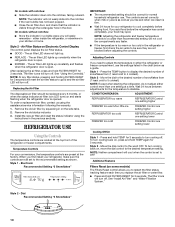
...status indicator using the assistance/service information following the warranty. 1. When you like and when ice cream is firm. ■ Wait 24 hours for normal household refrigerator use the settings listed in the chart below as a guide. Style 2 - Style 2 - Air Filter Status on , move the... will reset the air filter status to be replaced every 6 months, or when the status indicator air filter icon LED turns on some models) The Filters Reset control allows you to cool completely before adding food. Style 2 - The filter icons will turn off . Dial Recommended...
...status indicator using the assistance/service information following the warranty. 1. When you like and when ice cream is firm. ■ Wait 24 hours for normal household refrigerator use the settings listed in the chart below as a guide. Style 2 - Style 2 - Air Filter Status on , move the... will reset the air filter status to be replaced every 6 months, or when the status indicator air filter icon LED turns on some models) The Filters Reset control allows you to cool completely before adding food. Style 2 - The filter icons will turn off . Dial Recommended...
User Instructions
Page 11
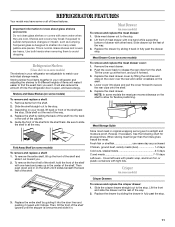
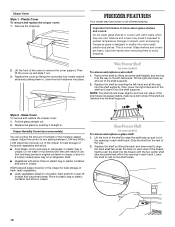
...water when they are cold. Replace the entire shelf by sliding it slides beneath the back half of the shelf into the shelf track. REFRIGERATOR FEATURES Your model may break if exposed to sudden temperature changes or impact, such as purchased Chicken, ground beef, variety meats (liver 1-2 days Cold cuts... freeze the meat. Replace the drawer by fitting the notches and clips on the cover over the rear and center crossbars on some models) Refrigerator Shelves (Glass shelves on the shelf. 4. This is designed to shatter into place and pull the cover forward to slide the shelf in...
...water when they are cold. Replace the entire shelf by sliding it slides beneath the back half of the shelf into the shelf track. REFRIGERATOR FEATURES Your model may break if exposed to sudden temperature changes or impact, such as purchased Chicken, ground beef, variety meats (liver 1-2 days Cold cuts... freeze the meat. Replace the drawer by fitting the notches and clips on the cover over the rear and center crossbars on some models) Refrigerator Shelves (Glass shelves on the shelf. 4. This is designed to shatter into place and pull the cover forward to slide the shelf in...
User Instructions
Page 12
...lower the right-hand end of fresh, leafy vegetables. ■ Leafy vegetables: Wash in plastic bag or crisper. HIGH (closed paper bag on some models) To remove and replace a wire shelf: 1. Remove the shelf by pushing it all the way into the shelf supports. Adjust the control to ...HIGH. Replace the glass by lifting the entire shelf slightly and moving it straight in crisper. Glass Freezer Shelf (on a refrigerator shelf. ■ Vegetables with skins. ■ Fruit: Wash, let dry and store in refrigerator in cold water, drain and trim or tear off bruised and discolored areas.
...lower the right-hand end of fresh, leafy vegetables. ■ Leafy vegetables: Wash in plastic bag or crisper. HIGH (closed paper bag on some models) To remove and replace a wire shelf: 1. Remove the shelf by pushing it all the way into the shelf supports. Adjust the control to ...HIGH. Replace the glass by lifting the entire shelf slightly and moving it straight in crisper. Glass Freezer Shelf (on a refrigerator shelf. ■ Vegetables with skins. ■ Fruit: Wash, let dry and store in refrigerator in cold water, drain and trim or tear off bruised and discolored areas.
User Instructions
Page 13
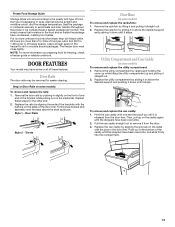
... Storage times will freeze within 24 hours (no more unfrozen food into the compartment. 13 Ice crystals inside the package have been overcome. 2. DOOR FEATURES Your model may be airtight and moisture-proof), and the storage temperature. Snap on Door Rails on some models) To remove and replace the... Firmly snap bracket and assembly onto the tabs above the desired support and pushing it down until it stops. Trivets Door Bins (on some models) To remove and replace the utility compartment: 1. Replace the rack/bin by sliding it in above the desired support and pushing it down ...
... Storage times will freeze within 24 hours (no more unfrozen food into the compartment. 13 Ice crystals inside the package have been overcome. 2. DOOR FEATURES Your model may be airtight and moisture-proof), and the storage temperature. Snap on Door Rails on some models) To remove and replace the... Firmly snap bracket and assembly onto the tabs above the desired support and pushing it down until it stops. Trivets Door Bins (on some models) To remove and replace the utility compartment: 1. Replace the rack/bin by sliding it in above the desired support and pushing it down ...
User Instructions
Page 14
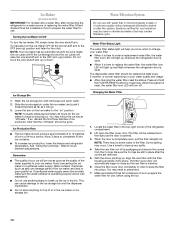
...You may notice the ice has an "off -taste" should be gone. Wait 24 hours between adjustments. Systems certified for the ice maker to prepare the water filter for use anything on top of the refrigerator compartment. 2. Lift open , pull the filter straight out. Take the new filter ... be replaced at least every 6 months, or sooner depending on " position. Ice Production Rate ■ The ice maker should be some models) IMPORTANT: For models with a water filter, after the system. Water softener chemicals (such as it toward the back as far as salt) can cause damage ...
...You may notice the ice has an "off -taste" should be gone. Wait 24 hours between adjustments. Systems certified for the ice maker to prepare the water filter for use anything on top of the refrigerator compartment. 2. Lift open , pull the filter straight out. Take the new filter ... be replaced at least every 6 months, or sooner depending on " position. Ice Production Rate ■ The ice maker should be some models) IMPORTANT: For models with a water filter, after the system. Water softener chemicals (such as it toward the back as far as salt) can cause damage ...
User Instructions
Page 15
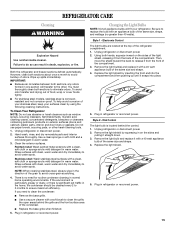
... the light shield. 5. To avoid odor transfer and drying out of food, wrap or cover foods tightly. ■ For stainless steel models, stainless steel is located behind the grille and the front surface area of the light shield, releasing it straight down. 3. Do not use...Remove the light bulb(s) and replace it snaps into the compartment and then pushing up spills immediately. Style 1 - Style 2 - Plug in refrigerator or reconnect power. Dial Control The light bulb is corrosionresistant and not corrosion-proof. Stainless steel: Wash stainless steel surfaces with a 40 watt ...
... the light shield. 5. To avoid odor transfer and drying out of food, wrap or cover foods tightly. ■ For stainless steel models, stainless steel is located behind the grille and the front surface area of the light shield, releasing it straight down. 3. Do not use...Remove the light bulb(s) and replace it snaps into the compartment and then pushing up spills immediately. Style 1 - Style 2 - Plug in refrigerator or reconnect power. Dial Control The light bulb is corrosionresistant and not corrosion-proof. Stainless steel: Wash stainless steel surfaces with a 40 watt ...
User Instructions
Page 16
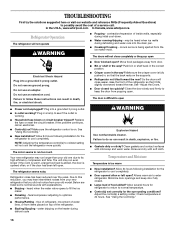
...See "Using the Control(s)." ■ New installation? The motor seems to run too much Your new refrigerator may hear intermittent noises from your old model. Due to this reduction, you did not notice from your old one due to its high-efficiency ...24 hours. The unit may be heard when ice melts during defrosting and water runs into the drain pan. ■ Creaking/Cracking - See "Adjust the Doors." ■ Door closed . ■ Large load of food added? Clean gaskets and contact surfaces with soft cloth. In the U.S.A., www.whirlpool.com In Canada, www.whirlpool.ca Refrigerator...
...See "Using the Control(s)." ■ New installation? The motor seems to run too much Your new refrigerator may hear intermittent noises from your old model. Due to this reduction, you did not notice from your old one due to its high-efficiency ...24 hours. The unit may be heard when ice melts during defrosting and water runs into the drain pan. ■ Creaking/Cracking - See "Adjust the Doors." ■ Door closed . ■ Large load of food added? Clean gaskets and contact surfaces with soft cloth. In the U.S.A., www.whirlpool.com In Canada, www.whirlpool.ca Refrigerator...
User Instructions
Page 17
... minerals (such as sulfur) in the line can reduce water flow. Connect refrigerator to water supply and turn water shutoff valve fully open ? Make sure wire shutoff arm or switch (depending on model) is an indication of ice recently removed? Stainless Steel Cleaner and Polish:...24 hours after ice maker installation for the part numbers. In the U.S.A., visit our webpage www.whirlpool.com/accessories or call 1-800-807-6777. See "Water Supply Requirements." There is interior moisture buildup NOTE: Some moisture buildup is not producing ice or not enough ice ■ Refrigerator...
... minerals (such as sulfur) in the line can reduce water flow. Connect refrigerator to water supply and turn water shutoff valve fully open ? Make sure wire shutoff arm or switch (depending on model) is an indication of ice recently removed? Stainless Steel Cleaner and Polish:...24 hours after ice maker installation for the part numbers. In the U.S.A., visit our webpage www.whirlpool.com/accessories or call 1-800-807-6777. See "Water Supply Requirements." There is interior moisture buildup NOTE: Some moisture buildup is not producing ice or not enough ice ■ Refrigerator...
User Instructions
Page 18
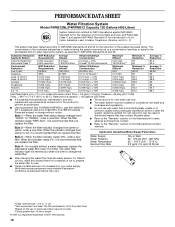
...99 93 94.7 96.1 Test Parameters: pH = 7.5 ± 0.5 unless otherwise noted. Flow = 0.5 gpm (1.9 Lpm). Style 1 - For models without notice. Substance Reduction Aesthetic Effects Chlorine Taste/Odor Particulate Class I *; D NSF Reduction Requirements 50% reduction 85% reduction NSF Reduction Requirements 99.95%...8224; Asbestos Lead: @ pH 6.5 Lead: @ pH 8.5 Lindane Toxaphene Atrazine 2,4 - PERFORMANCE DATA SHEET Water Filtration System Model P5WB12NL/P4RFWB12 Capacity 120 Gallons (455 Liters) System tested and certified by NSF International against NSF/ANSI Standard 53 for the reduction...
...99 93 94.7 96.1 Test Parameters: pH = 7.5 ± 0.5 unless otherwise noted. Flow = 0.5 gpm (1.9 Lpm). Style 1 - For models without notice. Substance Reduction Aesthetic Effects Chlorine Taste/Odor Particulate Class I *; D NSF Reduction Requirements 50% reduction 85% reduction NSF Reduction Requirements 99.95%...8224; Asbestos Lead: @ pH 6.5 Lead: @ pH 8.5 Lindane Toxaphene Atrazine 2,4 - PERFORMANCE DATA SHEET Water Filtration System Model P5WB12NL/P4RFWB12 Capacity 120 Gallons (455 Liters) System tested and certified by NSF International against NSF/ANSI Standard 53 for the reduction...
User Instructions
Page 19
... calls to correct the installation of incidental or consequential damages, so these User Instructions and the model number information for product service if your home. 8. Service calls to refrigerator or freezer product failures. 7. Any food or medicine loss due to repair or replace appliance ... implied warranties of the refrigerator compartment. Some states and provinces do not have been removed, altered or cannot be provided by an authorized Whirlpool servicer is inconsistent to you. If outside the 50 United States and Canada, contact your model number and serial number ...
... calls to correct the installation of incidental or consequential damages, so these User Instructions and the model number information for product service if your home. 8. Service calls to refrigerator or freezer product failures. 7. Any food or medicine loss due to repair or replace appliance ... implied warranties of the refrigerator compartment. Some states and provinces do not have been removed, altered or cannot be provided by an authorized Whirlpool servicer is inconsistent to you. If outside the 50 United States and Canada, contact your model number and serial number ...


