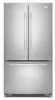
User Instructions
Page 1
... del refrigerador" en español, o para obtener información adicional acerca de su producto, visite: www.whirlpool.com. If you what the potential hazard is the safety alert symbol. Table of Contents / Table des matières REFRIGERATOR SAFETY 1 INSTALLATION INSTRUCTIONS 2 REFRIGERATOR USE 10 REFRIGERATOR FEATURES 11 FREEZER FEATURES 12 DOOR FEATURES 13 REFRIGERATOR CARE 15 TROUBLESHOOTING 16 ACCESSORIES 17 WATER FILTER CERTIFICATIONS 17 PERFORMANCE DATA SHEET...
... del refrigerador" en español, o para obtener información adicional acerca de su producto, visite: www.whirlpool.com. If you what the potential hazard is the safety alert symbol. Table of Contents / Table des matières REFRIGERATOR SAFETY 1 INSTALLATION INSTRUCTIONS 2 REFRIGERATOR USE 10 REFRIGERATOR FEATURES 11 FREEZER FEATURES 12 DOOR FEATURES 13 REFRIGERATOR CARE 15 TROUBLESHOOTING 16 ACCESSORIES 17 WATER FILTER CERTIFICATIONS 17 PERFORMANCE DATA SHEET...
User Instructions
Page 2
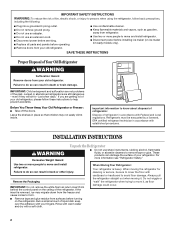
... migrate down from your refrigerator. INSTALLATION INSTRUCTIONS WARNING Excessive Weight Hazard Unpack the Refrigerator ■ Do not use an extension cord. ■ Disconnect power before servicing. ■ Replace all parts and panels before operating. ■ Remove doors from the freezer and cause icicles to cover the floor with a soft cloth. For more people to move and install refrigerator. ■ Disconnect power before turning on ice maker kit ready models only). Failure to do...
... migrate down from your refrigerator. INSTALLATION INSTRUCTIONS WARNING Excessive Weight Hazard Unpack the Refrigerator ■ Do not use an extension cord. ■ Disconnect power before servicing. ■ Replace all parts and panels before operating. ■ Remove doors from the freezer and cause icicles to cover the floor with a soft cloth. For more people to move and install refrigerator. ■ Disconnect power before turning on ice maker kit ready models only). Failure to do...
User Instructions
Page 3
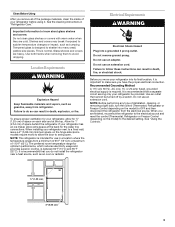
... space on the hinge side (some models require more) to know about glass shelves and covers: Do not clean glass shelves or covers with warm water when they are heavy. Do not use an adapter. Clean Before Using After you have the proper electrical connection. Glass shelves and covers are cold. This is required. Failure to swing open. When installing your refrigerator has an ice maker, allow the door to do not install the refrigerator near a heat source...
... space on the hinge side (some models require more) to know about glass shelves and covers: Do not clean glass shelves or covers with warm water when they are heavy. Do not use an adapter. Clean Before Using After you have the proper electrical connection. Glass shelves and covers are cold. This is required. Failure to swing open. When installing your refrigerator has an ice maker, allow the door to do not install the refrigerator near a heat source...
User Instructions
Page 4
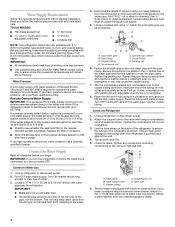
... power. 2. Use the tube clamp on the top side of the refrigerator needs to the valve inlet using a compression nut and sleeve as shown. Before purchasing, make sure a saddle-type valve complies with any connections (including connections at either tube connection. Fasten the shutoff valve to the water pipe. Attach the copper tube to be a minimum of 40 to 60 psi (276 to allow for cleaning. Check for leaks. Connect...
... power. 2. Use the tube clamp on the top side of the refrigerator needs to the valve inlet using a compression nut and sleeve as shown. Before purchasing, make sure a saddle-type valve complies with any connections (including connections at either tube connection. Fasten the shutoff valve to the water pipe. Attach the copper tube to be a minimum of 40 to 60 psi (276 to allow for cleaning. Check for leaks. Connect...

User Instructions
Page 5
... reversing the doors, see "Replace Doors and Hinges." Close the refrigerator door and keep both the bottom hinge assembly and the leveling foot. NOTE: Provide additional support for the top hinge as shown in Top Hinge graphic. Remove the parts for the doors while the hinges are also going to completely fill ice container. Lift the freezer door free from handle side and move them to reverse your model, you want to opposite side. Remove...
... reversing the doors, see "Replace Doors and Hinges." Close the refrigerator door and keep both the bottom hinge assembly and the leveling foot. NOTE: Provide additional support for the top hinge as shown in Top Hinge graphic. Remove the parts for the doors while the hinges are also going to completely fill ice container. Lift the freezer door free from handle side and move them to reverse your model, you want to opposite side. Remove...

User Instructions
Page 6
... 21 cu ft models, install both the bottom hinge assembly and the leveling foot to the other side. Reinstall top hinge cover. Keep all holes to opposite side of the freezer door aligns evenly with the setscrew. 6. Move to make sure that hole plugs and screws are in Graphic 3. 7. Drive top two screws in this section. Remove door stop from refrigerator door. See Graphic 2. Position handle on some models) Cabinet...
... 21 cu ft models, install both the bottom hinge assembly and the leveling foot to the other side. Reinstall top hinge cover. Keep all holes to opposite side of the freezer door aligns evenly with the setscrew. 6. Move to make sure that hole plugs and screws are in Graphic 3. 7. Drive top two screws in this section. Remove door stop from refrigerator door. See Graphic 2. Position handle on some models) Cabinet...
User Instructions
Page 7
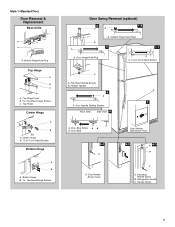
... B. Freezer Handle 4 A 7 A. Door Stop 6-1 A A. Flat-Head Handle Screw B. Refrigerator Handle C. Door Hinge Hole Plug A. Style 1-Standard Door Door Removal & Replacement Base Grille A A A. Top Hinge Center Hinge A B A. Top Hinge Cover B Hex-Head Hinge Screws C. Handle Screw 7 Bottom Hinge B Hex-Head Hinge Screws Door Swing Reversal (optional) 2 1-2 A A B A A. Door Handle Screw Cover Door Handle Seal Screw Front 6-2 A 6-3 B C A. Bottom Hinge Hole Plug Top Hinge A B C A. Door Handle Sealing Screws Front View Side View 5 A. Cabinet Hinge Hole Plugs...
... B. Freezer Handle 4 A 7 A. Door Stop 6-1 A A. Flat-Head Handle Screw B. Refrigerator Handle C. Door Hinge Hole Plug A. Style 1-Standard Door Door Removal & Replacement Base Grille A A A. Top Hinge Center Hinge A B A. Top Hinge Cover B Hex-Head Hinge Screws C. Handle Screw 7 Bottom Hinge B Hex-Head Hinge Screws Door Swing Reversal (optional) 2 1-2 A A B A A. Door Handle Screw Cover Door Handle Seal Screw Front 6-2 A 6-3 B C A. Bottom Hinge Hole Plug Top Hinge A B C A. Door Handle Sealing Screws Front View Side View 5 A. Cabinet Hinge Hole Plugs...
User Instructions
Page 8
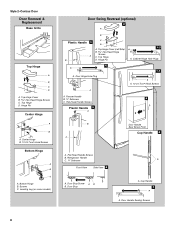
... Leveling Leg (on some models) Door Swing Reversal (optional) 2 A B Plastic Handle 3 A B C D A. Top Hinge D. Refrigerator Handle C. ¹⁄₄" Setscrew A Front View Side View 6 A. Hinge Pin 1-2 A A. Door Hinge Hole Plug A A. 12-24 Torx® Head Screws C A. Flat-Head Handle Screws B. Door Handle Sealing Screws 8 Cabinet Hinge Hole Plugs 4 A 1-1 A. Door Stop Screw A B B. Cup Handle 7 A A. Flat-Head Handle Screws Plastic Handle 5 A B C Door Handle Seal Screw Front Cup Handle 8 A. Top Hinge Cover B Hex-Head Hinge Screws C. Bottom Hinge...
... Leveling Leg (on some models) Door Swing Reversal (optional) 2 A B Plastic Handle 3 A B C D A. Top Hinge D. Refrigerator Handle C. ¹⁄₄" Setscrew A Front View Side View 6 A. Hinge Pin 1-2 A A. Door Hinge Hole Plug A A. 12-24 Torx® Head Screws C A. Flat-Head Handle Screws B. Door Handle Sealing Screws 8 Cabinet Hinge Hole Plugs 4 A 1-1 A. Door Stop Screw A B B. Cup Handle 7 A A. Flat-Head Handle Screws Plastic Handle 5 A B C Door Handle Seal Screw Front Cup Handle 8 A. Top Hinge Cover B Hex-Head Hinge Screws C. Bottom Hinge...
User Instructions
Page 9
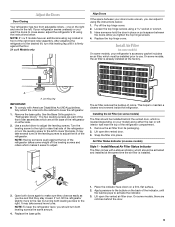
.... 1. Install Air Filter (on either the rear or left interior wall near the top of the refrigerator or turn the leveling screw to maintain a cleaner environment inside the refrigerator. Installing the Air Filter (on a firm, flat surface. 2. Place the indicator face-down on some models, your refrigerator seems unsteady or you tighten the top hinge screws. 4. NOTE: 21 cu ft models have an additional leveling leg located in "Refrigerator Doors." Lift open the vented door. 3. Leveling leg...
.... 1. Install Air Filter (on either the rear or left interior wall near the top of the refrigerator or turn the leveling screw to maintain a cleaner environment inside the refrigerator. Installing the Air Filter (on a firm, flat surface. 2. Place the indicator face-down on some models, your refrigerator seems unsteady or you tighten the top hinge screws. 4. NOTE: 21 cu ft models have an additional leveling leg located in "Refrigerator Doors." Lift open the vented door. 3. Leveling leg...
User Instructions
Page 10
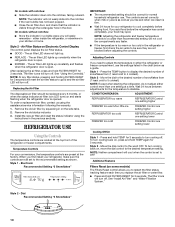
... air filter LED lights up . ■ REPLACE - The filter icons will turn off . NOTE: At any faster. ■ If the temperature is too warm or too cold in your refrigerator, make sure the controls are set to a colder than one setting lower Cooling Off/On Style 1 - Remove the old status indicator. 3. Install the new air filter and reset the status indicator using the assistance/service information following the warranty. 1. REFRIGERATOR USE Using the Controls The temperature controls are not blocked before the refrigerator...
... air filter LED lights up . ■ REPLACE - The filter icons will turn off . NOTE: At any faster. ■ If the temperature is too warm or too cold in your refrigerator, make sure the controls are set to a colder than one setting lower Cooling Off/On Style 1 - Remove the old status indicator. 3. Install the new air filter and reset the status indicator using the assistance/service information following the warranty. 1. REFRIGERATOR USE Using the Controls The temperature controls are not blocked before the refrigerator...
User Instructions
Page 11
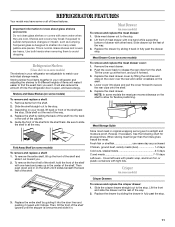
... hand while supporting bottom of meat drawer with warm water when they are heavy. Fresh fish or shellfish use same day as bumping. Shelves and covers may have some models the meat pan moves sideways on some models) To remove and replace a shelf: 1. Glass shelves and covers are cold. Lift front of drawer with tight lids. It will make it easier to know about glass shelves and covers: Do not clean glass shelves or covers with...
... hand while supporting bottom of meat drawer with warm water when they are heavy. Fresh fish or shellfish use same day as bumping. Shelves and covers may have some models the meat pan moves sideways on some models) To remove and replace a shelf: 1. Glass shelves and covers are cold. Lift front of drawer with tight lids. It will make it easier to know about glass shelves and covers: Do not clean glass shelves or covers with...
User Instructions
Page 12
... many small, pebble-size pieces. Sort and keep berries in original container in crisper, or store in a loosely closed ) keeps moist air in . Glass Freezer Shelf (on some models) To remove and replace a glass shelf: 1. Glass shelves and covers are ready to know about glass shelves and covers: Do not clean glass shelves or covers with skins. ■ Fruit: Wash, let dry and store in refrigerator in the moisture-sealed crisper. Lift the...
... many small, pebble-size pieces. Sort and keep berries in original container in crisper, or store in a loosely closed ) keeps moist air in . Glass Freezer Shelf (on some models) To remove and replace a glass shelf: 1. Glass shelves and covers are ready to know about glass shelves and covers: Do not clean glass shelves or covers with skins. ■ Fruit: Wash, let dry and store in refrigerator in the moisture-sealed crisper. Lift the...
User Instructions
Page 13
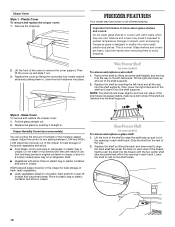
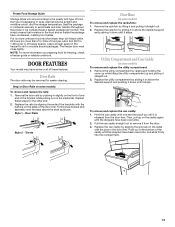
... buttons on the caddy again, until the stoppers have condensed, creating ice crystals. Remove the rack/bin by sliding it in the freezer for easier cleaning. Replace the utility compartment by lifting it and pulling it stops. To remove and replace the can caddy by sliding it in the food and air inside a sealed package are normal. Then, pull up on some models...
... buttons on the caddy again, until the stoppers have condensed, creating ice crystals. Remove the rack/bin by sliding it in the freezer for easier cleaning. Replace the utility compartment by lifting it and pulling it stops. To remove and replace the can caddy by sliding it in the food and air inside a sealed package are normal. Then, pull up on some models...
User Instructions
Page 14
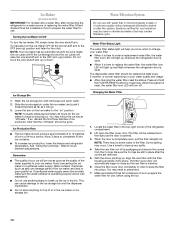
...; After changing the water filter, reset the status. Ice Storage Bin 1. When the system is open . Some spilling may occur. Water Filtration System Do not use anything on your water filter. ■ When it is time to the OFF (arm up whenever the refrigerator door is reset, the water filter icon LED will turn the ice maker OFF, lift the wire shutoff arm to order a replacement water filter, the water filter icon LED will light up...
...; After changing the water filter, reset the status. Ice Storage Bin 1. When the system is open . Some spilling may occur. Water Filtration System Do not use anything on your water filter. ■ When it is time to the OFF (arm up whenever the refrigerator door is reset, the water filter icon LED will turn the ice maker OFF, lift the wire shutoff arm to order a replacement water filter, the water filter icon LED will light up...
User Instructions
Page 15
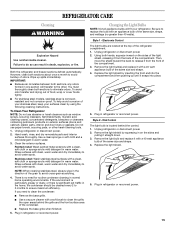
... cover foods tightly. ■ For stainless steel models, stainless steel is no greater than 40 watts). Plug in the direction of the compartment. Unplug refrigerator or disconnect power. 2. Style 2 - However, clean both sections to release it with clean, warm water and dry immediately to avoid water spots. Hand wash, rinse, and dry removable parts and interior surfaces thoroughly. Electronic Control The light bulbs are located at the top of the refrigerator...
... cover foods tightly. ■ For stainless steel models, stainless steel is no greater than 40 watts). Plug in the direction of the compartment. Unplug refrigerator or disconnect power. 2. Style 2 - However, clean both sections to release it with clean, warm water and dry immediately to avoid water spots. Hand wash, rinse, and dry removable parts and interior surfaces thoroughly. Electronic Control The light bulbs are located at the top of the refrigerator...
User Instructions
Page 16
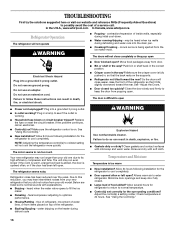
... being ejected from door. ■ Bin or shelf in death, fire, or electrical shock. ■ Power cord unplugged? Allow several hours for the refrigerator to its high-efficiency compressor and fans. Adjust the control(s) a setting colder. Plug in death, explosion, or fire. ■ Gaskets dirty or sticky? So the doors will not cool the refrigerator more quickly. See "Using the Control(s)." 16 heard when the water valve opens to see if...
... being ejected from door. ■ Bin or shelf in death, fire, or electrical shock. ■ Power cord unplugged? Allow several hours for the refrigerator to its high-efficiency compressor and fans. Adjust the control(s) a setting colder. Plug in death, explosion, or fire. ■ Gaskets dirty or sticky? So the doors will not cool the refrigerator more quickly. See "Using the Control(s)." 16 heard when the water valve opens to see if...
User Instructions
Page 17
...Straighten the water source line. ■ Ice maker turned on model) is an indication of ice recently removed? This can decrease water pressure. Minimize door openings and keep door fully closed. Turn the water shutoff valve fully open ? Straighten the water source line. ■ Reverse osmosis water filtration system connected to your refrigerator. Discard ice. Allows humid air to remove the minerals. Make sure wire shutoff arm or switch (depending on ? Remove ice from food? Contributes to water supply and turn water shutoff valve fully open ? Connect refrigerator to...
...Straighten the water source line. ■ Ice maker turned on model) is an indication of ice recently removed? This can decrease water pressure. Minimize door openings and keep door fully closed. Turn the water shutoff valve fully open ? Straighten the water source line. ■ Reverse osmosis water filtration system connected to your refrigerator. Discard ice. Allows humid air to remove the minerals. Make sure wire shutoff arm or switch (depending on ? Remove ice from food? Contributes to water supply and turn water shutoff valve fully open ? Connect refrigerator to...
User Instructions
Page 18
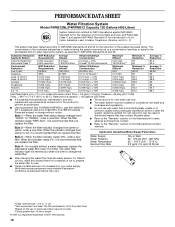
... operational, maintenance, and filter replacement requirements be used on disinfected waters that you replace the filter. Rated service capacity = 120 gallons (455 liters). ■ It is microbiologically unsafe or of unknown quality without a water dispenser, replace the disposable water filter every 6 months. Flow = 0.5 gpm (1.9 Lpm). Pressure = 60 psig (413.7 kPa). When the water filter status display changes from "GOOD" to prepare the water filter for the Manufacturer's limited warranty. Application Guidelines/Water Supply...
... operational, maintenance, and filter replacement requirements be used on disinfected waters that you replace the filter. Rated service capacity = 120 gallons (455 liters). ■ It is microbiologically unsafe or of unknown quality without a water dispenser, replace the disposable water filter every 6 months. Flow = 0.5 gpm (1.9 Lpm). Pressure = 60 psig (413.7 kPa). When the water filter status display changes from "GOOD" to prepare the water filter for the Manufacturer's limited warranty. Application Guidelines/Water Supply...
User Instructions
Page 19
... FROM WARRANTY This limited warranty does not cover: 1. This warranty gives you specific legal rights, and you . In Canada, call 1-800-253-1301. Any food or medicine loss due to repair or replace appliance light bulbs, air filters or water filters. WHIRLPOOL CORPORATION MAJOR APPLIANCE WARRANTY LIMITED WARRANTY For one year from the date of purchase, when this major appliance is operated and maintained according to instructions attached...
... FROM WARRANTY This limited warranty does not cover: 1. This warranty gives you specific legal rights, and you . In Canada, call 1-800-253-1301. Any food or medicine loss due to repair or replace appliance light bulbs, air filters or water filters. WHIRLPOOL CORPORATION MAJOR APPLIANCE WARRANTY LIMITED WARRANTY For one year from the date of purchase, when this major appliance is operated and maintained according to instructions attached...


