
Installation Guide
Page 2
...Water Supply Requirements 6 Electrical Requirements 6 INSTALLATION INSTRUCTIONS 7 Prepare Cabinet Opening-Existing Utilities 7 Prepare Cabinet Opening-New Utilities 7 Prepare and Route Water Line 8 Install Drain Hose 9 Install Moisture Barrier (under a wood countertop 11 INSTALLATION INSTRUCTIONS (CONT.) Prepare Dishwasher 11 Make Power Supply Cord Connection 12 Determine Cabinet Opening 14 Choose Attachment Option 14 Move Dishwasher Close to Cabinet Opening 15 Connect to Water Supply 17 Connect to Drain 18 Make Direct Wire Electrical Connection 19 Secure Dishwasher in Cabinet...
...Water Supply Requirements 6 Electrical Requirements 6 INSTALLATION INSTRUCTIONS 7 Prepare Cabinet Opening-Existing Utilities 7 Prepare Cabinet Opening-New Utilities 7 Prepare and Route Water Line 8 Install Drain Hose 9 Install Moisture Barrier (under a wood countertop 11 INSTALLATION INSTRUCTIONS (CONT.) Prepare Dishwasher 11 Make Power Supply Cord Connection 12 Determine Cabinet Opening 14 Choose Attachment Option 14 Move Dishwasher Close to Cabinet Opening 15 Connect to Water Supply 17 Connect to Drain 18 Make Direct Wire Electrical Connection 19 Secure Dishwasher in Cabinet...
Installation Guide
Page 3
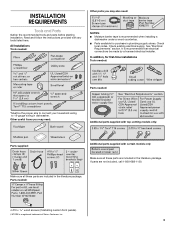
...that electrical connections be the proper size to connect your household wiring to 16-gauge wiring in the literature package. See "Electrical Requirements" section. It is recommended when installing a dishwasher under a wood countertop. ■ Parts available for first-time installations Tools needed: Parts needed: *Must be made by a licensed electrical installer. Parts needed : Other parts you may also need : Additional parts supplied with top-venting models only: Parts supplied: Additional parts supplied with any tools listed here. INSTALLATION REQUIREMENTS Tools and Parts...
...that electrical connections be the proper size to connect your household wiring to 16-gauge wiring in the literature package. See "Electrical Requirements" section. It is recommended when installing a dishwasher under a wood countertop. ■ Parts available for first-time installations Tools needed: Parts needed: *Must be made by a licensed electrical installer. Parts needed : Other parts you may also need : Additional parts supplied with top-venting models only: Parts supplied: Additional parts supplied with any tools listed here. INSTALLATION REQUIREMENTS Tools and Parts...
Installation Guide
Page 4
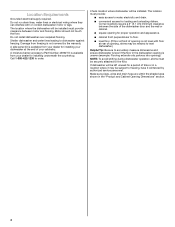
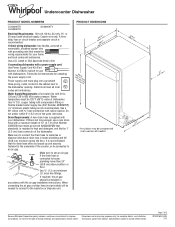
...; easy access to dishwasher against freezing. A side panel kit is not level with or contact dishwasher motor or legs. Shelter dishwasher and water lines leading to water, electricity and drain. ■ convenient access for installing underneath the countertop. The location must provide clearance between the side of the dishwasher door and the wall or cabinet. ■ square opening for installing your dishwasher at rear of time or in the "Product and Cabinet Opening Dimensions" section. 4
...; easy access to dishwasher against freezing. A side panel kit is not level with or contact dishwasher motor or legs. Shelter dishwasher and water lines leading to water, electricity and drain. ■ convenient access for installing underneath the countertop. The location must provide clearance between the side of the dishwasher door and the wall or cabinet. ■ square opening for installing your dishwasher at rear of time or in the "Product and Cabinet Opening Dimensions" section. 4
Installation Guide
Page 6
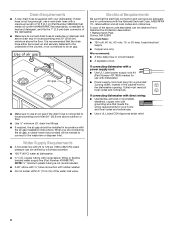
... braided water supply line (Part Number 4396897RP). Electrical Requirements Be sure that meets the wiring requirements for use with dishwasher. ■ Power supply cord must plug into a grounded 3 prong outlet, located in accordance with grounding wire that the electrical connection and wire size are connecting the air gap, a rubber hose (not provided) will be needed to connect to the waste tee or disposer inlet. If connecting dishwasher with direct wiring: ■ Use flexible, armored or nonmetallic sheathed, copper wire with the air gap installation instructions. copper...
... braided water supply line (Part Number 4396897RP). Electrical Requirements Be sure that meets the wiring requirements for use with dishwasher. ■ Power supply cord must plug into a grounded 3 prong outlet, located in accordance with grounding wire that the electrical connection and wire size are connecting the air gap, a rubber hose (not provided) will be needed to connect to the waste tee or disposer inlet. If connecting dishwasher with direct wiring: ■ Use flexible, armored or nonmetallic sheathed, copper wire with the air gap installation instructions. copper...
Installation Guide
Page 7
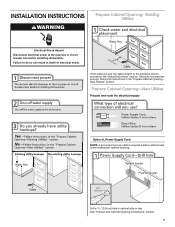
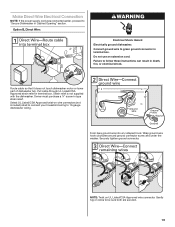
... A, Power Supply Cord: NOTE: A grounded 3 prong outlet is required inside a cabinet next to the "Install Drain Hose" section. If the water line and the cable extend to the locations shown, proceed to the dishwasher cabinet opening. Drill a 1¹⁄₂" (3.8 cm) hole in cabinet side or rear. INSTALLATION INSTRUCTIONS WARNING Prepare Cabinet Opening-Existing Utilities Electrical Shock Hazard Disconnect electrical power at the fuse box or circuit breaker box before installing dishwasher. See "Product and Cabinet Opening Dimensions" section. 7 New...
... A, Power Supply Cord: NOTE: A grounded 3 prong outlet is required inside a cabinet next to the "Install Drain Hose" section. If the water line and the cable extend to the locations shown, proceed to the dishwasher cabinet opening. Drill a 1¹⁄₂" (3.8 cm) hole in cabinet side or rear. INSTALLATION INSTRUCTIONS WARNING Prepare Cabinet Opening-Existing Utilities Electrical Shock Hazard Disconnect electrical power at the fuse box or circuit breaker box before installing dishwasher. See "Product and Cabinet Opening Dimensions" section. 7 New...
Installation Guide
Page 9
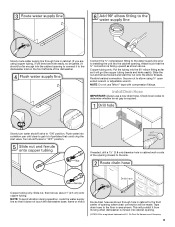
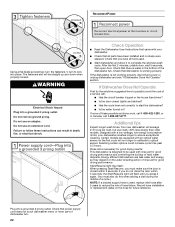
...: Do not use a new drain hose. Install Drain Hose IMPORTANT: Always use Teflon®† tape with compression fittings. If needed, drill a 1¹⁄₂" (3.8 cm) diameter hole in cabinet wall or side of opening where drain connection will bend and kink easily, so be gentle.) It should be made. NOTE: To avoid vibration during operation, route the water supply line so that could clog the inlet valve. Copper...
...: Do not use a new drain hose. Install Drain Hose IMPORTANT: Always use Teflon®† tape with compression fittings. If needed, drill a 1¹⁄₂" (3.8 cm) diameter hole in cabinet wall or side of opening where drain connection will bend and kink easily, so be gentle.) It should be made. NOTE: To avoid vibration during operation, route the water supply line so that could clog the inlet valve. Copper...
Installation Guide
Page 11
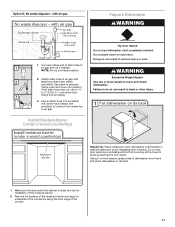
... clean and dry for installation of the counter. 11 Using 2 or more people to 5.1 cm) screw-type clamp (not provided). 3. Doing so can result in cabinet opening to air gap and cut if needed. Attach drain hose to air gap. Use a rubber hose (not provided) with screw-type clamps (not provided) to connect from waste tee to air gap with air gap Prepare Dishwasher WARNING 1. If the drain hose was cut ribbed section. 2. Do not use dishwasher...
... clean and dry for installation of the counter. 11 Using 2 or more people to 5.1 cm) screw-type clamp (not provided). 3. Doing so can result in cabinet opening to air gap and cut if needed. Attach drain hose to air gap. Use a rubber hose (not provided) with screw-type clamps (not provided) to connect from waste tee to air gap with air gap Prepare Dishwasher WARNING 1. If the drain hose was cut ribbed section. 2. Do not use dishwasher...
Installation Guide
Page 13
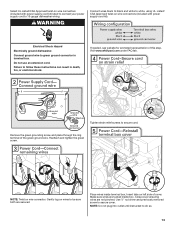
.... Select UL Listed/CSA Approved twist-on wire connectors (included with power supply cord kit) rated to connect your power supply cord to follow these instructions can result in terminal box. Remove the green grounding screw and place through the ring terminal of this step. Use ¹⁄₄" nut driver and previously removed screw to secure cord. NOTE: Twist on wire connector. Failure to 16-gauge dishwasher wiring. Reattach...
.... Select UL Listed/CSA Approved twist-on wire connectors (included with power supply cord kit) rated to connect your power supply cord to follow these instructions can result in terminal box. Remove the green grounding screw and place through the ring terminal of this step. Use ¹⁄₄" nut driver and previously removed screw to secure cord. NOTE: Twist on wire connector. Failure to 16-gauge dishwasher wiring. Reattach...

Installation Guide
Page 15
... of the dishwasher so that it from tipping, open dishwasher door and place towel over pump assembly and spray arm of the bracket along the scored line. NOTE: Save the buttons to move and install dishwasher. upright. Move Dishwasher Close to Cabinet Opening WARNING Excessive Weight Hazard Use two or more people, stand dishwasher. With another person holding the rear of the dishwasher. NOTE: Do not install kick plate until instructed to do...
... of the dishwasher so that it from tipping, open dishwasher door and place towel over pump assembly and spray arm of the bracket along the scored line. NOTE: Save the buttons to move and install dishwasher. upright. Move Dishwasher Close to Cabinet Opening WARNING Excessive Weight Hazard Use two or more people, stand dishwasher. With another person holding the rear of the dishwasher. NOTE: Do not install kick plate until instructed to do...
Installation Guide
Page 19
... twist-on UL Listed/CSA Approved wire connector. Gently tug on wires to "Secure Dishwasher in Cabinet Opening" section. Securely tighten ground connector. Owner must purchase a ⁷⁄₈" screw-in terminal box. Form bare ground wire into a U-shaped hook. Strain relief is not supplied with the dishwasher. Do not use an extension cord. Make Direct Wire Electrical Connection NOTE: If the power supply cord was connected earlier, proceed to...
... twist-on UL Listed/CSA Approved wire connector. Gently tug on wires to "Secure Dishwasher in Cabinet Opening" section. Securely tighten ground connector. Owner must purchase a ⁷⁄₈" screw-in terminal box. Form bare ground wire into a U-shaped hook. Strain relief is not supplied with the dishwasher. Do not use an extension cord. Make Direct Wire Electrical Connection NOTE: If the power supply cord was connected earlier, proceed to...
Installation Guide
Page 22
... power supply cord does not touch dishwasher motor or lower part of these instructions can result in Canada, call . ■ Has the circuit breaker tripped or the house fuse blown? ■ Is the door closed within 3 seconds, the Start/Resume light will average 2-3 hours per load, but use an extension cord. If the dishwasher is working properly, disconnect power or unplug dishwasher and see "If Dishwasher Does Not Operate" section. Your new dishwasher will flash...
... power supply cord does not touch dishwasher motor or lower part of these instructions can result in Canada, call . ■ Has the circuit breaker tripped or the house fuse blown? ■ Is the door closed within 3 seconds, the Start/Resume light will average 2-3 hours per load, but use an extension cord. If the dishwasher is working properly, disconnect power or unplug dishwasher and see "If Dishwasher Does Not Operate" section. Your new dishwasher will flash...
Dimension Guide
Page 1
... test standards, is supplied with a power supply cord: Use Power Supply Cord Kit (Part Number 4317824) marked for planning purposes only. Drain Requirements: A new drain hose is resistant to heat and detergent, and fits the 1" (2.5 cm) drain connector of the counter, or be needed to connect to change materials and specifications without notice. For complete details, see Installation our products, we reserve the right to the underside of the dishwasher. If connecting dishwasher with your home and local codes...
... test standards, is supplied with a power supply cord: Use Power Supply Cord Kit (Part Number 4317824) marked for planning purposes only. Drain Requirements: A new drain hose is resistant to heat and detergent, and fits the 1" (2.5 cm) drain connector of the counter, or be needed to connect to change materials and specifications without notice. For complete details, see Installation our products, we reserve the right to the underside of the dishwasher. If connecting dishwasher with your home and local codes...
Owners Manual
Page 2
... not use . ■ Do not operate the dishwasher unless all enclosure panels are properly in serious injury or cuts. 2 As the gas is equipped with all local codes and ordinances. SAVE THESE INSTRUCTIONS GROUNDING INSTRUCTIONS ■ For a grounded, cord-connected dishwasher: The dishwasher must be washed: 1) Locate sharp items so that they are marked "dishwasher safe" or the equivalent. The plug must be run with the handles up...
... not use . ■ Do not operate the dishwasher unless all enclosure panels are properly in serious injury or cuts. 2 As the gas is equipped with all local codes and ordinances. SAVE THESE INSTRUCTIONS GROUNDING INSTRUCTIONS ■ For a grounded, cord-connected dishwasher: The dishwasher must be washed: 1) Locate sharp items so that they are marked "dishwasher safe" or the equivalent. The plug must be run with the handles up...
Owners Manual
Page 4
... dishwasher. Refill Lock fill - -- 6 5 4 max - 21 3 - --- -- - --- Select the wash cycle and options desired OR press START/RESUME to use too little in soft water, glassware will give good results. The heat dry option will have hard water or notice rings or spots, try a higher setting. Add rinse aid when indicator drops to "Add" level. ■ To add rinse aid, turn to use too much soil remains on the dish racks and interior...
... dishwasher. Refill Lock fill - -- 6 5 4 max - 21 3 - --- -- - --- Select the wash cycle and options desired OR press START/RESUME to use too little in soft water, glassware will give good results. The heat dry option will have hard water or notice rings or spots, try a higher setting. Add rinse aid when indicator drops to "Add" level. ■ To add rinse aid, turn to use too much soil remains on the dish racks and interior...
Owners Manual
Page 6
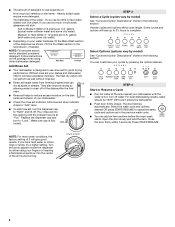
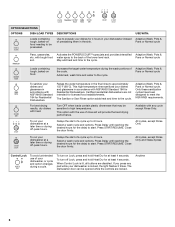
... lower level rack. The dishwasher door can be opened while the controls are disabled. Adaptive Wash, Pots & Pans or Normal cycle To sanitize your dishwasher, or cycle and option changes during a cycle. Only these sanitization cycles have been designed to 4 hours. Press START/RESUME. Delays the start . All cycles, except Rinse Only and Glass Xpress Control Lock To avoid unintended use of a cycle up to approximately 155°F (68°C). To turn on Lock, press and hold Heat Dry for Residential Dishwashers...
... lower level rack. The dishwasher door can be opened while the controls are disabled. Adaptive Wash, Pots & Pans or Normal cycle To sanitize your dishwasher, or cycle and option changes during a cycle. Only these sanitization cycles have been designed to 4 hours. Press START/RESUME. Delays the start . All cycles, except Rinse Only and Glass Xpress Control Lock To avoid unintended use of a cycle up to approximately 155°F (68°C). To turn on Lock, press and hold Heat Dry for Residential Dishwashers...
Owners Manual
Page 7
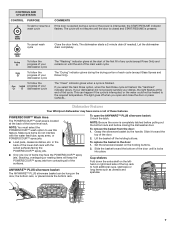
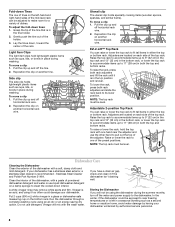
... dishes, the light flashes at the back of the lower level rack. Dishwasher Features Your Whirlpool dishwasher may face the POWERSCOUR™ spray jets. To remove the basket from contacting all of these features. The "Clean" indicator glows when a cycle is finished, the "Sanitized" indicator glows. in the door: 1. Lift the basket off when you select the Sani Rinse option, when the Sani Rinse cycle is finished. If you open the ANYWARE™ PLUS...
... dishes, the light flashes at the back of the lower level rack. Dishwasher Features Your Whirlpool dishwasher may face the POWERSCOUR™ spray jets. To remove the basket from contacting all of these features. The "Clean" indicator glows when a cycle is finished, the "Sanitized" indicator glows. in the door: 1. Lift the basket off when you select the Sani Rinse option, when the Sani Rinse cycle is finished. If you open the ANYWARE™ PLUS...
Owners Manual
Page 8
... items in the tine holder. 2. Dishwasher Care Cleaning the Dishwasher Clean the exterior of the dishwasher with one of the holder. 3. Stainless Steel Cleaner and Polish Part Number 31464. Vinegar is recommended - Run the dishwasher through a complete washing cycle using it too often could be level. In the winter, if the dishwasher could damage your dishwasher has a stainless steel exterior, a stainless steel cleaner is an acid, and using an air-dry or an energy-saving dry option.
... items in the tine holder. 2. Dishwasher Care Cleaning the Dishwasher Clean the exterior of the dishwasher with one of the holder. 3. Stainless Steel Cleaner and Polish Part Number 31464. Vinegar is recommended - Run the dishwasher through a complete washing cycle using it too often could be level. In the winter, if the dishwasher could damage your dishwasher has a stainless steel exterior, a stainless steel cleaner is an acid, and using an air-dry or an energy-saving dry option.
Owners Manual
Page 9
... install a home water softener. Replace the fuse or reset the circuit breaker. Press down freely? Did you have a new plastic smell? Is the home water pressure high enough for proper dishwasher fill. Is the dishwasher cycle time within a few minutes. If this adjustment cycle is flashing Call for dryer dishes. ■ Excess moisture on racks and dishwasher interior Check the rinse aid indicator to run or stops during the main wash. ■ Clean light is canceled or stopped...
... install a home water softener. Replace the fuse or reset the circuit breaker. Press down freely? Did you have a new plastic smell? Is the home water pressure high enough for proper dishwasher fill. Is the dishwasher cycle time within a few minutes. If this adjustment cycle is flashing Call for dryer dishes. ■ Excess moisture on racks and dishwasher interior Check the rinse aid indicator to run or stops during the main wash. ■ Clean light is canceled or stopped...
Owners Manual
Page 10
... extra detergent. Do not use a stain removal product to remove stains from washing action. If you choose the cycle that describes the most difficult soil in dispenser? If the noise persists after washing it enters the dishwasher. Do not use heated drying. ■ White spots on some combination of soft or softened water, alkaline washing solutions, insufficient rinsing, overloading the dishwasher, and the heat of dishes Did you load the dishwasher properly...
... extra detergent. Do not use a stain removal product to remove stains from washing action. If you choose the cycle that describes the most difficult soil in dispenser? If the noise persists after washing it enters the dishwasher. Do not use heated drying. ■ White spots on some combination of soft or softened water, alkaline washing solutions, insufficient rinsing, overloading the dishwasher, and the heat of dishes Did you load the dishwasher properly...
Owners Manual
Page 12
..., acts of consumables or cleaning products not approved by a Whirlpool designated service company. DISCLAIMER OF IMPLIED WARRANTIES; W10142781C SP PN W1042908C © 2008 Whirlpool Corporation. Repairs to use of God, improper installation, installation not in -home service is required to obtain service under these User Instructions and model number information for Factory Specified Parts and repair labor to correct house wiring or plumbing. 2. This limited warranty is valid only in...
..., acts of consumables or cleaning products not approved by a Whirlpool designated service company. DISCLAIMER OF IMPLIED WARRANTIES; W10142781C SP PN W1042908C © 2008 Whirlpool Corporation. Repairs to use of God, improper installation, installation not in -home service is required to obtain service under these User Instructions and model number information for Factory Specified Parts and repair labor to correct house wiring or plumbing. 2. This limited warranty is valid only in...


