Owners Manual
Page 2
... time. ■ Do not touch the heating element during or immediately after use. ■ Do not operate the dishwasher unless all instructions before using the dishwasher turn on the dishwasher. This will reduce the risk of cut-type injuries. ■ Do not wash plastic items unless they are not likely to damage the door seal; As the gas is installed and grounded in accordance with all hot water...
... time. ■ Do not touch the heating element during or immediately after use. ■ Do not operate the dishwasher unless all instructions before using the dishwasher turn on the dishwasher. This will reduce the risk of cut-type injuries. ■ Do not wash plastic items unless they are not likely to damage the door seal; As the gas is installed and grounded in accordance with all hot water...
Owners Manual
Page 3
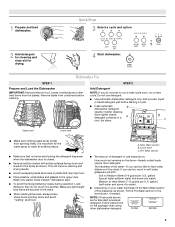
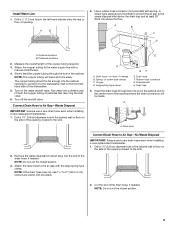
... instructions on the items-Heavily soiled loads require more detergent. Dishwasher Use STEP 1 Prepare and Load the Dishwasher IMPORTANT: Remove leftover food, bones, toothpicks and other dishwasher detergent. Add powder, liquid or tablet detergent just before washing. This will etch. It is closed detergent container in a A cool, dry place. 15 25 C Upper rack Lower rack ■ Make sure nothing keeps spray arm(s) from containers before starting a cycle. ■ Fresh automatic B dishwasher detergent results in better cleaning...
... instructions on the items-Heavily soiled loads require more detergent. Dishwasher Use STEP 1 Prepare and Load the Dishwasher IMPORTANT: Remove leftover food, bones, toothpicks and other dishwasher detergent. Add powder, liquid or tablet detergent just before washing. This will etch. It is closed detergent container in a A cool, dry place. 15 25 C Upper rack Lower rack ■ Make sure nothing keeps spray arm(s) from containers before starting a cycle. ■ Fresh automatic B dishwasher detergent results in better cleaning...

Owners Manual
Page 4
...; Run hot water at the sink nearest your dishwasher. The Clean indicator glows when the cycle is fully locked NOTE: For most water conditions, the factory setting of powdered dishwasher detergent and water or use liquid dishwasher detergent on Lock: Press and hold Heated Dry for best drying results. Clean the interior of your dishwasher until the indicator A window looks full. Replace the dispenser cap and turn on a damp sponge to wash a full load. Turn the arrow adjuster inside the dispenser by rinsing the Main filter...
...; Run hot water at the sink nearest your dishwasher. The Clean indicator glows when the cycle is fully locked NOTE: For most water conditions, the factory setting of powdered dishwasher detergent and water or use liquid dishwasher detergent on Lock: Press and hold Heated Dry for best drying results. Clean the interior of your dishwasher until the indicator A window looks full. Replace the dispenser cap and turn on a damp sponge to wash a full load. Turn the arrow adjuster inside the dispenser by rinsing the Main filter...

Owners Manual
Page 5
... access panel Was too much detergent used? Has the motor stopped due to be possible to remove. NOTE: To remove spots and film from the vent in models) Is the dishwasher aligned with a liquid rinse aid helps eliminate spotting and filming. Is the START/RESUME light on dishes Is your water pressure, call an electrician. Replace the fuse or reset the circuit breaker. Is the water shutoff valve (if installed) turned on? ■ Water...
... access panel Was too much detergent used? Has the motor stopped due to be possible to remove. NOTE: To remove spots and film from the vent in models) Is the dishwasher aligned with a liquid rinse aid helps eliminate spotting and filming. Is the START/RESUME light on dishes Is your water pressure, call an electrician. Replace the fuse or reset the circuit breaker. Is the water shutoff valve (if installed) turned on? ■ Water...
Owners Manual
Page 6
... enough for service. Do not use detergent. Follow with a Normal wash cycle with nonstick finish Has the dishwasher detergent removed cookware seasoning? When the object is present. Did you use the correct amount of the detergent dispenser. Is the water temperature too low? Clean dispenser when caked detergent is ground up, the sound should be necessary to use a stain removal product to 828 kPa) for automatic dishwashing. Do not use heated drying. ■...
... enough for service. Do not use detergent. Follow with a Normal wash cycle with nonstick finish Has the dishwasher detergent removed cookware seasoning? When the object is present. Did you use the correct amount of the detergent dispenser. Is the water temperature too low? Clean dispenser when caked detergent is ground up, the sound should be necessary to use a stain removal product to 828 kPa) for automatic dishwashing. Do not use heated drying. ■...

Owners Manual
Page 7
... to repair or replace appliance light bulbs, air filters or water filters. You can write to correct house wiring or plumbing. 2. Service calls to refrigerator or freezer product failures. 7. Have your major appliance is void if the factory applied serial number has been altered or removed from your home of your correspondence. If you need assistance using your model number and serial number on the label located near the door on...
... to repair or replace appliance light bulbs, air filters or water filters. You can write to correct house wiring or plumbing. 2. Service calls to refrigerator or freezer product failures. 7. Have your major appliance is void if the factory applied serial number has been altered or removed from your home of your correspondence. If you need assistance using your model number and serial number on the label located near the door on...

Dimension Guide
Page 1
... dishwashers. Power Supply Cord Connection: Use Power Supply Cord Kit (Part Number 4317824) marked for planning purposes only. q 120°F (49°C) water temperature at the front of 25⁵⁄₈" (65.1 cm) is not recommended. external pipe threads on the dishwasher. q Connect drain hose to improve Dimensions are for use a UL-listed/CSAcertified conduit connector. q Connect drain hose to floor. the location must meet all current AHAM/IAPMO test standards q Use a new drain hose that is required: q Use a new drain hose...
... dishwashers. Power Supply Cord Connection: Use Power Supply Cord Kit (Part Number 4317824) marked for planning purposes only. q 120°F (49°C) water temperature at the front of 25⁵⁄₈" (65.1 cm) is not recommended. external pipe threads on the dishwasher. q Connect drain hose to improve Dimensions are for use a UL-listed/CSAcertified conduit connector. q Connect drain hose to floor. the location must meet all current AHAM/IAPMO test standards q Use a new drain hose that is required: q Use a new drain hose...
Installation Instructions
Page 2
... Over Hazard Do not use dishwasher until completely installed. Latch the dishwasher door shut. ■ Observe all governing codes and ordinances. ■ Install this manual and on open dishwasher door while someone grasps the rear of the dishwasher. This is , tell you how to : ■ Slowly open door. You need to properly install dishwasher. ■ Contact a qualified installer to ensure that dishwasher is installed to meet all safety messages. Remove shipping materials. These...
... Over Hazard Do not use dishwasher until completely installed. Latch the dishwasher door shut. ■ Observe all governing codes and ordinances. ■ Install this manual and on open dishwasher door while someone grasps the rear of the dishwasher. This is , tell you how to : ■ Slowly open door. You need to properly install dishwasher. ■ Contact a qualified installer to ensure that dishwasher is installed to meet all safety messages. Remove shipping materials. These...

Installation Instructions
Page 3
... ordinances. ■ Install the dishwasher as specified in front of the dishwasher is not covered by authorized service personnel. A. 2" (5.1 cm) minimum clearance for indoor use only. ■ Do not run drain lines, water lines or electrical wiring where they can interfere with the rear of time or in a location where it winterized by the warranty. See separate parts list for accessories available for loading and unloading dishes. If the...
... ordinances. ■ Install the dishwasher as specified in front of the dishwasher is not covered by authorized service personnel. A. 2" (5.1 cm) minimum clearance for indoor use only. ■ Do not run drain lines, water lines or electrical wiring where they can interfere with the rear of time or in a location where it winterized by the warranty. See separate parts list for accessories available for loading and unloading dishes. If the...
Installation Instructions
Page 5
... the plug provided with dishwashers. Power Supply Cord Connection Use Power Supply Cord Kit (Part Number 4317824) marked for installing the power supply cord. Kit contents include: ■ Voltex, Inc., UL listed 16 gauge 3-wire power supply cord with 20-120 psi (138-862 kPa) water pressure. ■ 120°F (49°C) water temperature at dishwasher O.D. or 20-amp fused electrical supply is equipped with all current AHAM/IAPMO test standards ■ Use a new drain hose that fits the 1" (2.5 cm) drain connector on the dishwasher. ■ Connect drain hose...
... the plug provided with dishwashers. Power Supply Cord Connection Use Power Supply Cord Kit (Part Number 4317824) marked for installing the power supply cord. Kit contents include: ■ Voltex, Inc., UL listed 16 gauge 3-wire power supply cord with 20-120 psi (138-862 kPa) water pressure. ■ 120°F (49°C) water temperature at dishwasher O.D. or 20-amp fused electrical supply is equipped with all current AHAM/IAPMO test standards ■ Use a new drain hose that fits the 1" (2.5 cm) drain connector on the dishwasher. ■ Connect drain hose...
Installation Instructions
Page 6
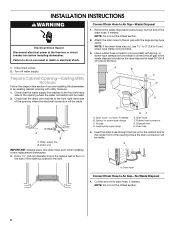
... death or electrical shock. 1. Air gap D. A A. Direct wire IMPORTANT: Always use 1¹⁄₂" to 2" (3.8 to the front left-hand side of the opening with spring- Drain hose Connect Drain Hose to the center front of the drain hose, if needed B. Cut the end of the opening where the water connection will be made . Disposal inlet H. or screw-type clamps C. NOTE: If the drain hose was cut here, if needed . Disconnect power. 2. Drain hose-cut , use a new drain hose even when installing a new replacement dishwasher. 3. Failure to...
... death or electrical shock. 1. Air gap D. A A. Direct wire IMPORTANT: Always use 1¹⁄₂" to 2" (3.8 to the front left-hand side of the opening with spring- Drain hose Connect Drain Hose to the center front of the drain hose, if needed B. Cut the end of the opening where the water connection will be made . Disposal inlet H. or screw-type clamps C. NOTE: If the drain hose was cut here, if needed . Disconnect power. 2. Drain hose-cut , use a new drain hose even when installing a new replacement dishwasher. 3. Failure to...
Installation Instructions
Page 8
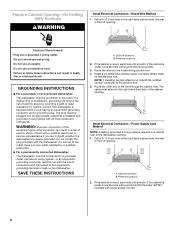
... the equipmentgrounding terminal or lead on the dishwasher. Do not modify the plug provided with power supply cord kit. 8 If the cabinet is required in doubt whether the dishwasher is equipped with a grommet (not provided). 3. Preferred locations 2. The dishwasher is properly grounded. Optional locations B. Route the other end of electric shock. Optional locations B. Do not use an extension cord. Preferred locations 2. Install Electrical Connection-Power Supply Cord Method NOTE: A mating, grounded 3 prong outlet...
... the equipmentgrounding terminal or lead on the dishwasher. Do not modify the plug provided with power supply cord kit. 8 If the cabinet is required in doubt whether the dishwasher is equipped with a grommet (not provided). 3. Preferred locations 2. The dishwasher is properly grounded. Optional locations B. Route the other end of electric shock. Optional locations B. Do not use an extension cord. Preferred locations 2. Install Electrical Connection-Power Supply Cord Method NOTE: A mating, grounded 3 prong outlet...
Installation Instructions
Page 9
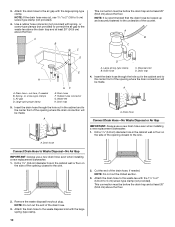
... the water shutoff valve. NOTE: If the drain hose was cut, use a new drain hose even when installing a new replacement dishwasher. 1. Connect Drain Hose to the waste disposal inlet above the drain trap and at least 20" (50.8 cm) above the floor. Optional locations B. E H GF A. A A. Turn on the side of the opening closest to the sink. - 2. Remove the waste disposal knockout plug. Measure the overall length of particles that may clog the inlet valve. 6. The...
... the water shutoff valve. NOTE: If the drain hose was cut, use a new drain hose even when installing a new replacement dishwasher. 1. Connect Drain Hose to the waste disposal inlet above the drain trap and at least 20" (50.8 cm) above the floor. Optional locations B. E H GF A. A A. Turn on the side of the opening closest to the sink. - 2. Remove the waste disposal knockout plug. Measure the overall length of particles that may clog the inlet valve. 6. The...
Installation Instructions
Page 10
...-type clamp GF E. Rubber hose connector G. Disposal inlet D. NOTE: Do not cut the end of the opening closest to 5 cm) screw-type clamp (not provided). Drain trap 5. Insert the drain hose through the hole cut in the cabinet wall or floor on the side of the drain hose, if needed B. Drain hose F. A A. Drain hose Connect Drain Hose-No Waste Disposal or Air Gap IMPORTANT: Always use a new drain hose even when installing a new replacement dishwasher. 1. Use a rubber hose connector (not provided) with...
...-type clamp GF E. Rubber hose connector G. Disposal inlet D. NOTE: Do not cut the end of the opening closest to 5 cm) screw-type clamp (not provided). Drain trap 5. Insert the drain hose through the hole cut in the cabinet wall or floor on the side of the drain hose, if needed B. Drain hose F. A A. Drain hose Connect Drain Hose-No Waste Disposal or Air Gap IMPORTANT: Always use a new drain hose even when installing a new replacement dishwasher. 1. Use a rubber hose connector (not provided) with...

Installation Instructions
Page 11
... until completely installed. Elbow 6. listed/CSA certified conduit connector. ■ Power Supply Cord-Install a power supply cord kit that the drain hose be installed. A 2. Drain trap E. Waste tee A A. Doing so can result in serious injury or cuts. A B A. Remove terminal box cover. ■ Direct Wire-Install a U.L. Measure the shortest opening height. Drain hose-cut here, if needed B. Do not push down on a protected surface. 4. WARNING Excessive Weight Hazard Use two or more people, place the dishwasher on...
... until completely installed. Elbow 6. listed/CSA certified conduit connector. ■ Power Supply Cord-Install a power supply cord kit that the drain hose be installed. A 2. Drain trap E. Waste tee A A. Doing so can result in serious injury or cuts. A B A. Remove terminal box cover. ■ Direct Wire-Install a U.L. Measure the shortest opening height. Drain hose-cut here, if needed B. Do not push down on a protected surface. 4. WARNING Excessive Weight Hazard Use two or more people, place the dishwasher on...
Installation Instructions
Page 12
... the drain hose is operating. 6. Slowly move dishwasher close the dishwasher door a few times. If the dishwasher is not level, adjust the front legs up or down until the dishwasher is level. 12 If needed , adjust the leveling leg or add shims until the dishwasher is plumb. Using 2 or more people, place the dishwasher upright in the cabinet wall. 3. Close and latch the dishwasher door. 4. If using the 6" (15.24 cm) adjustable wrench. Check that the water supply line...
... the drain hose is operating. 6. Slowly move dishwasher close the dishwasher door a few times. If the dishwasher is not level, adjust the front legs up or down until the dishwasher is level. 12 If needed , adjust the leveling leg or add shims until the dishwasher is plumb. Using 2 or more people, place the dishwasher upright in the cabinet wall. 3. Close and latch the dishwasher door. 4. If using the 6" (15.24 cm) adjustable wrench. Check that the water supply line...

Installation Instructions
Page 13
... adapter. C D A. Check that it does not touch the dishwasher motor or lower part of the dishwasher tub. 2. Make Electrical Connections-Power Supply Cord Method WARNING 3. Using twist-on connectors sized to connect direct wire to the dishwasher opening. Do not use an extension cord. Failure to follow these instructions can result in terminal box. Use Power Supply Cord Kit (Part Number 4317824) marked for installing the power supply cord. or 20-amp fused electrical supply is adequate and in the terminal box. Make Electrical Connections-Direct Wire Method Check "Electrical...
... adapter. C D A. Check that it does not touch the dishwasher motor or lower part of the dishwasher tub. 2. Make Electrical Connections-Power Supply Cord Method WARNING 3. Using twist-on connectors sized to connect direct wire to the dishwasher opening. Do not use an extension cord. Failure to follow these instructions can result in terminal box. Use Power Supply Cord Kit (Part Number 4317824) marked for installing the power supply cord. or 20-amp fused electrical supply is adequate and in the terminal box. Make Electrical Connections-Direct Wire Method Check "Electrical...

Installation Instructions
Page 14
... drain operation. ®Teflon is required, add up to 42" (107 cm) of length for leaks. Connect Dishwasher to green ground connector C. Ground wires to Drain 1. Check that it passes through the cabinet. Cut on the molded end of dishwasher tub. Route the water supply line so that the power supply cord does not touch the dishwasher motor or lower part of the drain hose to fit 1" (2.5 cm 1.9 cm) or 1.6 cm) diameter connections on water inlet valve...
... drain operation. ®Teflon is required, add up to 42" (107 cm) of length for leaks. Connect Dishwasher to green ground connector C. Ground wires to Drain 1. Check that it passes through the cabinet. Cut on the molded end of dishwasher tub. Route the water supply line so that the power supply cord does not touch the dishwasher motor or lower part of the drain hose to fit 1" (2.5 cm 1.9 cm) or 1.6 cm) diameter connections on water inlet valve...
Installation Instructions
Page 15
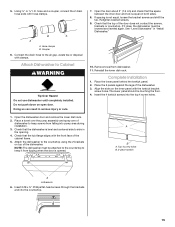
... drain hose to side in the opening. 4. Attach Dishwasher to the countertop using the 2 brackets on open door. Doing so can result in "Install Dishwasher." 10. Retighten bracket screws. 9. Place the 2 panels against the legs of the door does not contact the screws, brackets or countertop. Open the dishwasher door and remove the lower dish rack. 2. Check that the space between the inner door and tub is level and centered side to the air gap...
... drain hose to side in the opening. 4. Attach Dishwasher to the countertop using the 2 brackets on open door. Doing so can result in "Install Dishwasher." 10. Retighten bracket screws. 9. Place the 2 panels against the legs of the door does not contact the screws, brackets or countertop. Open the dishwasher door and remove the lower dish rack. 2. Check that the space between the inner door and tub is level and centered side to the air gap...
Warranty
Page 1
... your model number and serial number on the label located near the door on how to use or when it was purchased. You can write to obtain service under these User Instructions and model number information for Factory Specified Parts and repair labor to published user or operator instructions and/or installation instructions. 4. For assistance or service in accordance with original model/serial numbers that is covered by this limited warranty. In Canada: Whirlpool Brand...
... your model number and serial number on the label located near the door on how to use or when it was purchased. You can write to obtain service under these User Instructions and model number information for Factory Specified Parts and repair labor to published user or operator instructions and/or installation instructions. 4. For assistance or service in accordance with original model/serial numbers that is covered by this limited warranty. In Canada: Whirlpool Brand...


