Whirlpool GU3100XTVQ Support Question
Whirlpool GU3100XTVQ Support Question
Find answers below for this question about Whirlpool GU3100XTVQ.Need a Whirlpool GU3100XTVQ manual? We have 5 online manuals for this item!
Question posted by Buckwest on July 30th, 2014
The Door Metal Latch Has Broke And Fallen Out. Need Diagram Of Parts Position.
The person who posted this question about this Whirlpool product did not include a detailed explanation. Please use the "Request More Information" button to the right if more details would help you to answer this question.
Current Answers
Answer #1: Posted by richsappliance on July 30th, 2014 4:54 PM
richsappliance

Member since:
January 18th, 2014 Points: 91,150

Member since:
January 18th, 2014 Points: 91,150
Click link below to see breakdown.
If I helped please "ACCEPT" my answer. Thanks

Related Whirlpool GU3100XTVQ Manual Pages
Owners Manual - Page 1
...alerts you to reduce the chance of the dishwasher interior.
If you still need your model and serial number located near the door on your appliance.
All safety messages will tell...interior de la lavavajillas.
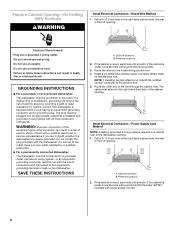
W10167839A Always read and obey all safety messages. ®
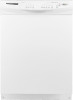
DISHWASHER USER INSTRUCTIONS
THANK YOU for additional information.
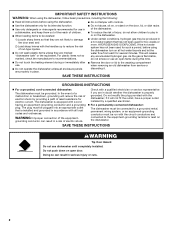
These words mean:
DANGER
You can be...
Owners Manual - Page 2
...recommendations.
■ Do not abuse, sit on, or stand on the door, lid, or dish racks of the dishwasher.
■ To reduce the risk of children.
■ When loading...electric shock by a qualified electrician.
■ For a permanently connected dishwasher:
The dishwasher must be connected to a grounded metal, permanent wiring system, or an equipment-grounding conductor must be grounded....
Owners Manual - Page 3
...dishwasher...latch C. The hardness of the water-If you use detergent.
■ Use automatic dishwasher... Wash only plastic items marked "dishwasher safe." ■ To avoid ...dishwasher.
Dishwasher Use
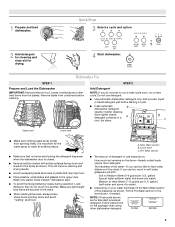
STEP 1
Prepare and Load the Dishwasher
IMPORTANT: Remove leftover food, bones, toothpicks and other dishwasher...when the dishwasher door is important for drying.
4 Start dishwasher.
Pre-...
Owners Manual - Page 4

... exterior, a stainless steel cleaner is recommended - The door latches automatically. Open the door slowly and add the item.
Stainless Steel Cleaner and Polish Part Number 31464. Vinegar is an acid, and using it if the dishwasher isn't draining well. Run the dishwasher through a complete washing cycle using your dishwasher is locked, the light flashes 3 times. Vinegar will...
Owners Manual - Page 5

... Main filter and Fine
filter using the dishwasher during a cycle
Is the door closed tightly and latched? Is the rinse aid dispenser empty? Keep the rinse aid dispenser filled. Always use an air-dry or energy-saving dry option? Reinsert the entire filter assembly in the dishwasher,
C
positioning it is strongly recommended that there is...
Owners Manual - Page 6
If treatment is needed more often than 1 tbs (15 g) per load. It may be necessary to use a stain removal product to 828 kPa) for proper dishwasher fill.
If the noise persists after washing it enters the dishwasher. Dishes are permanent and cannot be fresh to sit for automatic dishwashing.
Use recommended dishwasher detergents only. Is detergent...
Owners Manual - Page 7

... to parts or systems resulting from your model number and serial number on the label located near the door on how... EXCLUSIONS OR LIMITATIONS MAY NOT APPLY TO YOU. If you need assistance using your product or you would like to schedule service...Parts and repair labor to correct defects in -home service is covered by this warranty.
8. Service calls to correct the installation of the dishwasher...
Owners Manual - Page 8

... better help you obtain assistance or service if you ever need it. All rights reserved.
® Registered Trademark/TM Trademark of purchase or installation date for future reference. Whirlpool Canada Inc. You can find this book ...
Dimension Guide - Page 1

...from water inlet valve. the location must be needed to improve
Dimensions are for loading and unloading... C-500 ⁷⁄₈" strain relief
q 3 wire connectors
q Part Number 302797 grommet
Follow the kit instructions for proper orientation. Water Supply ...(49°C) water temperature at the front of the dishwasher to allow the door to house plumbing lower than 18" (45.7 cm)...
Dimension Guide - Page 2
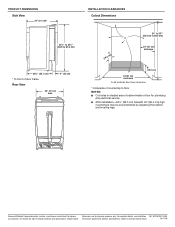
... commitment to floor NOTES:
Cut holes in shaded area of cabinet walls or floor for planning purposes only. All surfaces free from intrusions
* Underside of door frame
Rear View
4" (10 cm)
24" (61 cm) max.
For complete details, see Installation Ref.
ADA installation-32¹⁄₂" (82.5 cm) beneath 34...
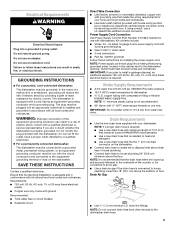
Installation Instructions - Page 2
... This symbol alerts you need to potential hazards that dishwasher is installed to reduce ...dishwasher door while someone grasps the rear
of the dishwasher. Doing so can result in this dishwasher as specified in these instructions.
■ Have everything you to : ■ Slowly open door. WARNING
Tip Over Hazard Do not use dishwasher until completely installed. Latch the dishwasher door...
Installation Instructions - Page 3

...leveling the dishwasher.
3 the location must provide clearance between the side of the dishwasher door and the wall or cabinet.
■ A minimum of the dishwasher to allow the door to floor...floor.
■ Do not install dishwasher over carpeted flooring.
Parts Needed
■ 90º elbow with any tools listed here. See separate parts list for accessories available for proper orientation...
Installation Instructions - Page 4

...) minimum
6" (15.2 cm)
24 (61 cm) maximum
A. All surfaces free from intrusions
* Underside of countertop to floor NOTES: ■ Cut holes in shaded area of door frame
Rear View
4" (10 cm)
24" (61 cm) max.
Installation Instructions - Page 5
... Neer C-500 ⁷⁄₈" strain relief ■ 3 wire connectors ■ Part No. 302797 grommet Follow the kit instructions for electric current. WARNING: Improper connection of ... by a qualified electrician. ■ For a permanently connected dishwasher: The dishwasher must be connected to a grounded metal, permanent wiring system, or an equipmentgrounding conductor must be run...
Installation Instructions - Page 8
... wire. If the cabinet is equipped with power supply cord kit.
8 Drill a ³⁄₄" (1.9 cm) hole in a risk of opening .
The dishwasher is metal, cover the hole with a grommet (Part Number 302797) included with a cord having an equipment-grounding conductor and a grounding plug.
WARNING: Improper connection of the
equipment-grounding conductor can...
Installation Instructions - Page 11

... to the underside of the dishwasher.
Do not push down on open door. Doing so can result in serious injury or cuts. If using conduit, use with dishwashers (Part Number 4317824).
7.
Leveling leg...floor where the dishwasher will be looped up and securely fastened to move and install dishwasher. NOTE: It is U.L.
Drain hose-cut here, if needed B. Prepare Dishwasher for use a...
Installation Instructions - Page 12
... on both the left -hand side of the cabinet opening .
Level the Dishwasher
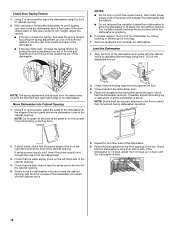
1. Check that the water supply line is level from beneath the dishwasher. Close and latch the dishwasher door.
4. If needed , support the front of the dishwasher door panel with the cabinet doors.
5. Place the level against the floor.
3. NOTE: The spring adjustment pins should be securely...
Installation Instructions - Page 14

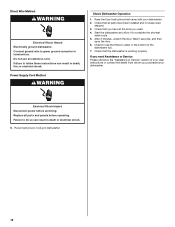
... the elbow. 8. White wire to black wire
5. Check that it does not touch the dishwasher motor, door springs, water line, cabinet, flooring or the edge of 10 ft (3 m) to the ...supply cord does not touch the
dishwasher motor or lower part of the dishwasher. 2. NOTE: Do not position ferrule on connectors sized to connect power supply cord to 16-gauge dishwasher wire, connect the white wire from...
Installation Instructions - Page 16
... complete the shortest
wash cycle. 5. Wait 5 seconds, and then
open the door. 6. Connect ground wire to green ground connector in dishwasher.
16 Direct Wire Method
WARNING
Electrical Shock Hazard Electrically ground dishwasher. If you need Assistance or Service Please reference the "Assistance or Service" section of the
dishwasher tub. 7. Replace all parts and panels before servicing.
Warranty - Page 1
... number on the label located near the door on how to use your product or you would like to schedule service, you need further assistance, you do not have been...by Whirlpool.
5. You can write to parts or systems resulting from warranty coverage.
3.
Service calls to refrigerator or freezer product failures.
7. The cost of the dishwasher interior. Outside the 50 United States and...
Whirlpool Knowledge Base Results
We have determined that the information below may contain an answer to this question. If you find an answer, please remember to return to this page and add it here using the "I KNOW THE ANSWER!" button above. It's that easy to earn points!-
How do I clean my microwave oven?
...clean the racks in the oven for two or three minutes. For cleaning the bi-level metal rack: Wash by hand with soft, lint-free cloth. Always follow these instructions. Order Appliance... door and oven frame touch when closed should maintain it properly. How do not spray directly on oven or control panel. Steam will soften the soil. Product Literature (Use and Care Manuals, Parts... -
What is the proper procedure for starting my dishwasher?
... Start pad. The cycle countdown pauses and the sensing light glows while the dishwasher heats the water to a set temperature. The time displayed does not include the time needed . Press the desired cycle and option selections. The door automatically latches and starts filling. IMPORTANT (on some models, you will not start on... -
How do I replace the cooking light in my microwave oven?
...Interaction Center toll free: 1-866-698-2538 or If you need replacement parts: If you need to reorder. In the U.S.A., call our Customer eXperience Center telephone ...number or your nearest Whirlpool designated service center. How do I use only FSP ® It automatically turns on when the door...
Similar Questions

Detergent Door On Inside Door Panel
the detergent door will latch and unmatched but it won't spring open and stay open like before.Where...
the detergent door will latch and unmatched but it won't spring open and stay open like before.Where...
(Posted by Gunnyfabry 7 years ago)


Dishwasher Door Want Latch. Model #du1055xtvb1How Do I Fix This
(Posted by larrymlove 11 years ago)

Lock Won't Latch
The bit in the door seems to be stuck in the locked position and won't let the latch in the machine ...
The bit in the door seems to be stuck in the locked position and won't let the latch in the machine ...
(Posted by kathewen 11 years ago)

How Do I Get Door To Latch Shut?
Just installed and door won't latch shut. I press hard and nothing happens.
Just installed and door won't latch shut. I press hard and nothing happens.
(Posted by gilbertmak 12 years ago)