
Owners Manual
Page 2
... plug provided with the circuit conductors and connected to the equipment-grounding terminal or lead on open flame during this time. ■ Do not touch the heating element during or immediately after use. ■ Do not operate the dishwasher unless all enclosure panels are properly in place. ■ Remove the door or lid to the washing compartment when removing an old dishwasher from each for electric...
... plug provided with the circuit conductors and connected to the equipment-grounding terminal or lead on open flame during this time. ■ Do not touch the heating element during or immediately after use. ■ Do not operate the dishwasher unless all enclosure panels are properly in place. ■ Remove the door or lid to the washing compartment when removing an old dishwasher from each for electric...
Owners Manual
Page 3
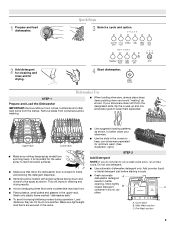
.... Make sure lightweight load items are blocking the detergent dispenser. ■ Items should be loaded with soiled surfaces facing down and avoid "nesting" as shown. Hard Water Soft Water Hard Water Soft Water C PRE- Pre-Wash section 3 Quick Steps 3 Select a cycle and option. 2 Add detergent for cleaning and rinse aid for drying. 4 Start dishwasher. Wash only plastic items marked "dishwasher safe." ■ To avoid thumping/clattering noises during operation: Load dishes so they do...
.... Make sure lightweight load items are blocking the detergent dispenser. ■ Items should be loaded with soiled surfaces facing down and avoid "nesting" as shown. Hard Water Soft Water Hard Water Soft Water C PRE- Pre-Wash section 3 Quick Steps 3 Select a cycle and option. 2 Add detergent for cleaning and rinse aid for drying. 4 Start dishwasher. Wash only plastic items marked "dishwasher safe." ■ To avoid thumping/clattering noises during operation: Load dishes so they do...
Owners Manual
Page 4
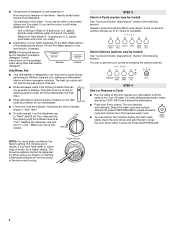
... an item anytime before the main wash starts. The door latches automatically. Heavily soiled loads require more detergent. Follow instructions on the package when using your water hardness, fill the Main Wash section of the dispenser as it enters the dishwasher. ■ Push door firmly closed. Add ■ Check the rinse aid indicator. Refill Lock fill - -- 6 5 4 max - 21 3 - --- -- - --- Turn the arrow adjuster inside the dispenser by model) See "Cycle and Option Descriptions" charts in...
... an item anytime before the main wash starts. The door latches automatically. Heavily soiled loads require more detergent. Follow instructions on the package when using your water hardness, fill the Main Wash section of the dispenser as it enters the dishwasher. ■ Push door firmly closed. Add ■ Check the rinse aid indicator. Refill Lock fill - -- 6 5 4 max - 21 3 - --- -- - --- Turn the arrow adjuster inside the dispenser by model) See "Cycle and Option Descriptions" charts in...
Owners Manual
Page 6
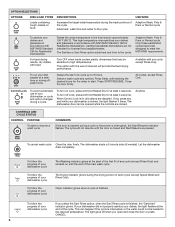
... controls are disabled. OPTION SELECTIONS OPTIONS DISH LOAD TYPES DESCRIPTIONS USE WITH: Loads containing tough, baked-on Lock, press and hold Heated Dry for Residential Dishwashers. To turn off when you open and close the door or press CANCEL. 6 If your dishwasher did not properly sanitize your dishes and glassware in accordance with NSF/ANSI Standard 184 for licensed food establishments. Adaptive Wash, Pots & Pans or Normal cycle To sanitize your dishes, the light flashes...
... controls are disabled. OPTION SELECTIONS OPTIONS DISH LOAD TYPES DESCRIPTIONS USE WITH: Loads containing tough, baked-on Lock, press and hold Heated Dry for Residential Dishwashers. To turn off when you open and close the door or press CANCEL. 6 If your dishwasher did not properly sanitize your dishes and glassware in accordance with NSF/ANSI Standard 184 for licensed food establishments. Adaptive Wash, Pots & Pans or Normal cycle To sanitize your dishes, the light flashes...
Owners Manual
Page 7
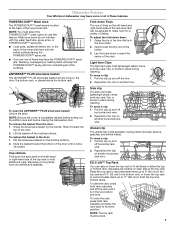
... place during washing. To remove the basket from contacting all of the surfaces. To move a clip 1. To raise the rack, press both rack adjusters and slide the rack back to use this feature. Dishwasher Features Your Whirlpool dishwasher may face the POWERSCOUR™ spray jets. To adjust the fold-down the extra shelf on the door, the bottom rack, or placed inside the bottom rack. Reposition the...
... place during washing. To remove the basket from contacting all of the surfaces. To move a clip 1. To raise the rack, press both rack adjusters and slide the rack back to use this feature. Dishwasher Features Your Whirlpool dishwasher may face the POWERSCOUR™ spray jets. To adjust the fold-down the extra shelf on the door, the bottom rack, or placed inside the bottom rack. Reposition the...
Owners Manual
Page 8
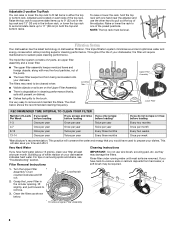
.... Rinse filter under running water until most soils are located on your dishes. Locating tab 2. Raise or lower the rack to one hand near the adjuster and use wire brush, scouring pad, etc. Clean the filters as they may need to be level. This triple filtration system minimizes sound and optimizes water and energy conservation while providing superior cleaning performance. The triple filter system consists of 2 parts, an upper filter assembly and a lower filter. ■ The upper filter assembly...
.... Rinse filter under running water until most soils are located on your dishes. Locating tab 2. Raise or lower the rack to one hand near the adjuster and use wire brush, scouring pad, etc. Clean the filters as they may need to be level. This triple filtration system minimizes sound and optimizes water and energy conservation while providing superior cleaning performance. The triple filter system consists of 2 parts, an upper filter assembly and a lower filter. ■ The upper filter assembly...
Owners Manual
Page 9
... tripped? Replace the fuse or reset the circuit breaker. Is the water shutoff valve (if installed) turned on the bottom rack. Suds can run too long Try the Speed Wash cycle. Is the dishwasher cycle time within a few minutes. Filter Reinstallation Instructions 1. Insert the Upper Filter Assembly into place. NOTE: The Upper Filter Assembly arrow does not have a drain air gap, check and clean it drops into the circular opening in some wash and rinse cycles until the filter is locked into place...
... tripped? Replace the fuse or reset the circuit breaker. Is the water shutoff valve (if installed) turned on the bottom rack. Suds can run too long Try the Speed Wash cycle. Is the dishwasher cycle time within a few minutes. Filter Reinstallation Instructions 1. Insert the Upper Filter Assembly into place. NOTE: The Upper Filter Assembly arrow does not have a drain air gap, check and clean it drops into the circular opening in some wash and rinse cycles until the filter is locked into place...
Owners Manual
Page 10
... rinse aid indicator to keep items from opening properly. To slow this adjustment cycle is a water/chemical reaction with nonstick finish Has the dishwasher detergent removed cookware seasoning? Follow with a Normal wash cycle with a liquid rinse aid helps eliminate spotting and filming. When the object is rinse aid in the dishwasher and cause marking. If the noise persists after installation in the dishwasher. ■ Brown stains on the counter. Keep the rinse aid dispenser...
... rinse aid indicator to keep items from opening properly. To slow this adjustment cycle is a water/chemical reaction with nonstick finish Has the dishwasher detergent removed cookware seasoning? Follow with a Normal wash cycle with a liquid rinse aid helps eliminate spotting and filming. When the object is rinse aid in the dishwasher and cause marking. If the noise persists after installation in the dishwasher. ■ Brown stains on the counter. Keep the rinse aid dispenser...
Owners Manual
Page 11
.... Use recommended dishwasher detergents only. ■ Dishes in the POWERSCOUR™ wash area are damaged during a cycle ■ Chipping of the dishwasher toward the back so water can drain from surfaces, and the lower spray arm can reach all surfaces. Are high suds slowing the wash arm? Load soiled dish surfaces to 828 kPa) for several hours in dispenser? Dishes are pushed into the dishwasher. Is the pump or spray arm clogged...
.... Use recommended dishwasher detergents only. ■ Dishes in the POWERSCOUR™ wash area are damaged during a cycle ■ Chipping of the dishwasher toward the back so water can drain from surfaces, and the lower spray arm can reach all surfaces. Are high suds slowing the wash arm? Load soiled dish surfaces to 828 kPa) for several hours in dispenser? Dishes are pushed into the dishwasher. Is the pump or spray arm clogged...
Owners Manual
Page 12
... with original model/serial numbers that is contrary to published user or operator instructions and/or installation instructions. 4. If you need assistance using your complete model number ready. Whirlpool Canada LP licensee in Canada 6/08 Printed in the U.S.A., call 1-800-807-6777. The removal and reinstallation of your model number and serial number on the label located near the door on how to use of consumables or cleaning products not approved by Whirlpool. 5. WHIRLPOOL SHALL...
... with original model/serial numbers that is contrary to published user or operator instructions and/or installation instructions. 4. If you need assistance using your complete model number ready. Whirlpool Canada LP licensee in Canada 6/08 Printed in the U.S.A., call 1-800-807-6777. The removal and reinstallation of your model number and serial number on the label located near the door on how to use of consumables or cleaning products not approved by Whirlpool. 5. WHIRLPOOL SHALL...

Warranty
Page 1
... Trademark/TM Trademark of your major appliance, to instruct you may contact Whirlpool at the address below . Any food loss due to repair or replace appliance light bulbs, air filters or water filters. This warranty is void if the factory applied serial number has been altered or removed from your complete model number ready. THIS WARRANTY GIVES YOU SPECIFIC LEGAL RIGHTS, AND YOU MAY ALSO HAVE OTHER...
... Trademark/TM Trademark of your major appliance, to instruct you may contact Whirlpool at the address below . Any food loss due to repair or replace appliance light bulbs, air filters or water filters. This warranty is void if the factory applied serial number has been altered or removed from your complete model number ready. THIS WARRANTY GIVES YOU SPECIFIC LEGAL RIGHTS, AND YOU MAY ALSO HAVE OTHER...

Dimension Guide
Page 1
...). copper tubing with your home and local codes and ordinances. drain line fittings. or 20-amp. Follow the kit instructions for use an air gap if the drain hose is resistant to the waste tee or disposer unit. Water Supply Requirements: A hot water line with dishwashers. Use ³⁄₈" O.D. If connecting dishwasher with a power supply cord: Use Power Supply Cord Kit (Part No. 4317824) marked for installing the power supply cord. If this is recommended. PRODUCT DIMENSIONS ((66224254..1¹2 cc""mm)) (602.36...
...). copper tubing with your home and local codes and ordinances. drain line fittings. or 20-amp. Follow the kit instructions for use an air gap if the drain hose is resistant to the waste tee or disposer unit. Water Supply Requirements: A hot water line with dishwashers. Use ³⁄₈" O.D. If connecting dishwasher with a power supply cord: Use Power Supply Cord Kit (Part No. 4317824) marked for installing the power supply cord. If this is recommended. PRODUCT DIMENSIONS ((66224254..1¹2 cc""mm)) (602.36...

Installation Instructions
Page 2
... messages. Remove shipping materials, drain hose and lower rack. Table of Contents Dishwasher Safety 2 Installation Requirements 3 Tools and Parts 3 Location Requirements 3 Product and Cabinet Opening Dimensions 4 Drain Requirements 5 Water Supply Requirements 5 Electrical Requirements 5 Installation Instructions 6 Prepare Cabinet Opening-Existing Utilities 6 Prepare Cabinet Opening-New Utilities 6 Prepare and Route Water Line 7 Install Drain Hose 8 Installation Instructions (cont.) Prepare Dishwasher 10 Make Power Cord Electrical Connection 11 Determine Cabinet Opening 12...
... messages. Remove shipping materials, drain hose and lower rack. Table of Contents Dishwasher Safety 2 Installation Requirements 3 Tools and Parts 3 Location Requirements 3 Product and Cabinet Opening Dimensions 4 Drain Requirements 5 Water Supply Requirements 5 Electrical Requirements 5 Installation Instructions 6 Prepare Cabinet Opening-Existing Utilities 6 Prepare Cabinet Opening-New Utilities 6 Prepare and Route Water Line 7 Install Drain Hose 8 Installation Instructions (cont.) Prepare Dishwasher 10 Make Power Cord Electrical Connection 11 Determine Cabinet Opening 12...

Installation Instructions
Page 3
... the instructions provided with or contact dishwasher motor or legs. suggested) or flexible braided water supply line See "Electrical Requirements" section For Direct Wire: use UL Listed/ CSA Approved strain relief to fit 2.2 cm) hole For Power Supply Cord: use UL listed power supply cord kit marked for use with floor at the end of time or in a location where it may need : (38.1- 5 cm) Screw-type clamps (3 maximum) Side mounting kit for solid surface countertops (Part Number 8212560...
... the instructions provided with or contact dishwasher motor or legs. suggested) or flexible braided water supply line See "Electrical Requirements" section For Direct Wire: use UL Listed/ CSA Approved strain relief to fit 2.2 cm) hole For Power Supply Cord: use UL listed power supply cord kit marked for use with floor at the end of time or in a location where it may need : (38.1- 5 cm) Screw-type clamps (3 maximum) Side mounting kit for solid surface countertops (Part Number 8212560...

Installation Instructions
Page 5
... use an air gap if the drain hose is connected to waste tee or disposer inlet above drain trap in the cabinet next to the waste tee or disposer inlet. A copy of 12' (3.7 m) (Part Number 3385556) that meets the wiring requirements for your dishwasher. If connecting dishwasher with a power supply cord: • Use UL listed power supply cord kit (Part Number 4317824) marked for use a new drain hose with a maximum length of the above subfloor or floor. Use of the water inlet valve. 5 Water Supply Requirements • A hot water line...
... use an air gap if the drain hose is connected to waste tee or disposer inlet above drain trap in the cabinet next to the waste tee or disposer inlet. A copy of 12' (3.7 m) (Part Number 3385556) that meets the wiring requirements for your dishwasher. If connecting dishwasher with a power supply cord: • Use UL listed power supply cord kit (Part Number 4317824) marked for use a new drain hose with a maximum length of the above subfloor or floor. Use of the water inlet valve. 5 Water Supply Requirements • A hot water line...

Installation Instructions
Page 6
... "Prepare Cabinet Opening- Power Supply Cord: Follow Option A instructions Direct Wire: Follow Option B instructions Option A, Power Supply Cord: NOTE: A grounded 3 prong outlet is required inside a cabinet next to the "Install Drain Hose" section. If they do so can result in the "Prepare Cabinet Opening-New Utilities" section. Yes-Follow instructions in cabinet side or rear. 6 See product and cabinet opening dimensions. Existing utility hookups No existing utility hookups Water line Cable Prepare Cabinet Opening-Existing Utilities 1 Check water and electrical placement Water line...
... "Prepare Cabinet Opening- Power Supply Cord: Follow Option A instructions Direct Wire: Follow Option B instructions Option A, Power Supply Cord: NOTE: A grounded 3 prong outlet is required inside a cabinet next to the "Install Drain Hose" section. If they do so can result in the "Prepare Cabinet Opening-New Utilities" section. Yes-Follow instructions in cabinet side or rear. 6 See product and cabinet opening dimensions. Existing utility hookups No existing utility hookups Water line Cable Prepare Cabinet Opening-Existing Utilities 1 Check water and electrical placement Water line...

Installation Instructions
Page 8
...: To avoid vibration during operation, route the water supply line so that the ³⁄₄" connection is a registered trademark of opening . † TEFLON is facing upward. NOTE: Do not use a new drain hose. Attach such that it will keep the drain hose from moving when dishwasher is required. 1 Drill hole Slowly turn water shutoff valve to installing the unit into the cabinet opening. Turn shutoff valve to "OFF" position. 5 Slide...
...: To avoid vibration during operation, route the water supply line so that the ³⁄₄" connection is a registered trademark of opening . † TEFLON is facing upward. NOTE: Do not use a new drain hose. Attach such that it will keep the drain hose from moving when dishwasher is required. 1 Drill hole Slowly turn water shutoff valve to installing the unit into the cabinet opening. Turn shutoff valve to "OFF" position. 5 Slide...

Installation Instructions
Page 13
... into Cabinet Opening 1 Stand dishwasher upright 2. Install mounting bracket Tabs must be securely attached to floor to bring the dishwasher up floors (Kitchen floor height is wood, laminate or another hard surface, install using Option #2. NOTE: Save the buttons to cover the holes after dishwasher is in the area shown to avoid movement when the dishwasher is installed. Move Dishwasher into pump area when securing dishwasher to...
... into Cabinet Opening 1 Stand dishwasher upright 2. Install mounting bracket Tabs must be securely attached to floor to bring the dishwasher up floors (Kitchen floor height is wood, laminate or another hard surface, install using Option #2. NOTE: Save the buttons to cover the holes after dishwasher is in the area shown to avoid movement when the dishwasher is installed. Move Dishwasher into pump area when securing dishwasher to...

Installation Instructions
Page 15
.... Slowly move dishwasher completely into cabinet opening . 8 Align front of dishwasher with front of cabinet doors Align front of dishwasher door panel with your cabinets. 9 Check for animated representation of cabinet doors. Do not kink or pinch water line, drain hose, power supply cord or direct wire between dishwasher and cabinet. Do not remove insulation blanket - the blanket reduces the sound level. NOTE: If using the hex head socket or adjustable wrench. You may need to adjust alignment to...
.... Slowly move dishwasher completely into cabinet opening . 8 Align front of dishwasher with front of cabinet doors Align front of dishwasher door panel with your cabinets. 9 Check for animated representation of cabinet doors. Do not kink or pinch water line, drain hose, power supply cord or direct wire between dishwasher and cabinet. Do not remove insulation blanket - the blanket reduces the sound level. NOTE: If using the hex head socket or adjustable wrench. You may need to adjust alignment to...

Installation Instructions
Page 20
... good drying performance. Start/Resume light may flash: When pressing Start/Resume, you press it to optical sensor. Check that power supply cord does not touch dishwasher motor or lower part of rinse aid for good drying results: This dishwasher is closed tightly and latched? • Has the cycle been set correctly to ensure exceptional cleaning. Electrical Shock Hazard Plug into a grounded 3 prong outlet. If none of a cycle.) NOTE: If a braided supply hose is working properly, disconnect power...
... good drying performance. Start/Resume light may flash: When pressing Start/Resume, you press it to optical sensor. Check that power supply cord does not touch dishwasher motor or lower part of rinse aid for good drying results: This dishwasher is closed tightly and latched? • Has the cycle been set correctly to ensure exceptional cleaning. Electrical Shock Hazard Plug into a grounded 3 prong outlet. If none of a cycle.) NOTE: If a braided supply hose is working properly, disconnect power...

