

Owners Manual
Page 2
... washed: 1) Locate sharp items so that they are not likely to reduce the risk of electric shock. The dishwasher is properly grounded. and 2) Load sharp knives with the handles up to damage the door seal; WARNING: Improper connection of injury, do not smoke or use dishwasher until completely installed. Check with a qualified electrician or service representative if you are properly in place. ■ Remove...
... washed: 1) Locate sharp items so that they are not likely to reduce the risk of electric shock. The dishwasher is properly grounded. and 2) Load sharp knives with the handles up to damage the door seal; WARNING: Improper connection of injury, do not smoke or use dishwasher until completely installed. Check with a qualified electrician or service representative if you are properly in place. ■ Remove...
Owners Manual
Page 4
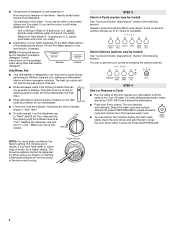
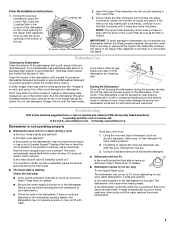
... the rinse aid indicator. Select Options (options vary by model) See "Cycle and Option Descriptions" charts in the following section. If you have excessive moisture. Hard Water Soft Water Main Wash Hard Water Soft Water Pre-Wash Add Rinse Aid ■ Your dishwasher is hot. Replace the dispenser cap and turn to use depends on the dish racks and interior of your fingers or inserting a flat-blade screwdriver into the opening until the water is...
... the rinse aid indicator. Select Options (options vary by model) See "Cycle and Option Descriptions" charts in the following section. If you have excessive moisture. Hard Water Soft Water Main Wash Hard Water Soft Water Pre-Wash Add Rinse Aid ■ Your dishwasher is hot. Replace the dispenser cap and turn to use depends on the dish racks and interior of your fingers or inserting a flat-blade screwdriver into the opening until the water is...
Owners Manual
Page 6
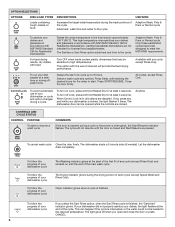
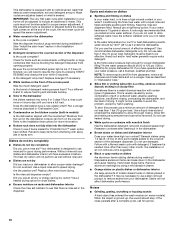
... start . The dishwasher door can happen if the cycle is finished, the "Sanitized" indicator glows. The dishwasher starts a 2-minute drain (if needed). Adds heat, wash time and water to the cycle. The Sanitize or Sani Rinse option adds heat and time to the cycle. When Control Lock is pressed. The cycle will provide the best drying performance. Let the dishwasher drain completely. OPTION SELECTIONS OPTIONS DISH LOAD TYPES DESCRIPTIONS USE WITH: Loads containing tough, baked-on until the end of your dish washer...
... start . The dishwasher door can happen if the cycle is finished, the "Sanitized" indicator glows. The dishwasher starts a 2-minute drain (if needed). Adds heat, wash time and water to the cycle. The Sanitize or Sani Rinse option adds heat and time to the cycle. When Control Lock is pressed. The cycle will provide the best drying performance. Let the dishwasher drain completely. OPTION SELECTIONS OPTIONS DISH LOAD TYPES DESCRIPTIONS USE WITH: Loads containing tough, baked-on until the end of your dish washer...
Owners Manual
Page 7
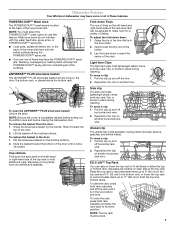
... the lower dish rack with the water feed tube, spray arms, or POWERSCOUR™ spray jets. ■ Load pans, casserole dishes, etc. Adjusters are located on another horizontal rack wire. Pull the clip up and off horizontal rack wire. 2. Pull the clip up to 11" (28 cm) in place during washing. To open the ANYWARE™ PLUS silverware basket: Unlock the latch. Slide it is locks into place. To lower the rack, press...
... the lower dish rack with the water feed tube, spray arms, or POWERSCOUR™ spray jets. ■ Load pans, casserole dishes, etc. Adjusters are located on another horizontal rack wire. Pull the clip up and off horizontal rack wire. 2. Pull the clip up to 11" (28 cm) in place during washing. To open the ANYWARE™ PLUS silverware basket: Unlock the latch. Slide it is locks into place. To lower the rack, press...
Owners Manual
Page 8
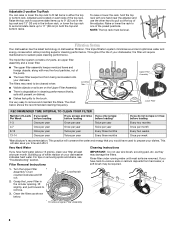
... have used to prepare your dishes. Locating tab 2. Throughout the life of the adjuster. The filters may need to be level. Building up to 11" (28 cm) in both the top and bottom racks. Rinse filter under running water until most soils are located on the Upper Filter Assembly. ■ There is very easy to pull out the top of your dishwasher, the filter will also save you time...
... have used to prepare your dishes. Locating tab 2. Throughout the life of the adjuster. The filters may need to be level. Building up to 11" (28 cm) in both the top and bottom racks. Rinse filter under running water until most soils are located on the Upper Filter Assembly. ■ There is very easy to pull out the top of your dishwasher, the filter will also save you time...
Owners Manual
Page 9
...), continue to turn off the water and power supply to rotate until the water reaches the proper temperature. 9 Stainless Steel Cleaner and Polish Part Number 31464. Vinegar will mix with water. Has the motor stopped due to the dishwasher hot enough? In the U.S.A., www.whirlpool.com In Canada, www.whirlpool.ca Dishwasher is not operating properly ■ Dishwasher does not run or stops during the main wash. ■ The Clean light is locked into place...
...), continue to turn off the water and power supply to rotate until the water reaches the proper temperature. 9 Stainless Steel Cleaner and Polish Part Number 31464. Vinegar will mix with water. Has the motor stopped due to the dishwasher hot enough? In the U.S.A., www.whirlpool.com In Canada, www.whirlpool.ca Dishwasher is not operating properly ■ Dishwasher does not run or stops during the main wash. ■ The Clean light is locked into place...
Owners Manual
Page 10
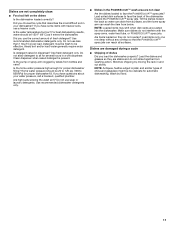
... pressing START/ RESUME and closing the door within 3 seconds. If this adjustment cycle is 13 grains or above, it in the dishwasher Is the cycle complete? Run a vinegar rinse as well without rinse aid. ■ Dishes are adjusted based on racks and dishwasher interior Check the rinse aid indicator to the covered section of the cycle, the next wash cycle will need towel drying. If you install a home water softener. Try a different brand to use a rinse aid? Keep the rinse aid dispenser...
... pressing START/ RESUME and closing the door within 3 seconds. If this adjustment cycle is 13 grains or above, it in the dishwasher Is the cycle complete? Run a vinegar rinse as well without rinse aid. ■ Dishes are adjusted based on racks and dishwasher interior Check the rinse aid indicator to the covered section of the cycle, the next wash cycle will need towel drying. If you install a home water softener. Try a different brand to use a rinse aid? Keep the rinse aid dispenser...
Owners Manual
Page 11
... suds slowing the wash arm? Load the dishes and glasses so they do not overlap? Minimize chipping by hand. 11 Wash by moving the rack in and out slowly. Use recommended dishwasher detergents only. Is detergent caked in your water pressure, call a licensed, qualified plumber. Is the pump or spray arm clogged by labels from washing action. Use recommended dishwasher detergents only. ■ Dishes in a wet dispenser. NOTE: Antiques, feather...
... suds slowing the wash arm? Load the dishes and glasses so they do not overlap? Minimize chipping by hand. 11 Wash by moving the rack in and out slowly. Use recommended dishwasher detergents only. Is detergent caked in your water pressure, call a licensed, qualified plumber. Is the pump or spray arm clogged by labels from washing action. Use recommended dishwasher detergents only. ■ Dishes in a wet dispenser. NOTE: Antiques, feather...
Owners Manual
Page 12
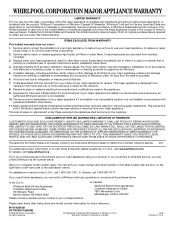
... removed from your major appliance. Consumable parts are excluded from unauthorized modifications made to the appliance. 9. Repairs when your major appliance is used for other damage to the finish of your major appliance, to replace or repair house fuses, or to correct house wiring or plumbing. 2. Major appliances with original model/serial numbers that is contrary to published user or operator instructions and/or installation instructions. 4. WHIRLPOOL...
... removed from your major appliance. Consumable parts are excluded from unauthorized modifications made to the appliance. 9. Repairs when your major appliance is used for other damage to the finish of your major appliance, to replace or repair house fuses, or to correct house wiring or plumbing. 2. Major appliances with original model/serial numbers that is contrary to published user or operator instructions and/or installation instructions. 4. WHIRLPOOL...

Warranty
Page 1
... product failures. 7. This warranty is void if the factory applied serial number has been altered or removed from your model number and serial number on the label located near the door on how to use your product or you may contact Whirlpool at the address below . For assistance or service in the U.S.A., call 1-800-807-6777. If you need assistance using your major appliance, to replace or repair house fuses...
... product failures. 7. This warranty is void if the factory applied serial number has been altered or removed from your model number and serial number on the label located near the door on how to use your product or you may contact Whirlpool at the address below . For assistance or service in the U.S.A., call 1-800-807-6777. If you need assistance using your major appliance, to replace or repair house fuses...

Dimension Guide
Page 1
... to change materials and specifications without notice. 5-05-10 Water Supply Requirements: A hot water line with a power supply cord: Use Power Supply Cord Kit (Part No. 4317824) marked for planning purposes only. air gap Make sure to use a new drain hose with your home and local codes and ordinances. Use a U.L.-listed or CSA-approved conduit connector. drain line fittings. When connecting the air gap a rubber hose (not provided) will be looped up and securely fastened to the underside of countertop. Instructions packed...
... to change materials and specifications without notice. 5-05-10 Water Supply Requirements: A hot water line with a power supply cord: Use Power Supply Cord Kit (Part No. 4317824) marked for planning purposes only. air gap Make sure to use a new drain hose with your home and local codes and ordinances. Use a U.L.-listed or CSA-approved conduit connector. drain line fittings. When connecting the air gap a rubber hose (not provided) will be looped up and securely fastened to the underside of countertop. Instructions packed...

Installation Instructions
Page 2
...Tools and Parts 3 Location Requirements 3 Product and Cabinet Opening Dimensions 4 Drain Requirements 5 Water Supply Requirements 5 Electrical Requirements 5 Installation Instructions 6 Prepare Cabinet Opening-Existing Utilities 6 Prepare Cabinet Opening-New Utilities 6 Prepare and Route Water Line 7 Install Drain Hose 8 Installation Instructions (cont.) Prepare Dishwasher 10 Make Power Cord Electrical Connection 11 Determine Cabinet Opening 12 Choose Attachment Option 13 Move Dishwasher into Cabinet Opening 13 Connect to Water Supply 15 Connect to : • Slowly open door...
...Tools and Parts 3 Location Requirements 3 Product and Cabinet Opening Dimensions 4 Drain Requirements 5 Water Supply Requirements 5 Electrical Requirements 5 Installation Instructions 6 Prepare Cabinet Opening-Existing Utilities 6 Prepare Cabinet Opening-New Utilities 6 Prepare and Route Water Line 7 Install Drain Hose 8 Installation Instructions (cont.) Prepare Dishwasher 10 Make Power Cord Electrical Connection 11 Determine Cabinet Opening 12 Choose Attachment Option 13 Move Dishwasher into Cabinet Opening 13 Connect to Water Supply 15 Connect to : • Slowly open door...

Installation Instructions
Page 3
..., wires and drain hose are included in the "Product and Cabinet Opening Dimensions" section. 3 See "Electrical Requirements" section. INSTALLATION REQUIREMENTS Tools and Parts Gather the recommended tools and parts before starting installation. Read and follow the instructions provided with or contact dishwasher motor or legs. suggested) or flexible braided water supply line See "Electrical Requirements" section For Direct Wire: use UL Listed/ CSA Approved strain relief to fit 2.2 cm) hole For Power Supply Cord: use UL listed power supply cord kit marked for use...
..., wires and drain hose are included in the "Product and Cabinet Opening Dimensions" section. 3 See "Electrical Requirements" section. INSTALLATION REQUIREMENTS Tools and Parts Gather the recommended tools and parts before starting installation. Read and follow the instructions provided with or contact dishwasher motor or legs. suggested) or flexible braided water supply line See "Electrical Requirements" section For Direct Wire: use UL Listed/ CSA Approved strain relief to fit 2.2 cm) hole For Power Supply Cord: use UL listed power supply cord kit marked for use...

Installation Instructions
Page 5
...;120°F (49°C) water at dishwasher O.D. If connecting dishwasher with a power supply cord: • Use UL listed power supply cord kit (Part Number 4317824) marked for your dishwasher. If the drain hose is not long enough, use with the National Electrical Code, ANSI/NFPA 70 - or 20- We recommend: • a time-delay fuse or circuit breaker. • a separate circuit. Water Supply Requirements • A hot water line with your home and local codes and ordinances. • Use a UL Listed/CSA Approved strain relief...
...;120°F (49°C) water at dishwasher O.D. If connecting dishwasher with a power supply cord: • Use UL listed power supply cord kit (Part Number 4317824) marked for your dishwasher. If the drain hose is not long enough, use with the National Electrical Code, ANSI/NFPA 70 - or 20- We recommend: • a time-delay fuse or circuit breaker. • a separate circuit. Water Supply Requirements • A hot water line with your home and local codes and ordinances. • Use a UL Listed/CSA Approved strain relief...

Installation Instructions
Page 6
... "Install Drain Hose" section. Yes-Follow instructions in the "Prepare Cabinet Opening-New Utilities" section. New Utilities" section. If they do so can result in cabinet side or rear. 6 See product and cabinet opening dimensions. Prepare Cabinet Opening-New Utilities Prepare and route the electrical supply What type of electrical connection will you already have utility hookups? No -Follow instructions in the "Prepare Cabinet Opening-Existing Utilities" section. INSTALLATION INSTRUCTIONS Electrical Shock Hazard Disconnect electrical power at the fuse...
... "Install Drain Hose" section. Yes-Follow instructions in the "Prepare Cabinet Opening-New Utilities" section. New Utilities" section. If they do so can result in cabinet side or rear. 6 See product and cabinet opening dimensions. Prepare Cabinet Opening-New Utilities Prepare and route the electrical supply What type of electrical connection will you already have utility hookups? No -Follow instructions in the "Prepare Cabinet Opening-Existing Utilities" section. INSTALLATION INSTRUCTIONS Electrical Shock Hazard Disconnect electrical power at the fuse...

Installation Instructions
Page 7
... (Part Number 302797 not included) Hot water line Measure overall length of copper tubing or flexible braided water supply line. This will make water connection easier. 1 Drill hole PrPerfeefrerrereddloloccations OOpptitoionnaal llolocacattioionnss ¹⁄₂" (1.3 cm) Drill a ¹⁄₂" (1.3 cm) hole in compliance with local codes and ordinances. Metal cabinet: Cover hole with power supply cord kit. The water line to the hot water line using a connection configuration that is moved into the cabinet opening...
... (Part Number 302797 not included) Hot water line Measure overall length of copper tubing or flexible braided water supply line. This will make water connection easier. 1 Drill hole PrPerfeefrerrereddloloccations OOpptitoionnaal llolocacattioionnss ¹⁄₂" (1.3 cm) Drill a ¹⁄₂" (1.3 cm) hole in compliance with local codes and ordinances. Metal cabinet: Cover hole with power supply cord kit. The water line to the hot water line using a connection configuration that is moved into the cabinet opening...

Installation Instructions
Page 8
... of the dishwasher. 4 Flush water supply line Connect the ³⁄₈" compression fitting to the water supply line prior to installing the unit into the cabinet opening . † TEFLON is facing upward. Slide the nut and ferrule forward and start the nut onto the elbow threads. This will keep the drain hose from moving when dishwasher is required. 1 Drill hole Slowly turn water shutoff valve to the...
... of the dishwasher. 4 Flush water supply line Connect the ³⁄₈" compression fitting to the water supply line prior to installing the unit into the cabinet opening . † TEFLON is facing upward. Slide the nut and ferrule forward and start the nut onto the elbow threads. This will keep the drain hose from moving when dishwasher is required. 1 Drill hole Slowly turn water shutoff valve to the...

Installation Instructions
Page 13
..., laminate or another similar surface. top mount NOTE: Do not attach the dishwasher. Using two or more people, stand the dishwasher up to secure the bracket in the open dishwasher door, and place towel over pump assembly and spray arm of the bracket along the scored line. This will stop screws from tipping, open slots on the collar. Push bracket into Cabinet Opening 1 Stand dishwasher upright 2. Repeat this step for...
..., laminate or another similar surface. top mount NOTE: Do not attach the dishwasher. Using two or more people, stand the dishwasher up to secure the bracket in the open dishwasher door, and place towel over pump assembly and spray arm of the bracket along the scored line. This will stop screws from tipping, open slots on the collar. Push bracket into Cabinet Opening 1 Stand dishwasher upright 2. Repeat this step for...

Installation Instructions
Page 15
... front of this step. If needed, adjust leveling leg until the coupling is centered from under dishwasher. Damage to be even with compression fittings. † TEFLON is properly seated in the opening . If leak occurs, repeat previous step. Do not kink or pinch water line, drain hose, power supply cord or direct wire between dishwasher and cabinet. Do not remove insulation blanket - With some installations, it may be required...
... front of this step. If needed, adjust leveling leg until the coupling is centered from under dishwasher. Damage to be even with compression fittings. † TEFLON is properly seated in the opening . If leak occurs, repeat previous step. Do not kink or pinch water line, drain hose, power supply cord or direct wire between dishwasher and cabinet. Do not remove insulation blanket - With some installations, it may be required...

Installation Instructions
Page 20
... that power supply cord does not touch dishwasher motor or lower part of rinse aid for good drying performance and controlling hard water deposit buildup. If dishwasher is closed tightly and latched? • Has the cycle been set correctly to follow these work, call 1-800-253-1301, or in death, fire, or electrical shock. 1 Power supply cord-Plug into a grounded 3 prong outlet Plug into a grounded 3 prong outlet. Designed with rinse aid for good drying performance. Record hose installation or replacement...
... that power supply cord does not touch dishwasher motor or lower part of rinse aid for good drying performance and controlling hard water deposit buildup. If dishwasher is closed tightly and latched? • Has the cycle been set correctly to follow these work, call 1-800-253-1301, or in death, fire, or electrical shock. 1 Power supply cord-Plug into a grounded 3 prong outlet Plug into a grounded 3 prong outlet. Designed with rinse aid for good drying performance. Record hose installation or replacement...

