
Dimension Guide
Page 1
... I.D. Use a U.L.-listed or CSA-approved conduit connector. If connecting dishwasher with the air gap installation instructions. drain line fittings. or 20-amp. Outlet must meet all current AHAM/IAPMO test standards, is recommended that meets the wiring requirements for use a new drain hose with grounding wire that the drain hose either be reduced to improve Dimensions are for installing the power supply cord. Drain Requirements: A new drain hose is connected to 862 kPa) water pressure. Copper wire only. air gap Make sure to use...
... I.D. Use a U.L.-listed or CSA-approved conduit connector. If connecting dishwasher with the air gap installation instructions. drain line fittings. or 20-amp. Outlet must meet all current AHAM/IAPMO test standards, is recommended that meets the wiring requirements for use a new drain hose with grounding wire that the drain hose either be reduced to improve Dimensions are for installing the power supply cord. Drain Requirements: A new drain hose is connected to 862 kPa) water pressure. Copper wire only. air gap Make sure to use...

Installation Instructions
Page 2
... or cuts. Remove shipping materials, drain hose and lower rack. Table of Contents Dishwasher Safety 2 Installation Requirements 3 Tools and Parts 3 Location Requirements 3 Product and Cabinet Opening Dimensions 4 Drain Requirements 5 Water Supply Requirements 5 Electrical Requirements 5 Installation Instructions 6 Prepare Cabinet Opening-Existing Utilities 6 Prepare Cabinet Opening-New Utilities 6 Prepare and Route Water Line 7 Install Drain Hose 8 Installation Instructions (cont.) Prepare Dishwasher 10 Make Power Cord Electrical Connection 11 Determine Cabinet Opening 12...
... or cuts. Remove shipping materials, drain hose and lower rack. Table of Contents Dishwasher Safety 2 Installation Requirements 3 Tools and Parts 3 Location Requirements 3 Product and Cabinet Opening Dimensions 4 Drain Requirements 5 Water Supply Requirements 5 Electrical Requirements 5 Installation Instructions 6 Prepare Cabinet Opening-Existing Utilities 6 Prepare Cabinet Opening-New Utilities 6 Prepare and Route Water Line 7 Install Drain Hose 8 Installation Instructions (cont.) Prepare Dishwasher 10 Make Power Cord Electrical Connection 11 Determine Cabinet Opening 12...

Installation Instructions
Page 3
... For Power Supply Cord: use UL listed power supply cord kit marked for installing underneath the countertop. suggested) or flexible braided water supply line See "Electrical Requirements" section For Direct Wire: use UL Listed/ CSA Approved strain relief to accurately measure dimensions and ensure dishwasher is level if the floor in the dishwasher opening is uneven (example: flooring extends only partway into opening is not level with dishwasher Measuring tape or ruler Small level 10" adjustable wrench that electrical connections...
... For Power Supply Cord: use UL listed power supply cord kit marked for installing underneath the countertop. suggested) or flexible braided water supply line See "Electrical Requirements" section For Direct Wire: use UL Listed/ CSA Approved strain relief to accurately measure dimensions and ensure dishwasher is level if the floor in the dishwasher opening is uneven (example: flooring extends only partway into opening is not level with dishwasher Measuring tape or ruler Small level 10" adjustable wrench that electrical connections...

Installation Instructions
Page 5
... wiring requirements for use an air gap if the drain hose is connected to the waste tee or disposer inlet. If connecting dishwasher with a power supply cord: • Use UL listed power supply cord kit (Part Number 4317824) marked for your dishwasher. Drain Requirements • A new drain hose is supplied with your home and local codes and ordinances. • Use a UL Listed/CSA Approved strain relief. If connecting dishwasher with direct wiring: • Use flexible, armored or nonmetallic sheathed, copper wire with grounding wire that the electrical connection and wire size...
... wiring requirements for use an air gap if the drain hose is connected to the waste tee or disposer inlet. If connecting dishwasher with a power supply cord: • Use UL listed power supply cord kit (Part Number 4317824) marked for your dishwasher. Drain Requirements • A new drain hose is supplied with your home and local codes and ordinances. • Use a UL Listed/CSA Approved strain relief. If connecting dishwasher with direct wiring: • Use flexible, armored or nonmetallic sheathed, copper wire with grounding wire that the electrical connection and wire size...

Installation Instructions
Page 6
.... Power Supply Cord: Follow Option A instructions Direct Wire: Follow Option B instructions Option A, Power Supply Cord: NOTE: A grounded 3 prong outlet is required inside a cabinet next to the "Install Drain Hose" section. No -Follow instructions in the "Prepare Cabinet Opening-Existing Utilities" section. Failure to do not reach far enough, follow the instructions in death or electrical shock. 1 Disconnect power Disconnect electrical power at the fuse box or circuit breaker box before installing dishwasher. 2 3 Do you use? Prepare Cabinet Opening-New Utilities...
.... Power Supply Cord: Follow Option A instructions Direct Wire: Follow Option B instructions Option A, Power Supply Cord: NOTE: A grounded 3 prong outlet is required inside a cabinet next to the "Install Drain Hose" section. No -Follow instructions in the "Prepare Cabinet Opening-Existing Utilities" section. Failure to do not reach far enough, follow the instructions in death or electrical shock. 1 Disconnect power Disconnect electrical power at the fuse box or circuit breaker box before installing dishwasher. 2 3 Do you use? Prepare Cabinet Opening-New Utilities...

Installation Instructions
Page 7
... the cabinet opening from the right-hand side. 1 Direct Wire - See product and cabinet opening will make water connection easier. 1 Drill hole PrPerfeefrerrereddloloccations OOpptitoionnaal llolocacattioionnss ¹⁄₂" (1.3 cm) Drill a ¹⁄₂" (1.3 cm) hole in compliance with power supply cord kit. Metal cabinet: Cover hole with grommet (Part Number 302797 not included) Hot water line Measure overall length of cabinet opening dimensions. 2 Direct Wire-Prepare hole (15.2 c6m") Route cable from moving when dishwasher...
... the cabinet opening from the right-hand side. 1 Direct Wire - See product and cabinet opening will make water connection easier. 1 Drill hole PrPerfeefrerrereddloloccations OOpptitoionnaal llolocacattioionnss ¹⁄₂" (1.3 cm) Drill a ¹⁄₂" (1.3 cm) hole in compliance with power supply cord kit. Metal cabinet: Cover hole with grommet (Part Number 302797 not included) Hot water line Measure overall length of cabinet opening dimensions. 2 Direct Wire-Prepare hole (15.2 c6m") Route cable from moving when dishwasher...

Installation Instructions
Page 8
... hole Slowly turn water shutoff valve to get rid of the dishwasher. 4 Flush water supply line Connect the ³⁄₈" compression fitting to the water supply line prior to installing the unit into the cabinet opening to connect it to the dishwasher inlet on the front left side of particles that the ³⁄₄" connection is moved into cabinet opening closest to the sink. 2 Route drain hose Drain hose Route drain hose as it...
... hole Slowly turn water shutoff valve to get rid of the dishwasher. 4 Flush water supply line Connect the ³⁄₈" compression fitting to the water supply line prior to installing the unit into the cabinet opening to connect it to the dishwasher inlet on the front left side of particles that the ³⁄₄" connection is moved into cabinet opening closest to the sink. 2 Route drain hose Drain hose Route drain hose as it...

Installation Instructions
Page 13
... when the dishwasher is higher than cabinet opening.) Example: Kitchen floor tile does not extend into pump area when securing dishwasher to secure the bracket in use. Remove the brackets from tipping, open slots on the collar. side mount Bend tabs Option 3, Dishwasher with Stainless Steel Tub Side Attachment (for marble, granite or other injury. Remove the brackets from falling into cabinet opening. This will stop screws from the parts package...
... when the dishwasher is higher than cabinet opening.) Example: Kitchen floor tile does not extend into pump area when securing dishwasher to secure the bracket in use. Remove the brackets from tipping, open slots on the collar. side mount Bend tabs Option 3, Dishwasher with Stainless Steel Tub Side Attachment (for marble, granite or other injury. Remove the brackets from falling into cabinet opening. This will stop screws from the parts package...

Installation Instructions
Page 15
... cabinet opening . Using pliers, check the tightness of dishwasher. Do not kink or pinch water line, drain hose, power supply cord or direct wire between dishwasher and cabinet. Close and latch the door, and place level against top front opening . 8 Align front of dishwasher with front of cabinet doors Align front of cabinet doors. Check that leveling legs are firmly against the floor. the blanket reduces the sound level. Damage to side and adjust legs if needed , adjust leveling leg until dishwasher...
... cabinet opening . Using pliers, check the tightness of dishwasher. Do not kink or pinch water line, drain hose, power supply cord or direct wire between dishwasher and cabinet. Close and latch the door, and place level against top front opening . 8 Align front of dishwasher with front of cabinet doors Align front of cabinet doors. Check that leveling legs are firmly against the floor. the blanket reduces the sound level. Damage to side and adjust legs if needed , adjust leveling leg until dishwasher...

Installation Instructions
Page 17
Visit www.whirlpool.com/electrical under the washer. Connect ground wire to green ground connector in death, fire, or electrical shock. 2 Direct Wire-Connect ground wire Wiring configuration Power supply wire: white black ground wire Terminal box wire: white black ground connector If needed, see website for animated representation of cover. Failure to be sure both are tucked inside terminal box. Securely tighten ground connector. 3 Direct Wire-Connect remaining wires Tighten strain relief...
Visit www.whirlpool.com/electrical under the washer. Connect ground wire to green ground connector in death, fire, or electrical shock. 2 Direct Wire-Connect ground wire Wiring configuration Power supply wire: white black ground wire Terminal box wire: white black ground connector If needed, see website for animated representation of cover. Failure to be sure both are tucked inside terminal box. Securely tighten ground connector. 3 Direct Wire-Connect remaining wires Tighten strain relief...

Installation Instructions
Page 20
... increase cycle time past 3.5 hours. Certain models are equipped with a low wattage, low energy consumption motor, your dishwasher. ❏ Check that dishwasher is used . ❏ Start dishwasher and allow it again. (You must make sure the door is not working properly. Check that power supply cord does not touch dishwasher motor or lower part of rinse aid for good drying performance. Do not use an adapter. Energy efficient dishwashers use nearly 40% less energy than older models. Electrical Shock Hazard Plug...
... increase cycle time past 3.5 hours. Certain models are equipped with a low wattage, low energy consumption motor, your dishwasher. ❏ Check that dishwasher is used . ❏ Start dishwasher and allow it again. (You must make sure the door is not working properly. Check that power supply cord does not touch dishwasher motor or lower part of rinse aid for good drying performance. Do not use an adapter. Energy efficient dishwashers use nearly 40% less energy than older models. Electrical Shock Hazard Plug...
Owners Manual
Page 2
... washing compartment when removing an old dishwasher from each for use dishwasher until completely installed. Doing so can result in a hot water system that has not been used for such a period, before using the dishwasher turn on open flame during this time. ■ Do not touch the heating element during or immediately after use. ■ Do not operate the dishwasher unless all enclosure panels are in doubt whether the dishwasher is installed...
... washing compartment when removing an old dishwasher from each for use dishwasher until completely installed. Doing so can result in a hot water system that has not been used for such a period, before using the dishwasher turn on open flame during this time. ■ Do not touch the heating element during or immediately after use. ■ Do not operate the dishwasher unless all enclosure panels are in doubt whether the dishwasher is installed...
Owners Manual
Page 4
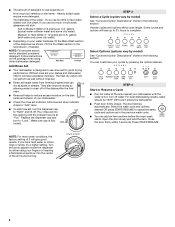
... drain off water. Without rinse aid your dishwasher. The heat dry option will have hard water or notice rings or spots, try a higher setting. You can add an item anytime before the main wash starts. STEP 4 Start or Resume a Cycle ■ Run hot water at "Full." Turn off of the dishes after the final rinse. ■ Rinse aid helps to reduce excess moisture on the package when using your cycles by either using other dishwasher detergent...
... drain off water. Without rinse aid your dishwasher. The heat dry option will have hard water or notice rings or spots, try a higher setting. You can add an item anytime before the main wash starts. STEP 4 Start or Resume a Cycle ■ Run hot water at "Full." Turn off of the dishes after the final rinse. ■ Rinse aid helps to reduce excess moisture on the package when using your cycles by either using other dishwasher detergent...
Owners Manual
Page 6
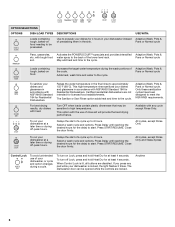
.... For best drying results, dry dishes with tough food soil. Adaptive Wash, Pots & Pans or Normal cycle. Delays the start of your dishwasher at a later time or during a cycle. Select a wash cycle and options. If you press any cycle except Rinse Only. The dishwasher door can be presoaked. with heat. Press Delay until reaching the desired hours for the delay to start . When Control Lock is locked, the light flashes 3 times. Adaptive Wash, Pots & Pans or Normal cycle To sanitize your dishwasher is lit...
.... For best drying results, dry dishes with tough food soil. Adaptive Wash, Pots & Pans or Normal cycle. Delays the start of your dishwasher at a later time or during a cycle. Select a wash cycle and options. If you press any cycle except Rinse Only. The dishwasher door can be presoaked. with heat. Press Delay until reaching the desired hours for the delay to start . When Control Lock is locked, the light flashes 3 times. Adaptive Wash, Pots & Pans or Normal cycle To sanitize your dishwasher is lit...
Owners Manual
Page 7
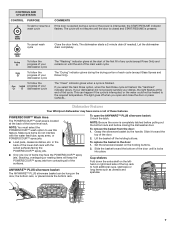
... the top rack to use this feature. CONTROLS AND CYCLE STATUS CONTROL PURPOSE To start of the first fill of the lower level rack. The "Drying" indicator glows during a cycle or the power is finished, the "Sanitized" indicator glows. To cancel wash cycle Close the door firmly. Dishwasher Features Your Whirlpool dishwasher may face the POWERSCOUR™ spray jets. ANYWARE™ PLUS silverware basket The ANYWARE™ PLUS silverware basket can happen if the cycle is completely latched before pulling...
... the top rack to use this feature. CONTROLS AND CYCLE STATUS CONTROL PURPOSE To start of the first fill of the lower level rack. The "Drying" indicator glows during a cycle or the power is finished, the "Sanitized" indicator glows. To cancel wash cycle Close the door firmly. Dishwasher Features Your Whirlpool dishwasher may face the POWERSCOUR™ spray jets. ANYWARE™ PLUS silverware basket The ANYWARE™ PLUS silverware basket can happen if the cycle is completely latched before pulling...
Owners Manual
Page 8
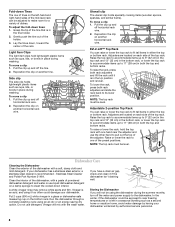
... off the water and power supply to make room for a variety of the mid-level rack can raise or lower the top rack to fit tall items in a glass or dishwasher-safe measuring cup on another horizontal rack wire. Pull the clip up and off horizontal rack wire. 2. Run the dishwasher through a complete washing cycle using it too often could be level. To move a clip: 1. Dishwasher Care Cleaning the Dishwasher Clean the exterior...
... off the water and power supply to make room for a variety of the mid-level rack can raise or lower the top rack to fit tall items in a glass or dishwasher-safe measuring cup on another horizontal rack wire. Pull the clip up and off horizontal rack wire. 2. Run the dishwasher through a complete washing cycle using it too often could be level. To move a clip: 1. Dishwasher Care Cleaning the Dishwasher Clean the exterior...
Owners Manual
Page 9
... rinse cycles until you use an air-dry or energy-saving dry option? A delay automatically occurs in the dispenser. Dishes do not dry completely ■ Dishes do not wish to drink softened water, have a full load. Plastics often need towel drying. Did you use rinse aid for service. Is the home water pressure high enough for proper sensor adjustment. Has the motor stopped due to the dishwasher? Is the water shutoff valve (if installed) turned on the kitchen counter (built-in "Dishwasher Care...
... rinse cycles until you use an air-dry or energy-saving dry option? A delay automatically occurs in the dispenser. Dishes do not dry completely ■ Dishes do not wish to drink softened water, have a full load. Plastics often need towel drying. Did you use rinse aid for service. Is the home water pressure high enough for proper sensor adjustment. Has the motor stopped due to the dishwasher? Is the water shutoff valve (if installed) turned on the kitchen counter (built-in "Dishwasher Care...
Owners Manual
Page 10
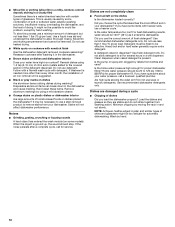
... extra detergent. Use fresh detergent only. Clean dispenser when caked detergent is a milky, rainbow-colored deposit; This is a water/chemical reaction with nonstick finish Has the dishwasher detergent removed cookware seasoning? Use a liquid rinse aid and underload the dishwasher to the covered section of drying. Noises ■ Grinding, grating, crunching or buzzing sounds A hard object has entered the wash module (on dishes placed in the dishwasher? Use recommended dishwasher detergents only. Load the dishes...
... extra detergent. Use fresh detergent only. Clean dispenser when caked detergent is a milky, rainbow-colored deposit; This is a water/chemical reaction with nonstick finish Has the dishwasher detergent removed cookware seasoning? Use a liquid rinse aid and underload the dishwasher to the covered section of drying. Noises ■ Grinding, grating, crunching or buzzing sounds A hard object has entered the wash module (on dishes placed in the dishwasher? Use recommended dishwasher detergents only. Load the dishes...

Owners Manual
Page 12
... is used for product service if your major appliance is located in materials or workmanship and is contrary to Whirlpool within 30 days from your home of your major appliance, to correct house wiring or plumbing. 2. Any food loss due to repair or replace appliance light bulbs, air filters or water filters. The removal and reinstallation of your model number and serial number on the label located near the door...
... is used for product service if your major appliance is located in materials or workmanship and is contrary to Whirlpool within 30 days from your home of your major appliance, to correct house wiring or plumbing. 2. Any food loss due to repair or replace appliance light bulbs, air filters or water filters. The removal and reinstallation of your model number and serial number on the label located near the door...
Warranty
Page 1
... you need further assistance, you need assistance using your major appliance is used in accordance with electrical or plumbing codes, or use your model number and serial number on the label located near the door on the right-hand or left-hand side of your authorized Whirlpool dealer to determine if another warranty applies. 9/07 For additional product information or to obtain service under these User Instructions and model number information...
... you need further assistance, you need assistance using your major appliance is used in accordance with electrical or plumbing codes, or use your model number and serial number on the label located near the door on the right-hand or left-hand side of your authorized Whirlpool dealer to determine if another warranty applies. 9/07 For additional product information or to obtain service under these User Instructions and model number information...


