Dimension Guide
Page 1
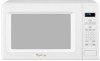
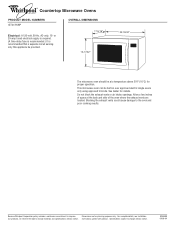
... improve Dimensions are located. Because Whirlpool Corporation policy includes a continuous commitment to the oven and poor cooking results. Instructions packed with product. Allow a few inches of the oven where the exhaust vents are for planning purposes only. Specifications subject to change without notice. OVERALL DIMENSIONS 17-5/16" 13-17A/32" 22-19/32" The microwave oven should...
... improve Dimensions are located. Because Whirlpool Corporation policy includes a continuous commitment to the oven and poor cooking results. Instructions packed with product. Allow a few inches of the oven where the exhaust vents are for planning purposes only. Specifications subject to change without notice. OVERALL DIMENSIONS 17-5/16" 13-17A/32" 22-19/32" The microwave oven should...
Installation Instructions
Page 2
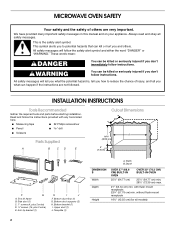
... on your appliance. Side duct (1) C. 1" screws (4, plus 2 extra) D. ¹⁄₂" screws (15, plus 2 extra) E. MICROWAVE OVEN SAFETY Your safety and the safety of injury, and tell you don't immediately follow the safety alert symbol and either the word "DANGER" or "WARNING." Depth DIMENSION S Width Depth Height OVER 27" (68.6 CM) BUILT-IN...
... on your appliance. Side duct (1) C. 1" screws (4, plus 2 extra) D. ¹⁄₂" screws (15, plus 2 extra) E. MICROWAVE OVEN SAFETY Your safety and the safety of injury, and tell you don't immediately follow the safety alert symbol and either the word "DANGER" or "WARNING." Depth DIMENSION S Width Depth Height OVER 27" (68.6 CM) BUILT-IN...

Installation Instructions
Page 4
..., use template to correctly engage with existing screw. Centerline F. Bottom bracket 2. Attach the side duct and upper duct assembly to centerline of microwave oven cabinet. Anti-tip bracket C. Cutout opening B. Anti-tip bracket 4 Cutout floor 2. Cutout opening B 2.06 cm) C. 3" (7.62... ducts. Press down firmly on microwave oven surface before ducts are not to cabinet with anti-tip bracket. Fasten duct assembly to scale.) B C A. Microwave Oven Placement 1. Be sure to align the centerline of template to left side of cutout floor. (Dimensions as shown are attached. 3.
..., use template to correctly engage with existing screw. Centerline F. Bottom bracket 2. Attach the side duct and upper duct assembly to centerline of microwave oven cabinet. Anti-tip bracket C. Cutout opening B. Anti-tip bracket 4 Cutout floor 2. Cutout opening B 2.06 cm) C. 3" (7.62... ducts. Press down firmly on microwave oven surface before ducts are not to cabinet with anti-tip bracket. Fasten duct assembly to scale.) B C A. Microwave Oven Placement 1. Be sure to align the centerline of template to left side of cutout floor. (Dimensions as shown are attached. 3.


