Owners Manual
Page 2
... 7 Clock 7 Tones 7 Timer 7 Control Lock 7 Demo Mode 7 Options 7 MICROWAVE OVEN USE 8 Food Characteristics 8 Cooking Guidelines 8 Cookware and Dinnerware 9 Aluminum Foil and Metal 9 Microwave Cooking Power 9 Manual Cooking 10 Cooking in Stages 10 Sensor Cooking 10 Sensor Popcorn 10 Sensor Cook 11 Sensor Reheat 11 Auto Defrost 12 Warm Hold 12 MICROWAVE OVEN CARE 13 General Cleaning 13 TROUBLESHOOTING 14 ASSISTANCE...
... 7 Clock 7 Tones 7 Timer 7 Control Lock 7 Demo Mode 7 Options 7 MICROWAVE OVEN USE 8 Food Characteristics 8 Cooking Guidelines 8 Cookware and Dinnerware 9 Aluminum Foil and Metal 9 Microwave Cooking Power 9 Manual Cooking 10 Cooking in Stages 10 Sensor Cooking 10 Sensor Popcorn 10 Sensor Cook 11 Sensor Reheat 11 Auto Defrost 12 Warm Hold 12 MICROWAVE OVEN CARE 13 General Cleaning 13 TROUBLESHOOTING 14 ASSISTANCE...
Owners Manual
Page 3
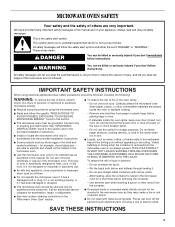
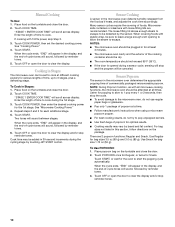
...; Read all safety messages. All safety messages will follow the specific "PRECAUTIONS TO AVOID POSSIBLE EXPOSURE TO EXCESSIVE MICROWAVE ENERGY" found in the microwave oven as described in this manual. Do not use straight-sided containers with metal scouring pads. This type of burns, electric shock, fire, ...leave paper products, cooking utensils, or food in the cavity when not in the "Microwave Oven Care" section. ■ To reduce the risk of injury to explode and should be inserted in this manual and on your appliance. This is not working properly, or if it . -...
...; Read all safety messages. All safety messages will follow the specific "PRECAUTIONS TO AVOID POSSIBLE EXPOSURE TO EXCESSIVE MICROWAVE ENERGY" found in the microwave oven as described in this manual. Do not use straight-sided containers with metal scouring pads. This type of burns, electric shock, fire, ...leave paper products, cooking utensils, or food in the cavity when not in the "Microwave Oven Care" section. ■ To reduce the risk of injury to explode and should be inserted in this manual and on your appliance. This is not working properly, or if it . -...
Owners Manual
Page 6
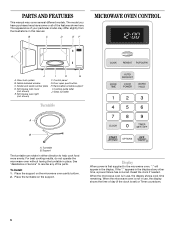
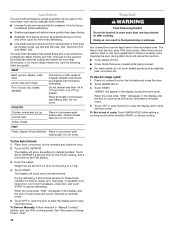
...the display shows cook time remaining. To Install: 1. If the ":" appears in the display. Microwave oven light (not shown) F. See "Assistance or Service" to help cook food more evenly. B C D E F MICROWAVE OVEN CONTROL A J I . Model and serial number plate D. Door open push button H. Glass ...support on the support. Reset the clock if needed. When the microwave oven is set) or Timer countdown. 6 Place the turntable on the microwave oven cavity bottom. 2. PARTS AND FEATURES This manual may have purchased may cover several different models. The model you have...
...the display shows cook time remaining. To Install: 1. If the ":" appears in the display. Microwave oven light (not shown) F. See "Assistance or Service" to help cook food more evenly. B C D E F MICROWAVE OVEN CONTROL A J I . Model and serial number plate D. Door open push button H. Glass ...support on the support. Reset the clock if needed. When the microwave oven is set) or Timer countdown. 6 Place the turntable on the microwave oven cavity bottom. 2. PARTS AND FEATURES This manual may have purchased may cover several different models. The model you have...
Owners Manual
Page 7
...any manual cooking cycle, at 100% power for 5 seconds. Time may be added in the display. The microwave oven will turn off . Cook functions may be used to start or stop the microwave oven. Touching the OFF pad will also turn the microwave oven off . To Lock/Unlock Control: The microwave oven and ...door and touch START to enter correct time of cook time, up to enter desired time. 3. Touch number pads to resume the non-sensor cycle. Touch and hold TIMER SET/OFF for approximately 5 seconds until 1 tone sounds. Repeat to cancel the Timer. Start The START ...
...any manual cooking cycle, at 100% power for 5 seconds. Time may be added in the display. The microwave oven will turn off . Cook functions may be used to start or stop the microwave oven. Touching the OFF pad will also turn the microwave oven off . To Lock/Unlock Control: The microwave oven and ...door and touch START to enter correct time of cook time, up to enter desired time. 3. Touch number pads to resume the non-sensor cycle. Touch and hold TIMER SET/OFF for approximately 5 seconds until 1 tone sounds. Repeat to cancel the Timer. Start The START ...
Owners Manual
Page 10
... 2 seconds, then stop reminder tones. Sensor Cooking A sensor in Stages: 1. NOTE: During Popcorn function, as it heats, and adjusts the cook time accordingly. Manual Cooking To Use: 1. Place food on the package. Microwavesafe containers or steamers with all microwave cooking functions, the microwave oven should be canceled. NOTES: ■ The microwave oven should not exceed 95°F (35...
... 2 seconds, then stop reminder tones. Sensor Cooking A sensor in Stages: 1. NOTE: During Popcorn function, as it heats, and adjusts the cook time accordingly. Manual Cooking To Use: 1. Place food on the package. Microwavesafe containers or steamers with all microwave cooking functions, the microwave oven should be canceled. NOTES: ■ The microwave oven should not exceed 95°F (35...
Owners Manual
Page 12
Auto Defrost The Auto Defrost feature's preset programs can be used or the microwave oven can be manually set from fruit juice containers) before defrosting. ■ Shallow packages will defrost more quickly than deep blocks. ■ Separate food pieces as soon as possible ... the door. 2. Open door, turn , rearrange, or separate food. Touch OFF or open the door to shield parts of -cycle tones will appear in the microwave oven. Touch WARM HOLD. 3. Touch START. The Auto Defrost feature has preset times and cook powers for single cycle): 1. MEAT Beef: ground, steaks, roast, stew Lamb...
Auto Defrost The Auto Defrost feature's preset programs can be used or the microwave oven can be manually set from fruit juice containers) before defrosting. ■ Shallow packages will defrost more quickly than deep blocks. ■ Separate food pieces as soon as possible ... the door. 2. Open door, turn , rearrange, or separate food. Touch OFF or open the door to shield parts of -cycle tones will appear in the microwave oven. Touch WARM HOLD. 3. Touch START. The Auto Defrost feature has preset times and cook powers for single cycle): 1. MEAT Beef: ground, steaks, roast, stew Lamb...
Installation Instructions
Page 2
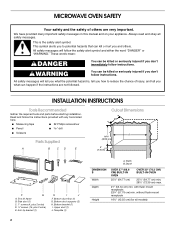
...if the instructions are very important. Bottom duct supports (2) H. Depth DIMENSION S Width Depth Height OVER 27" (68.6 CM) BUILT-IN OVEN OVER 30" (76.2 CM) BUILT-IN OVEN 25¹⁄₂" (64.77 cm) 25¹⁄₂" (64.77 cm) min; 28¹⁄₂" (72.39...We have provided many important safety messages in this manual and on your appliance. This is , tell you how to potential hazards that can be killed or seriously injured if you what the potential hazard is the safety alert symbol. MICROWAVE OVEN SAFETY Your safety and the safety of injury, and...
...if the instructions are very important. Bottom duct supports (2) H. Depth DIMENSION S Width Depth Height OVER 27" (68.6 CM) BUILT-IN OVEN OVER 30" (76.2 CM) BUILT-IN OVEN 25¹⁄₂" (64.77 cm) 25¹⁄₂" (64.77 cm) min; 28¹⁄₂" (72.39...We have provided many important safety messages in this manual and on your appliance. This is , tell you how to potential hazards that can be killed or seriously injured if you what the potential hazard is the safety alert symbol. MICROWAVE OVEN SAFETY Your safety and the safety of injury, and...


