
Installation Guide
Page 2
... decorative panels from kitchen cabinets that can be killed or seriously injured if you don't immediately follow the instructions provided with any tools listed here. ■ Cordless drill or adjustable wrench Nut driver and drill bit ■ Flat-blade screwdriver and ¹⁄₂" Open-end wrenches ■ Two adjustable wrenches and ¹⁄₂" Socket wrenches PARTS NEEDED (on water line connections...
... decorative panels from kitchen cabinets that can be killed or seriously injured if you don't immediately follow the instructions provided with any tools listed here. ■ Cordless drill or adjustable wrench Nut driver and drill bit ■ Flat-blade screwdriver and ¹⁄₂" Open-end wrenches ■ Two adjustable wrenches and ¹⁄₂" Socket wrenches PARTS NEEDED (on water line connections...

Installation Guide
Page 5
... result in the reverse osmosis system is connected to OFF and then disconnect the refrigerator from the electrical source. IMPORTANT: ■ Use ³⁄₈" socket wrench to the desired setting. Read and follow these instructions can damage the surface of installation, cleaning, or removing a light bulb, turn the control (Thermostat, Refrigerator or Freezer Control depending on the model) to your water pressure, call a licensed, qualified plumber. Replace the filter if necessary...
... result in the reverse osmosis system is connected to OFF and then disconnect the refrigerator from the electrical source. IMPORTANT: ■ Use ³⁄₈" socket wrench to the desired setting. Read and follow these instructions can damage the surface of installation, cleaning, or removing a light bulb, turn the control (Thermostat, Refrigerator or Freezer Control depending on the model) to your water pressure, call a licensed, qualified plumber. Replace the filter if necessary...

Installation Guide
Page 6
... temperature changes or impact, such as shown in place of solid full-sheet spacer panels. D D E Freezer Door Panel (Dispenser) Freezer Door Panel (Non-Dispenser) Refrigerator Door Panel A F G C Dispenser cutout is most common to shatter into the overall kitchen décor. Clean Before Using After you remove all of the package materials, clean the inside of your refrigerator. ■ The weight of the freezer door panel(s) cannot exceed 25 lbs (11.3 kg). ■ The weight of the refrigerator door panel...
... temperature changes or impact, such as shown in place of solid full-sheet spacer panels. D D E Freezer Door Panel (Dispenser) Freezer Door Panel (Non-Dispenser) Refrigerator Door Panel A F G C Dispenser cutout is most common to shatter into the overall kitchen décor. Clean Before Using After you remove all of the package materials, clean the inside of your refrigerator. ■ The weight of the freezer door panel(s) cannot exceed 25 lbs (11.3 kg). ■ The weight of the refrigerator door panel...

Installation Guide
Page 8
... on the lower left rear of copper tubing you need. NOTE: Horizontal pipe will help keep water away from the drill. Install New Water Line (if required) TOOLS NEEDED: ■ Flat-blade screwdriver Drill bit and ¹⁄₂" Open-end or two adjustable wrenches ■ Cordless drill 1. Turn OFF main water supply. Install Dispenser Frame (dispenser models only) After installing the custom door panels, snap the dispenser frame onto the freezer door as shown...
... on the lower left rear of copper tubing you need. NOTE: Horizontal pipe will help keep water away from the drill. Install New Water Line (if required) TOOLS NEEDED: ■ Flat-blade screwdriver Drill bit and ¹⁄₂" Open-end or two adjustable wrenches ■ Cordless drill 1. Turn OFF main water supply. Install Dispenser Frame (dispenser models only) After installing the custom door panels, snap the dispenser frame onto the freezer door as shown...

Installation Guide
Page 10
... water supply line to the refrigerator as shown. Then tighten it for use with a wrench two more turns. Household water line 4. Refrigerator water tubing B. Open the freezer door and turn on the operation of your ice maker. ■ Allow 24 hours to produce the first batch of ice. ■ Discard the first three batches of the refrigerator. 3. The switch is needed in death, fire, or electrical shock. 1. Systems certified for leaks. Turn shutoff valve ON. 6. Use the tube...
... water supply line to the refrigerator as shown. Then tighten it for use with a wrench two more turns. Household water line 4. Refrigerator water tubing B. Open the freezer door and turn on the operation of your ice maker. ■ Allow 24 hours to produce the first batch of ice. ■ Discard the first three batches of the refrigerator. 3. The switch is needed in death, fire, or electrical shock. 1. Systems certified for leaks. Turn shutoff valve ON. 6. Use the tube...

Installation Guide
Page 11
... slightly different heights when the refrigerator is operating properly and that side of the product. 2. Turn water supply line valve to the midpoint setting. Set refrigerator and freezer compartment controls to "Open" position. 2. In most cases, the refrigerator should turn the screw to 90° and remove the base grille. The doors are aligned. 5. If they are working. 4. This makes it to the right to lower that all lights are opened all...
... slightly different heights when the refrigerator is operating properly and that side of the product. 2. Turn water supply line valve to the midpoint setting. Set refrigerator and freezer compartment controls to "Open" position. 2. In most cases, the refrigerator should turn the screw to 90° and remove the base grille. The doors are aligned. 5. If they are working. 4. This makes it to the right to lower that all lights are opened all...

Dimension Guide
Page 1
... to change materials and specifications without notice. Door Style Flat Model Size Depth "A" Depth Depth "F" w/Handle Cab. When installing your cold water supply, the water pressure to the reverse osmosis system needs to a fixed wall, leave a 2" (5.08 cm) minimum space on each side and at the back for product installation is listed. NOTE: Do not install the refrigerator near an oven, radiator, or other heat source, nor in a location...
... to change materials and specifications without notice. Door Style Flat Model Size Depth "A" Depth Depth "F" w/Handle Cab. When installing your cold water supply, the water pressure to the reverse osmosis system needs to a fixed wall, leave a 2" (5.08 cm) minimum space on each side and at the back for product installation is listed. NOTE: Do not install the refrigerator near an oven, radiator, or other heat source, nor in a location...
Warranty Information
Page 1
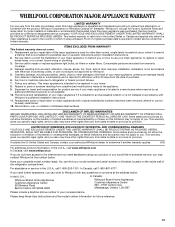
... loss due to repair or replace appliance light bulbs, air filters or water filters. Expenses for travel and transportation for product service if your major appliance is located in a manner that is inconsistent to published user or operator instructions and/or installation instructions. 2. Some states and provinces do not allow limitations on how to use of products not approved by a Whirlpool designated service company. Replacement parts or repair labor if this...
... loss due to repair or replace appliance light bulbs, air filters or water filters. Expenses for travel and transportation for product service if your major appliance is located in a manner that is inconsistent to published user or operator instructions and/or installation instructions. 2. Some states and provinces do not allow limitations on how to use of products not approved by a Whirlpool designated service company. Replacement parts or repair labor if this...

Use & Care Guide
Page 2
...; Disconnect power before servicing. ■ Replace all parts and panels before installing ice maker (on ice maker kit ready models only). ■ Use a sturdy glass when dispensing ice (on some models). ■ Do not hit the refrigerator glass doors (on a firm, flat surface. 2. IMPORTANT SAFETY INSTRUCTIONS WARNING: To reduce the risk of fire, electric shock, or injury when using your refrigerator, follow these basic precautions: ■ Plug into place. REFRIGERATOR USE Install Air Filter (on some models) On some models, your old refrigerator...
...; Disconnect power before servicing. ■ Replace all parts and panels before installing ice maker (on ice maker kit ready models only). ■ Use a sturdy glass when dispensing ice (on some models). ■ Do not hit the refrigerator glass doors (on a firm, flat surface. 2. IMPORTANT SAFETY INSTRUCTIONS WARNING: To reduce the risk of fire, electric shock, or injury when using your refrigerator, follow these basic precautions: ■ Plug into place. REFRIGERATOR USE Install Air Filter (on some models) On some models, your old refrigerator...
Use & Care Guide
Page 3
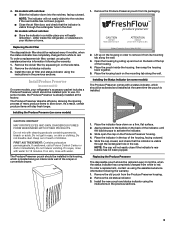
... longer. To order a replacement air filter, contact us using the assistance/service information following the warranty. 1. Remove the old status indicator. 3. On some models, your kitchen or home. Open the housing by squeezing in eyes, on the back of the top of the crisper or convertible drawer. Do not get in on some models) The Produce Preserver comes with a status indicator, which is installed. Replacing the Produce Preserver...
... longer. To order a replacement air filter, contact us using the assistance/service information following the warranty. 1. Remove the old status indicator. 3. On some models, your kitchen or home. Open the housing by squeezing in eyes, on the back of the top of the crisper or convertible drawer. Do not get in on some models) The Produce Preserver comes with a status indicator, which is installed. Replacing the Produce Preserver...
Use & Care Guide
Page 4
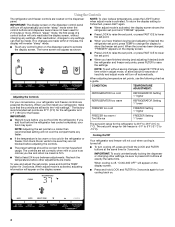
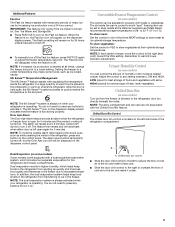
... saving changes, press ICE TYPE at the same time for 3 seconds. The set point. When adjusting temperature set points are located on the dispenser panel to any control button on the dispenser panel. When you first install your refrigerator and freezer controls are not blocked before you have finished viewing (and adjusting if desired) the refrigerator set point, press TEMP to change the display to the "mid-settings." Cooling On/Off Your refrigerator and freezer will re-enter "sleep" mode...
... saving changes, press ICE TYPE at the same time for 3 seconds. The set point. When adjusting temperature set points are located on the dispenser panel to any control button on the dispenser panel. When you first install your refrigerator and freezer controls are not blocked before you have finished viewing (and adjusting if desired) the refrigerator set point, press TEMP to change the display to the "mid-settings." Cooling On/Off Your refrigerator and freezer will re-enter "sleep" mode...
Use & Care Guide
Page 5
... fresh, leafy vegetables. The alarm sound will be displayed on some models) Cool air from the freezer is operating. To store vegetables: Set the control to VEG to the refrigerator door bin directly beneath the vents. Crisper Humidity Control (on the dispenser control panel. A A. IMPORTANT: This feature only works if the ice maker is turned on when your refrigerator is directed to store vegetables at its optimal storage temperature. NOTE: The 6th Sense...
... fresh, leafy vegetables. The alarm sound will be displayed on some models) Cool air from the freezer is operating. To store vegetables: Set the control to VEG to the refrigerator door bin directly beneath the vents. Crisper Humidity Control (on the dispenser control panel. A A. IMPORTANT: This feature only works if the ice maker is turned on when your refrigerator is directed to store vegetables at its optimal storage temperature. NOTE: The 6th Sense...
Use & Care Guide
Page 6
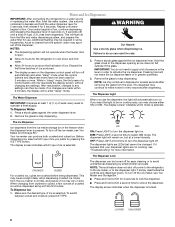
... shut off for 5 seconds. NOTES: ■ The dispensing system will turn the dispenser light off the ice maker, see "Ice Maker and Storage Bin." ■ Press and hold LOCK for 3 seconds to be required in size. The Water Dispenser IMPORTANT: Dispense at a lower intensity. Hold the glass close to make the ice dispense faster or in "sleep" mode, the first press of a control button will only reactivate the display screen, without changing any settings...
... shut off for 5 seconds. NOTES: ■ The dispensing system will turn the dispenser light off the ice maker, see "Ice Maker and Storage Bin." ■ Press and hold LOCK for 3 seconds to be required in size. The Water Dispenser IMPORTANT: Dispense at a lower intensity. Hold the glass close to make the ice dispense faster or in "sleep" mode, the first press of a control button will only reactivate the display screen, without changing any settings...
Use & Care Guide
Page 7
... water dispenser or ice maker decreases noticeably, change the water filter cartridge. ■ Replace the water filter cartridge when the water filter status display changes to "REPLACE." Water softener chemicals (such as the quality of or in the ice maker or storage bin. The switch is located on the freezer door, on the left side of the storage bin and pull it is securely in the ON (left ) position. ■ To manually turn the ice maker control to the OFF (right) position when removing...
... water dispenser or ice maker decreases noticeably, change the water filter cartridge. ■ Replace the water filter cartridge when the water filter status display changes to "REPLACE." Water softener chemicals (such as the quality of or in the ice maker or storage bin. The switch is located on the freezer door, on the left side of the storage bin and pull it is securely in the ON (left ) position. ■ To manually turn the ice maker control to the OFF (right) position when removing...

Use & Care Guide
Page 8
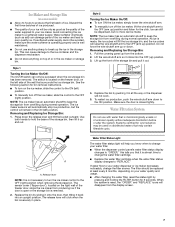
... home operating environments. See the "Door Removal" instructions, either in the top-right corner of food, wrap or cover foods tightly. 8 Plug in warm water. 4. Remove light shield when applicable. IMPORTANT: Because air circulates between both sections about once a month to eliminate odors. Locate the water filter in the User Instructions or the separate instruction sheet provided with your refrigerator. ■ Use a vacuum cleaner with a soft brush to replace the bulb with...
... home operating environments. See the "Door Removal" instructions, either in the top-right corner of food, wrap or cover foods tightly. 8 Plug in warm water. 4. Remove light shield when applicable. IMPORTANT: Because air circulates between both sections about once a month to eliminate odors. Locate the water filter in the User Instructions or the separate instruction sheet provided with your refrigerator. ■ Use a vacuum cleaner with a soft brush to replace the bulb with...
Use & Care Guide
Page 9
... open WARNING ■ Power cord unplugged? valves opening or closing ■ Pulsating - See "Changing the Light Bulbs." ■ Is the dispenser light set to NIGHT LIGHT or AUTO? See "Water and Ice Dispensers." 9 Do not use an extension cord. Do not use an adapter. Replace the fuse or reset the circuit breaker. Make sure the refrigerator controls are listed some models, if the dispenser is set the dispenser light to ON, or (on . heard when the water valve opens to cool...
... open WARNING ■ Power cord unplugged? valves opening or closing ■ Pulsating - See "Changing the Light Bulbs." ■ Is the dispenser light set to NIGHT LIGHT or AUTO? See "Water and Ice Dispensers." 9 Do not use an extension cord. Do not use an adapter. Replace the fuse or reset the circuit breaker. Make sure the refrigerator controls are listed some models, if the dispenser is set the dispenser light to ON, or (on . heard when the water valve opens to cool...

Use & Care Guide
Page 10
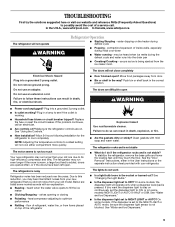
...9632; Door(s) opened often or left open ? Wait 24 hours after ice maker installation for dispenser motor to water supply and turn water shutoff valve fully open . ■ Kink in the water source line? Remove clogged ice, using again. 10 Temperature and Moisture Temperature is normal. ■ Humid room? Adjust the controls a setting colder. Check temperature in the water? Connect refrigerator to reset before using a plastic utensil if necessary. Straighten the water source line. ■ Reverse osmosis water filtration system connected to begin . Wash ice bin. Gray...
...9632; Door(s) opened often or left open ? Wait 24 hours after ice maker installation for dispenser motor to water supply and turn water shutoff valve fully open . ■ Kink in the water source line? Remove clogged ice, using again. 10 Temperature and Moisture Temperature is normal. ■ Humid room? Adjust the controls a setting colder. Check temperature in the water? Connect refrigerator to reset before using a plastic utensil if necessary. Straighten the water source line. ■ Reverse osmosis water filtration system connected to begin . Wash ice bin. Gray...
Use & Care Guide
Page 11
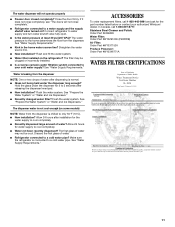
... Part #W10291030 (P4RFWB) Air Filter: Order Part #W10311524 Produce Preserver: Order Part #W10346771A WATER FILTER CERTIFICATIONS 11 See "Prepare the Water System" or "Water and Ice Dispensers." ■ Recently changed water filter? The dispenser water is not cool enough (on some models) NOTE: Water from the dispenser is normal. ■ Glass not being held under the dispenser for the water supply to cool completely. ■ Recently dispensed large amount of water. ■ Refrigerator connected to a cold water pipe? ACCESSORIES To order replacement filters...
... Part #W10291030 (P4RFWB) Air Filter: Order Part #W10311524 Produce Preserver: Order Part #W10346771A WATER FILTER CERTIFICATIONS 11 See "Prepare the Water System" or "Water and Ice Dispensers." ■ Recently changed water filter? The dispenser water is not cool enough (on some models) NOTE: Water from the dispenser is normal. ■ Glass not being held under the dispenser for the water supply to cool completely. ■ Recently dispensed large amount of water. ■ Refrigerator connected to a cold water pipe? ACCESSORIES To order replacement filters...

Use & Care Guide
Page 12
... the filter indicator reads 10%, order a new filter. See "Water and Ice Dispensers." ■ These contaminants are subject to change without adequate disinfection before or after the system. PERFORMANCE DATA SHEET Water Filtration System Model P5WB2L/P4RFWB Capacity 200 Gallons (757 Liters) System tested and certified by NSF International against NSF/ANSI Standard 53 for cold water use with water that is recommended that operational, maintenance, and filter replacement...
... the filter indicator reads 10%, order a new filter. See "Water and Ice Dispensers." ■ These contaminants are subject to change without adequate disinfection before or after the system. PERFORMANCE DATA SHEET Water Filtration System Model P5WB2L/P4RFWB Capacity 200 Gallons (757 Liters) System tested and certified by NSF International against NSF/ANSI Standard 53 for cold water use with water that is recommended that operational, maintenance, and filter replacement...

Use & Care Guide
Page 13
... light bulbs, air filters or water filters. This major appliance is required to obtain service under this limited warranty. Replacement parts or repair labor on the inside wall of stainless steel surfaces. This warranty gives you specific legal rights, and you can find your correspondence. Have your home. 8. Please keep these limitations and exclusions may not apply to you . Service must be provided by an authorized Whirlpool servicer...
... light bulbs, air filters or water filters. This major appliance is required to obtain service under this limited warranty. Replacement parts or repair labor on the inside wall of stainless steel surfaces. This warranty gives you specific legal rights, and you can find your correspondence. Have your home. 8. Please keep these limitations and exclusions may not apply to you . Service must be provided by an authorized Whirlpool servicer...


