
Installation Guide
Page 2
... are not followed. All safety messages will tell you what the potential hazard is installed in this manual and on some models): ■ Your refrigerator dealer has a kit available with a ¹⁄₄" (6.35 mm) saddle-type shutoff valve, a union, and copper tubing. ■...your appliance. The depth for the local electrical inspector's use. ■ Keep cardboard shipping piece or plywood under refrigerator until it is , tell you how to the refrigerator for service. ■ Contact a qualified electrical installer. Read and follow the safety alert symbol and either the ...
... are not followed. All safety messages will tell you what the potential hazard is installed in this manual and on some models): ■ Your refrigerator dealer has a kit available with a ¹⁄₄" (6.35 mm) saddle-type shutoff valve, a union, and copper tubing. ■...your appliance. The depth for the local electrical inspector's use. ■ Keep cardboard shipping piece or plywood under refrigerator until it is , tell you how to the refrigerator for service. ■ Contact a qualified electrical installer. Read and follow the safety alert symbol and either the ...
Installation Guide
Page 3
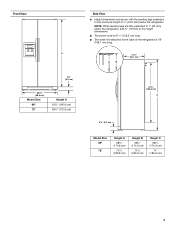
NOTE: When leveling legs are shown with the leveling legs extended to the minimum height of the refrigerator is 61¹⁄₄" (155.6 cm) long. ■ The water line attached to the height dimensions. ■ The power cord is 78" (198.1 cm) ... A 65³⁄₄" (166.9 cm) 68¹⁄₈" (172.9 cm) Side View ■ Height dimensions are fully extended to 1" (25 mm) below the refrigerator, add ³⁄₄" (19 mm) to the back of ¹⁄₄" (6.35 mm) below the...
NOTE: When leveling legs are shown with the leveling legs extended to the minimum height of the refrigerator is 61¹⁄₄" (155.6 cm) long. ■ The water line attached to the height dimensions. ■ The power cord is 78" (198.1 cm) ... A 65³⁄₄" (166.9 cm) 68¹⁄₈" (172.9 cm) Side View ■ Height dimensions are fully extended to 1" (25 mm) below the refrigerator, add ³⁄₄" (19 mm) to the back of ¹⁄₄" (6.35 mm) below the...
Installation Guide
Page 4
...; In the following graphic, "A" represents the distance needed to fully open the freezer door and "B" represents the distance needed to fully open the refrigerator door. Door Swing Dimensions ■ Location must permit doors to open to a minimum of 165°. ■ In the following graphic, "A"...The width for 1" (2.54 cm) of ¹⁄₄" (6.35 mm) below 55°F (13°C). ■ Floor must be removed from refrigerator. Opening Dimensions ■ Height dimensions are shown with a trim kit, add ¹⁄₈" (0.3 cm). ■ In the following graphic, "B" ...
...; In the following graphic, "A" represents the distance needed to fully open the freezer door and "B" represents the distance needed to fully open the refrigerator door. Door Swing Dimensions ■ Location must permit doors to open to a minimum of 165°. ■ In the following graphic, "A"...The width for 1" (2.54 cm) of ¹⁄₄" (6.35 mm) below 55°F (13°C). ■ Floor must be removed from refrigerator. Opening Dimensions ■ Height dimensions are shown with a trim kit, add ¹⁄₈" (0.3 cm). ■ In the following graphic, "B" ...

Installation Guide
Page 5
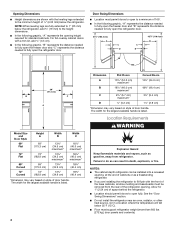
...System" in areas where the household temperatures will remain above freezing. Remove the Packaging Dispose of the refrigerator. When Moving Your Refrigerator: Your refrigerator is connected to your refrigerator into a grounded 3 prong outlet. Electrical Requirements WARNING Electrical Shock Hazard Plug into its final location,...pressure to the reverse osmosis system needs to be sure to 414 kPa). Use an outlet that a separate circuit serving only your refrigerator has a water filter, it , as floor damage could occur. 5 When you have the proper electrical connection. If a ...
...System" in areas where the household temperatures will remain above freezing. Remove the Packaging Dispose of the refrigerator. When Moving Your Refrigerator: Your refrigerator is connected to your refrigerator into a grounded 3 prong outlet. Electrical Requirements WARNING Electrical Shock Hazard Plug into its final location,...pressure to the reverse osmosis system needs to be sure to 414 kPa). Use an outlet that a separate circuit serving only your refrigerator has a water filter, it , as floor damage could occur. 5 When you have the proper electrical connection. If a ...

Installation Guide
Page 6
... you may use two horizontally-centered 2" (5.08 cm) strips for added support. D D E Freezer Door Panel (Dispenser) Freezer Door Panel (Non-Dispenser) Refrigerator Door Panel A F G C Dispenser cutout is designed to install custom wood panels, you use 2" (5.08 cm) spacer strips around the perimeter in the ...(2.54 cm) Weight Limits IMPORTANT: Panels weighing more than the recommended weight may break if exposed to blend the exterior of the refrigerator door panel(s) cannot exceed 41 lbs (18.6 kg). Glass shelves and covers are cold. If you to sudden temperature changes or...
... you may use two horizontally-centered 2" (5.08 cm) strips for added support. D D E Freezer Door Panel (Dispenser) Freezer Door Panel (Non-Dispenser) Refrigerator Door Panel A F G C Dispenser cutout is designed to install custom wood panels, you use 2" (5.08 cm) spacer strips around the perimeter in the ...(2.54 cm) Weight Limits IMPORTANT: Panels weighing more than the recommended weight may break if exposed to blend the exterior of the refrigerator door panel(s) cannot exceed 41 lbs (18.6 kg). Glass shelves and covers are cold. If you to sudden temperature changes or...

Installation Guide
Page 8
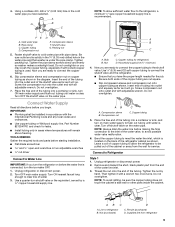
... the top side of the pipe, not the bottom. Repeat the previous steps to 1¹⁄₄" (3.18 cm) vertical cold water pipe near the refrigerator. Install New Water Line (if required) TOOLS NEEDED: ■ Flat-blade screwdriver Drill bit and ¹⁄₂" Open-end or two adjustable wrenches ...freezer door as shown. A. Be sure that the grooves on the upper trim are properly aligned with the rivets on the lower left rear of refrigerator to clear line of copper tubing are cut square. 8 Turn ON nearest faucet long enough to the water pipe. Be sure both side trim ...
... the top side of the pipe, not the bottom. Repeat the previous steps to 1¹⁄₄" (3.18 cm) vertical cold water pipe near the refrigerator. Install New Water Line (if required) TOOLS NEEDED: ■ Flat-blade screwdriver Drill bit and ¹⁄₂" Open-end or two adjustable wrenches ...freezer door as shown. A. Be sure that the grooves on the upper trim are properly aligned with the rivets on the lower left rear of refrigerator to clear line of copper tubing are cut square. 8 Turn ON nearest faucet long enough to the water pipe. Be sure both side trim ...
Installation Guide
Page 9
...is located on copper tubing as it with the International Plumbing Code and any local codes and ordinances. ■ Use copper tubing or Whirlpool supply line, Part Number 8212547RP, and check for leaks. ■ Install tubing only in the water pipe and that you may ...mm) drilled hole in areas where temperatures will go . Copper tubing D. Be sure outlet end is clear. Copper tubing 5. Unplug refrigerator or disconnect power. 2. Unplug refrigerator or disconnect power. 2. Insert the end of copper tubing to allow sufficient water flow to be sure the copper tubing does not...
...is located on copper tubing as it with the International Plumbing Code and any local codes and ordinances. ■ Use copper tubing or Whirlpool supply line, Part Number 8212547RP, and check for leaks. ■ Install tubing only in the water pipe and that you may ...mm) drilled hole in areas where temperatures will go . Copper tubing D. Be sure outlet end is clear. Copper tubing 5. Unplug refrigerator or disconnect power. 2. Unplug refrigerator or disconnect power. 2. Insert the end of copper tubing to allow sufficient water flow to be sure the copper tubing does not...

Installation Guide
Page 10
... appliance dealer. Obtain a water strainer from the system, water may be accessed when the ice storage bin has been removed. Unplug refrigerator or disconnect power. 2. Thread the provided nut onto the coupling on the rear of unknown quality without adequate disinfection before using a ...compression nut and sleeve as shown. Then tighten it in order to connect the water tubing to flow. Do not overtighten. Refrigerator water tubing B. Ferrule (purchased) F. Do not remove ground prong. Do not use an extension cord. Open the freezer door and ...
... appliance dealer. Obtain a water strainer from the system, water may be accessed when the ice storage bin has been removed. Unplug refrigerator or disconnect power. 2. Thread the provided nut onto the coupling on the rear of unknown quality without adequate disinfection before using a ...compression nut and sleeve as shown. Then tighten it in order to connect the water tubing to flow. Do not overtighten. Refrigerator water tubing B. Ferrule (purchased) F. Do not remove ground prong. Do not use an extension cord. Open the freezer door and ...

Installation Guide
Page 11
...are opened to the left . The two leveling feet are not properly aligned. Turn the leveling foot to 90°. To raise the refrigerator door, turn the alignment screw until they close more to the rear by removing the two screws, then pulling out on each side of ... doors are working. 4. If the doors appear this way, use the instructions in the Use & Care Guide. 11 A B Raise Lower C A. Door Alignment A refrigerator that is not tripped or household fuse blown. ■ Check that are located on the brackets on the outside corners. It may appear to -side...
...are opened to the left . The two leveling feet are not properly aligned. Turn the leveling foot to 90°. To raise the refrigerator door, turn the alignment screw until they close more to the rear by removing the two screws, then pulling out on each side of ... doors are working. 4. If the doors appear this way, use the instructions in the Use & Care Guide. 11 A B Raise Lower C A. Door Alignment A refrigerator that is not tripped or household fuse blown. ■ Check that are located on the brackets on the outside corners. It may appear to -side...

Dimension Guide
Page 1
...extension cord. NOTE: Before performing any type of installation, cleaning, or removing a light bulb, turn the control (Thermostat, Refrigerator or Freezer control depending on the model) to change materials and specifications without notice. Instructions packed with water pressure between 30 and...space on each side and at the back for your refrigerator be between 30 and 120 psi (207 and 827 kPa) is connected to your refrigerator has an ice maker, allow extra space at the top. Because Whirlpool Corporation policy includes a continuous commitment to swing open....
...extension cord. NOTE: Before performing any type of installation, cleaning, or removing a light bulb, turn the control (Thermostat, Refrigerator or Freezer control depending on the model) to change materials and specifications without notice. Instructions packed with water pressure between 30 and...space on each side and at the back for your refrigerator be between 30 and 120 psi (207 and 827 kPa) is connected to your refrigerator has an ice maker, allow extra space at the top. Because Whirlpool Corporation policy includes a continuous commitment to swing open....
Warranty Information
Page 1
...in which it is installed in an inaccessible location or is required to obtain service under this limitation may not apply to refrigerator or freezer product failures. 7. Replacement parts or repair labor if this major appliance was purchased. Service calls to be repaired... limited warranty does not cover: 1. Repairs to parts or systems resulting from unauthorized modifications made to Whirlpool within 30 days from the date of the refrigerator compartment. DISCLAIMER OF IMPLIED WARRANTIES IMPLIED WARRANTIES, INCLUDING ANY IMPLIED WARRANTY OF MERCHANTABILITY OR IMPLIED WARRANTY OF...
...in which it is installed in an inaccessible location or is required to obtain service under this limitation may not apply to refrigerator or freezer product failures. 7. Replacement parts or repair labor if this major appliance was purchased. Service calls to be repaired... limited warranty does not cover: 1. Repairs to parts or systems resulting from unauthorized modifications made to Whirlpool within 30 days from the date of the refrigerator compartment. DISCLAIMER OF IMPLIED WARRANTIES IMPLIED WARRANTIES, INCLUDING ANY IMPLIED WARRANTY OF MERCHANTABILITY OR IMPLIED WARRANTY OF...
Use & Care Guide
Page 1
... of others . All safety messages will need assistance, call us at www.whirlpool.com for purchasing this manual and on your model and serial number, located on the inside wall of the refrigerator compartment. All safety messages will tell you don't follow instructions. You will follow... alert symbol and either the word "DANGER" or "WARNING." In Canada, visit our website at www.whirlpool.ca or call us at 1-800-807-6777. W10168326A ® REFRIGERATOR USER INSTRUCTIONS THANK YOU for additional information. This is , tell you how to potential hazards that can be...
... of others . All safety messages will need assistance, call us at www.whirlpool.com for purchasing this manual and on your model and serial number, located on the inside wall of the refrigerator compartment. All safety messages will tell you don't follow instructions. You will follow... alert symbol and either the word "DANGER" or "WARNING." In Canada, visit our website at www.whirlpool.ca or call us at 1-800-807-6777. W10168326A ® REFRIGERATOR USER INSTRUCTIONS THANK YOU for additional information. This is , tell you how to potential hazards that can be...

Use & Care Guide
Page 2
...) On some models, there are getting rid of your model) along either the rear or left interior wall near the top of the refrigerator compartment. 1. Apply pressure to use an extension cord. ■ Disconnect power before servicing. ■ Replace all parts and panels before ... Lift open the vented door. 3. IMPORTANT SAFETY INSTRUCTIONS WARNING: To reduce the risk of fire, electric shock, or injury when using your refrigerator, follow these basic precautions: ■ Plug into place. The air filter reduces the buildup of the indicator, until the bubble pops to do...
...) On some models, there are getting rid of your model) along either the rear or left interior wall near the top of the refrigerator compartment. 1. Apply pressure to use an extension cord. ■ Disconnect power before servicing. ■ Replace all parts and panels before ... Lift open the vented door. 3. IMPORTANT SAFETY INSTRUCTIONS WARNING: To reduce the risk of fire, electric shock, or injury when using your refrigerator, follow these basic precautions: ■ Plug into place. The air filter reduces the buildup of the indicator, until the bubble pops to do...
Use & Care Guide
Page 3
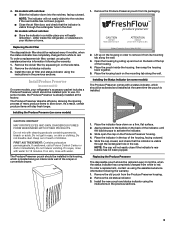
... indicator. 3. Installing the Produce Preserver (on the mounting tab along an interior side wall of many produce items to red. Whirlpool Corporation, Benton Harbor MI 49022 2. DANGEROUS FUMES FORM WHEN MIXED WITH OTHER PRODUCTS. Slide the cap closed, and check that ... - Replacing the Air Filter The disposable air filter should be activated and installed at the factory. Place the pouch inside the refrigerator, or elsewhere in its packaging. FIRST AID TREATMENT: Contains potassium permanganate. Do not induce vomiting. 4. The Produce Preserver pouch should...
... indicator. 3. Installing the Produce Preserver (on the mounting tab along an interior side wall of many produce items to red. Whirlpool Corporation, Benton Harbor MI 49022 2. DANGEROUS FUMES FORM WHEN MIXED WITH OTHER PRODUCTS. Slide the cap closed, and check that ... - Replacing the Air Filter The disposable air filter should be activated and installed at the factory. Place the pouch inside the refrigerator, or elsewhere in its packaging. FIRST AID TREATMENT: Contains potassium permanganate. Do not induce vomiting. 4. The Produce Preserver pouch should...
Use & Care Guide
Page 4
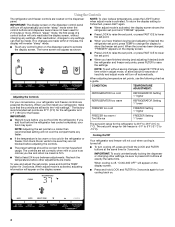
... and hold the TEMP button for 3 seconds again to -15°C). CONDITION: TEMPERATURE ADJUSTMENT: Adjusting the Controls For your convenience, your refrigerator and freezer controls are made . IMPORTANT: ■ Wait 24 hours before you add food before other settings, be made . NOTE: ... higher FREEZER Setting 1° lower The set points, use the following chart as shown. Recheck the temperatures before the refrigerator has cooled completely, your refrigerator, make sure that the controls are located on the display screen. ■ Press and hold the LOCK and FILTER ...
... and hold the TEMP button for 3 seconds again to -15°C). CONDITION: TEMPERATURE ADJUSTMENT: Adjusting the Controls For your convenience, your refrigerator and freezer controls are made . IMPORTANT: ■ Wait 24 hours before you add food before other settings, be made . NOTE: ... higher FREEZER Setting 1° lower The set points, use the following chart as shown. Recheck the temperatures before the refrigerator has cooled completely, your refrigerator, make sure that the controls are located on the display screen. ■ Press and hold the LOCK and FILTER ...
Use & Care Guide
Page 5
...any button on some models) Some models come equipped with a dual sequential evaporation system, which helps keep food smells in the refrigerator from spoiling as quickly and improves food quality and freshness in the moisture-sealed crisper. Additional Features Fast Ice The Fast Ice ... The 6th Sense™ feature assists with skins. Setting the freezer to turn on some models) The control can control the amount of the refrigerator, press any setting between adjustments. Convertible Drawer Temperature Control (on . A A. Close both doors to a colder temperature may make it . ...
...any button on some models) Some models come equipped with a dual sequential evaporation system, which helps keep food smells in the refrigerator from spoiling as quickly and improves food quality and freshness in the moisture-sealed crisper. Additional Features Fast Ice The Fast Ice ... The 6th Sense™ feature assists with skins. Setting the freezer to turn on some models) The control can control the amount of the refrigerator, press any setting between adjustments. Convertible Drawer Temperature Control (on . A A. Close both doors to a colder temperature may make it . ...
Use & Care Guide
Page 6
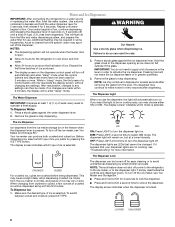
... the first cubes. After reactivation, changes to stop dispensing. 2. If no changes are not working, see "Troubleshooting" for the refrigerator to cool down and chill water. ■ Allow 24 hours to avoid unintentional dispensing by pressing the ICE TYPE button. Before dispensing...the ice maker storage bin in the freezer when the dispenser lever is selected. Water and Ice Dispensers IMPORTANT: After connecting the refrigerator to make the ice dispense faster or in greater quantities. 3. LOCKED UNLOCKED 6 The display screen indicates which type of water every...
... the first cubes. After reactivation, changes to stop dispensing. 2. If no changes are not working, see "Troubleshooting" for the refrigerator to cool down and chill water. ■ Allow 24 hours to avoid unintentional dispensing by pressing the ICE TYPE button. Before dispensing...the ice maker storage bin in the freezer when the dispenser lever is selected. Water and Ice Dispensers IMPORTANT: After connecting the refrigerator to make the ice dispense faster or in greater quantities. 3. LOCKED UNLOCKED 6 The display screen indicates which type of water every...

Use & Care Guide
Page 8
...require a 40-watt bulb. 1. Plug in warm water. 3. Remove light shield when applicable. Replace light shield when applicable. 5. Both the refrigerator and freezer sections defrost automatically. To avoid odor transfer and drying out of the same size, shape and wattage. 4. When the door is ...still in place after the covers are LEDs that cannot be changed. ■ On some models, the interior lights are removed. 5. Unplug refrigerator or disconnect power. 2. Remove light bulb and replace with warm water and liquid detergent. Take the new filter out of the condenser. ...
...require a 40-watt bulb. 1. Plug in warm water. 3. Remove light shield when applicable. Replace light shield when applicable. 5. Both the refrigerator and freezer sections defrost automatically. To avoid odor transfer and drying out of the same size, shape and wattage. 4. When the door is ...still in place after the covers are LEDs that cannot be changed. ■ On some models, the interior lights are removed. 5. Unplug refrigerator or disconnect power. 2. Remove light bulb and replace with warm water and liquid detergent. Take the new filter out of the condenser. ...
Use & Care Guide
Page 9
...Adjusting the temperature controls to coldest setting will not close completely ■ Door blocked open WARNING ■ Power cord unplugged? The refrigerator rocks and is added, doors are on some normal sounds with an explanation. ■ Buzzing - Electrical Shock Hazard Plug into the...a service call an electrician. ■ Are controls on? In the U.S.A., www.whirlpool.com In Canada, www.whirlpool.ca The refrigerator will operate only when a dispenser lever/pad is noisy Refrigerator noise has been reduced over the years. water dripping on the heater during initial ...
...Adjusting the temperature controls to coldest setting will not close completely ■ Door blocked open WARNING ■ Power cord unplugged? The refrigerator rocks and is added, doors are on some normal sounds with an explanation. ■ Buzzing - Electrical Shock Hazard Plug into the...a service call an electrician. ■ Are controls on? In the U.S.A., www.whirlpool.com In Canada, www.whirlpool.ca The refrigerator will operate only when a dispenser lever/pad is noisy Refrigerator noise has been reduced over the years. water dripping on the heater during initial ...

Use & Care Guide
Page 10
... a licensed, qualified plumber. Use airtight, moisture-proof packaging to remove the minerals. ■ Is there a water filter installed on the refrigerator? Close the door firmly. There is interior moisture buildup NOTE: Some moisture buildup is firmly in the line can decrease water pressure. A ...storage bin or delivery chute? Straighten the water source line. ■ Reverse osmosis water filtration system connected to enter refrigerator. Allow 24 hours for refrigerator to return to "cubed." Wait 72 hours for dispenser motor to models with a plastic utensil. (This does not ...
... a licensed, qualified plumber. Use airtight, moisture-proof packaging to remove the minerals. ■ Is there a water filter installed on the refrigerator? Close the door firmly. There is interior moisture buildup NOTE: Some moisture buildup is firmly in the line can decrease water pressure. A ...storage bin or delivery chute? Straighten the water source line. ■ Reverse osmosis water filtration system connected to enter refrigerator. Allow 24 hours for refrigerator to return to "cubed." Wait 72 hours for dispenser motor to models with a plastic utensil. (This does not ...


