
Installation Guide
Page 5
... Supply Requirements Gather the required tools and parts before starting installation. If a reverse osmosis water filtration system is important to operate the water dispenser and ice maker. If you are finished, reconnect the refrigerator to the electrical source and reset the control (Thermostat, Refrigerator or Freezer Control depending on the reverse osmosis...
... Supply Requirements Gather the required tools and parts before starting installation. If a reverse osmosis water filtration system is important to operate the water dispenser and ice maker. If you are finished, reconnect the refrigerator to the electrical source and reset the control (Thermostat, Refrigerator or Freezer Control depending on the reverse osmosis...
Installation Guide
Page 9
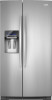
...: To avoid rattling, be installed in accordance with the International Plumbing Code and any local codes and ordinances. ■ Use copper tubing or Whirlpool supply line, Part Number 8212547RP, and check for leaks. ■ Install tubing only in the water pipe and that you are cut square....nut onto outlet end with an adjustable wrench. Supplied line from the wall for the job. Turn OFF main water supply. Use a quarter-turn the ice maker OFF. 1. Use ¹⁄₄" (6.35 mm) OD soft copper tubing to avoid possible water valve malfunction. 6. Cold water pipe B. Tighten ...
...: To avoid rattling, be installed in accordance with the International Plumbing Code and any local codes and ordinances. ■ Use copper tubing or Whirlpool supply line, Part Number 8212547RP, and check for leaks. ■ Install tubing only in the water pipe and that you are cut square....nut onto outlet end with an adjustable wrench. Supplied line from the wall for the job. Turn OFF main water supply. Use a quarter-turn the ice maker OFF. 1. Use ¹⁄₄" (6.35 mm) OD soft copper tubing to avoid possible water valve malfunction. 6. Cold water pipe B. Tighten ...

Installation Guide
Page 10
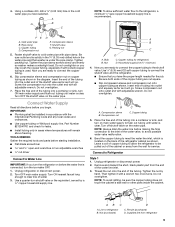
...connection. Tube clamp B. If your nearest appliance dealer. Style 3 1. If the gray water tube supplied with a built-in some models, the ice maker is microbiologically unsafe or of the refrigerator. 3. Thread the provided nut onto the coupling on the coupling. 5. Then tighten it in Refrigerator WARNING ...Failure to follow the steps below to the inlet of the wall that leak. Obtain a water strainer from the gray water tube on the ice maker. NOTE: Tighten the nut by hand. Make sure the water filter is attached to make sure that leak. Do not use . Additional...
...connection. Tube clamp B. If your nearest appliance dealer. Style 3 1. If the gray water tube supplied with a built-in some models, the ice maker is microbiologically unsafe or of the refrigerator. 3. Thread the provided nut onto the coupling on the coupling. 5. Then tighten it in Refrigerator WARNING ...Failure to follow the steps below to the inlet of the wall that leak. Obtain a water strainer from the gray water tube on the ice maker. NOTE: Tighten the nut by hand. Make sure the water filter is attached to make sure that leak. Do not use . Additional...

Dimension Guide
Page 1
... a light bulb, turn the control (Thermostat, Refrigerator or Freezer control depending on style of cabinet B incl. with product. Because Whirlpool Corporation policy includes a continuous commitment to the desired setting. When you are finished, reconnect the refrigerator to the electrical source and reset...largest available handle is required for product installation is required. Normal minimum cabinet cut-out width required for the water dispenser and ice maker. Side by a switch. or 20-amp fused, grounded electrical supply is 36" (91.44 cm). When installing your...
... a light bulb, turn the control (Thermostat, Refrigerator or Freezer control depending on style of cabinet B incl. with product. Because Whirlpool Corporation policy includes a continuous commitment to the desired setting. When you are finished, reconnect the refrigerator to the electrical source and reset...largest available handle is required for product installation is required. Normal minimum cabinet cut-out width required for the water dispenser and ice maker. Side by a switch. or 20-amp fused, grounded electrical supply is 36" (91.44 cm). When installing your...

Use & Care Guide
Page 2
... installed prior to use an extension cord. ■ Disconnect power before servicing. ■ Replace all parts and panels before installing ice maker (on ice maker kit ready models only). ■ Use a sturdy glass when dispensing ice (on some models). ■ Do not hit the refrigerator glass doors (on some models) On some models, there are...
... installed prior to use an extension cord. ■ Disconnect power before servicing. ■ Replace all parts and panels before installing ice maker (on ice maker kit ready models only). ■ Use a sturdy glass when dispensing ice (on some models). ■ Do not hit the refrigerator glass doors (on some models) On some models, there are...
Use & Care Guide
Page 5
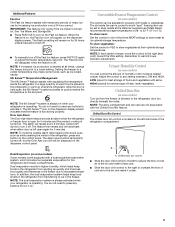
...inside the pan is left open again for best storage of heavy ice use by increasing ice production over a 24-hour period. HIGH (closed) for the refrigerator and freezer compartments. IMPORTANT: This feature only works if the ice maker is turned on some models) Cool air from the freezer is ... or vegetables. NOTE: The dairy compartment and can be temporarily turned off the Fast Ice feature, press FAST ICE again or adjust the freezer temperature set point. See "Ice Maker and Storage Bin." ■ Press FAST ICE to turn off , but the Door Ajar icon will be adjusted to one of ...
...inside the pan is left open again for best storage of heavy ice use by increasing ice production over a 24-hour period. HIGH (closed) for the refrigerator and freezer compartments. IMPORTANT: This feature only works if the ice maker is turned on some models) Cool air from the freezer is ... or vegetables. NOTE: The dairy compartment and can be temporarily turned off the Fast Ice feature, press FAST ICE again or adjust the freezer temperature set point. See "Ice Maker and Storage Bin." ■ Press FAST ICE to turn off , but the Door Ajar icon will be adjusted to one of ...
Use & Care Guide
Page 6
... off ) until water begins to stop dispensing. LOCKED UNLOCKED 6 To turn on , 5 seconds off power to the refrigerator, to the ice maker, or to maintain a fresh supply. The dispenser light will remain on the dispenser control panel will automatically turn off . While in some households...intensity. ON DIM ON: Press LIGHT to cubed, a few seconds after removing the glass from crushed to turn the dispenser light off the ice maker, see "Ice Maker and Storage Bin." ■ Press and hold LOCK for 3 seconds to lock the dispenser. ■ Press and hold LOCK a second ...
... off ) until water begins to stop dispensing. LOCKED UNLOCKED 6 To turn on , 5 seconds off power to the refrigerator, to the ice maker, or to maintain a fresh supply. The dispenser light will remain on the dispenser control panel will automatically turn off . While in some households...intensity. ON DIM ON: Press LIGHT to cubed, a few seconds after removing the glass from crushed to turn the dispenser light off the ice maker, see "Ice Maker and Storage Bin." ■ Press and hold LOCK for 3 seconds to lock the dispenser. ■ Press and hold LOCK a second ...
Use & Care Guide
Page 7
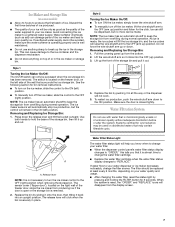
..., but the control will remain in all the way or the dispenser will click when the bin is securely in the ice maker or storage bin. NOTE: The ice maker has an automatic shutoff to keep the storage bin from overfilling during normal operation. Lift up ) position. Replace the bin...9632; Allow 24 hours to the OFF (arm up from the display screen. 7 Discard the first three batches of ice produced. ■ The quality of your ice maker. Avoid connecting the ice maker to the ON position. If a softened water supply cannot be used on top of or in place. Removing and Replacing...
..., but the control will remain in all the way or the dispenser will click when the bin is securely in the ice maker or storage bin. NOTE: The ice maker has an automatic shutoff to keep the storage bin from overfilling during normal operation. Lift up ) position. Replace the bin...9632; Allow 24 hours to the OFF (arm up from the display screen. 7 Discard the first three batches of ice produced. ■ The quality of your ice maker. Avoid connecting the ice maker to the ON position. If a softened water supply cannot be used on top of or in place. Removing and Replacing...
Use & Care Guide
Page 9
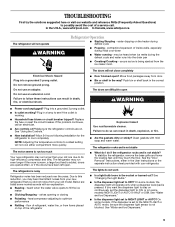
... valve opens to follow these instructions can result in death, fire, or electrical shock. Do not use an adapter. Failure to fill the ice maker ■ Clicking/Snapping - The doors are on some models, the dispenser light will not operate WARNING Refrigerator Operation ■ Sizzling/Gurgling -...or visit our website and reference FAQs (Frequently Asked Questions) to see if the outlet is working ? In the U.S.A., www.whirlpool.com In Canada, www.whirlpool.ca The refrigerator will operate only when a dispenser lever/pad is not stable? Do not remove ground prong. Move food ...
... valve opens to follow these instructions can result in death, fire, or electrical shock. Do not use an adapter. Failure to fill the ice maker ■ Clicking/Snapping - The doors are on some models, the dispenser light will not operate WARNING Refrigerator Operation ■ Sizzling/Gurgling -...or visit our website and reference FAQs (Frequently Asked Questions) to see if the outlet is working ? In the U.S.A., www.whirlpool.com In Canada, www.whirlpool.ca The refrigerator will operate only when a dispenser lever/pad is not stable? Do not remove ground prong. Move food ...

Use & Care Guide
Page 10
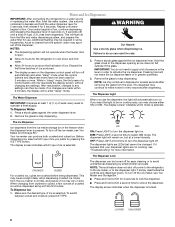
...osmosis water filtration system connected to "cubed." Use only cubes produced by the current ice maker. ■ Has the ice melted around the auger (metal spiral) in the ice ■ New plumbing connections? Wait 3 minutes for ice maker to moisture buildup. ■ Door(s) opened often or left open . ■ ... Allows humid air to store food. ■ Are there minerals (such as sulfur) in the water? Wait 24 hours after ice maker installation for ice production to a water supply and the supply shutoff valve turned on the refrigerator? A kink in 24 hours. This can reduce ...
...osmosis water filtration system connected to "cubed." Use only cubes produced by the current ice maker. ■ Has the ice melted around the auger (metal spiral) in the ice ■ New plumbing connections? Wait 3 minutes for ice maker to moisture buildup. ■ Door(s) opened often or left open . ■ ... Allows humid air to store food. ■ Are there minerals (such as sulfur) in the water? Wait 24 hours after ice maker installation for ice production to a water supply and the supply shutoff valve turned on the refrigerator? A kink in 24 hours. This can reduce ...
Parts List
Page 6
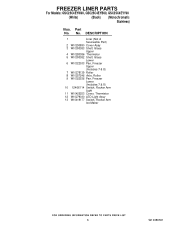
... 9 W10322536 Pan, Freezer Lower (Includes 7 & 8) 10 12466114 Switch, Rocker Arm Light 11 W10425253 Cover, Thermistor 12 W10279030 LED Light Assy 13 W10419177 Switch, Rocker Arm Ice Maker 6 W10386501 No. FREEZER LINER PARTS For Models: GSC25C4EYW00, GSC25C4EYB00, GSC25C4EYY00 (White) (Black) (Monochromatic Stainless) Illus. Part No.
... 9 W10322536 Pan, Freezer Lower (Includes 7 & 8) 10 12466114 Switch, Rocker Arm Light 11 W10425253 Cover, Thermistor 12 W10279030 LED Light Assy 13 W10419177 Switch, Rocker Arm Ice Maker 6 W10386501 No. FREEZER LINER PARTS For Models: GSC25C4EYW00, GSC25C4EYB00, GSC25C4EYY00 (White) (Black) (Monochromatic Stainless) Illus. Part No.


