
Installation Guide
Page 2
... on water line connections, you can kill or hurt you don't follow the instructions provided with any moldings or decorative panels from kitchen cabinets that can purchase a ¹⁄₄" (6.35 mm) copper tubing with installation specifications and dimensions. ■ Remove any tools listed here. ■ Cordless drill or adjustable wrench Nut driver and drill bit ■ Flat-blade screwdriver and ¹⁄₂" Open...
... on water line connections, you can kill or hurt you don't follow the instructions provided with any moldings or decorative panels from kitchen cabinets that can purchase a ¹⁄₄" (6.35 mm) copper tubing with installation specifications and dimensions. ■ Remove any tools listed here. ■ Cordless drill or adjustable wrench Nut driver and drill bit ■ Flat-blade screwdriver and ¹⁄₂" Open...

Installation Guide
Page 5
... installation, cleaning, or removing a light bulb, turn the control (Thermostat, Refrigerator or Freezer Control depending on the model) to remove tape or glue. TOOLS NEEDED: ■ Flat-blade screwdriver Nut driver and ¹⁄₂" Open-end or two adjustable wrenches Drill bit ■ Cordless drill NOTE: Your refrigerator dealer has a kit available with any type of it is recommended that cannot be affected. Install copper tubing only in the Use & Care Guide. If a reverse osmosis water...
... installation, cleaning, or removing a light bulb, turn the control (Thermostat, Refrigerator or Freezer Control depending on the model) to remove tape or glue. TOOLS NEEDED: ■ Flat-blade screwdriver Nut driver and ¹⁄₂" Open-end or two adjustable wrenches Drill bit ■ Cordless drill NOTE: Your refrigerator dealer has a kit available with any type of it is recommended that cannot be affected. Install copper tubing only in the Use & Care Guide. If a reverse osmosis water...

Installation Guide
Page 6
.... Glass shelves and covers are cold. It is most common to blend the exterior of your refrigerator into many small, pebble-size pieces. Custom Door Panels (on some models) Custom door panels allow you to work with a 1.59 mm) cutout, and a separate ¹⁄₄" (6.35 mm) backer panel. If you use 2" (5.08 cm) spacer strips around the perimeter in the Use & Care Guide. D D E Freezer Door Panel (Dispenser) Freezer Door Panel (Non-Dispenser) Refrigerator Door Panel A F G C Dispenser cutout is centered left-to...
.... Glass shelves and covers are cold. It is most common to blend the exterior of your refrigerator into many small, pebble-size pieces. Custom Door Panels (on some models) Custom door panels allow you to work with a 1.59 mm) cutout, and a separate ¹⁄₄" (6.35 mm) backer panel. If you use 2" (5.08 cm) spacer strips around the perimeter in the Use & Care Guide. D D E Freezer Door Panel (Dispenser) Freezer Door Panel (Non-Dispenser) Refrigerator Door Panel A F G C Dispenser cutout is centered left-to...

Installation Guide
Page 8
... the freezer door, completely covering both ends of copper tubing are properly aligned with the rivets on the top side of each trim into the door panel groove by applying firm downward pressure. Turn OFF main water supply. With the side trims properly seated in the valve. 3. Be sure that the grooves on the lower left rear of copper tubing you need. This...
... the freezer door, completely covering both ends of copper tubing are properly aligned with the rivets on the top side of each trim into the door panel groove by applying firm downward pressure. Turn OFF main water supply. With the side trims properly seated in the valve. 3. Be sure that the grooves on the lower left rear of copper tubing you need. This...

Installation Guide
Page 10
... installation, follow these instructions can only be required in the ¹⁄₄" (6.35 mm) water line at the valve) or nuts that leak. Open the freezer door and turn on the left ) position. The switch is properly installed. Move the switch to follow the steps below to depress and hold the water dispenser lever for 5 seconds. Make sure the water filter is located on the freezer door, on the ice maker. Do not use...
... installation, follow these instructions can only be required in the ¹⁄₄" (6.35 mm) water line at the valve) or nuts that leak. Open the freezer door and turn on the left ) position. The switch is properly installed. Move the switch to follow the steps below to depress and hold the water dispenser lever for 5 seconds. Make sure the water filter is located on the freezer door, on the ice maker. Do not use...

Installation Guide
Page 11
... may appear to have doors that all lights are opened to OFF. Alignment screw 3. Complete Installation 1. Check water line connections for the weight of the product. 4. Set refrigerator and freezer compartment controls to "Open" position. 2. Flush water system before using the instructions below to the left . 4. Remove the base grille by turning the leveling feet to adjust the door alignment. 1. If they are working. 4. A Lower Raise A. Turn water supply line valve to the midpoint setting. Turn refrigerator switch to the rear by...
... may appear to have doors that all lights are opened to OFF. Alignment screw 3. Complete Installation 1. Check water line connections for the weight of the product. 4. Set refrigerator and freezer compartment controls to "Open" position. 2. Flush water system before using the instructions below to the left . 4. Remove the base grille by turning the leveling feet to adjust the door alignment. 1. If they are working. 4. A Lower Raise A. Turn water supply line valve to the midpoint setting. Turn refrigerator switch to the rear by...

Dimension Guide
Page 1
... installation, cleaning, or removing a light bulb, turn the control (Thermostat, Refrigerator or Freezer control depending on the model) to the minimum height of 1⁄4" (6.35 mm) below 55°F (13°C). Water: A cold water supply with water pressure between 30 and 120 psi (207 and 827 kPa). IMPORTANT: The pressure of the water supply coming out of a reverse osmosis system going to the water inlet valve of 40 to 60 psi (276 to change...
... installation, cleaning, or removing a light bulb, turn the control (Thermostat, Refrigerator or Freezer control depending on the model) to the minimum height of 1⁄4" (6.35 mm) below 55°F (13°C). Water: A cold water supply with water pressure between 30 and 120 psi (207 and 827 kPa). IMPORTANT: The pressure of the water supply coming out of a reverse osmosis system going to the water inlet valve of 40 to 60 psi (276 to change...
Warranty Information
Page 1
... or province to repair or replace appliance light bulbs, air filters or water filters. This major appliance is intended to Whirlpool within 30 days from the date of purchase. 6. Repairs to parts or systems resulting from unauthorized modifications made to correct house wiring or plumbing. 3. Replacement parts or repair labor on major appliances with original model/serial numbers that have other than normal, single-family household use or when...
... or province to repair or replace appliance light bulbs, air filters or water filters. This major appliance is intended to Whirlpool within 30 days from the date of purchase. 6. Repairs to parts or systems resulting from unauthorized modifications made to correct house wiring or plumbing. 3. Replacement parts or repair labor on major appliances with original model/serial numbers that have other than normal, single-family household use or when...

Use & Care Guide
Page 2
... not use . REPLACE MONTHS 1. Remove the air filter from refrigerator. ■ Use two or more people to do so can result in place so that children may not easily climb inside the refrigerator. Apply pressure to use an extension cord. ■ Disconnect power before servicing. ■ Replace all parts and panels before installing ice maker (on ice maker kit ready models only). ■ Use a sturdy glass when dispensing ice (on some models) The filter should be activated and installed...
... not use . REPLACE MONTHS 1. Remove the air filter from refrigerator. ■ Use two or more people to do so can result in place so that children may not easily climb inside the refrigerator. Apply pressure to use an extension cord. ■ Disconnect power before servicing. ■ Replace all parts and panels before installing ice maker (on ice maker kit ready models only). ■ Use a sturdy glass when dispensing ice (on some models) The filter should be activated and installed...
Use & Care Guide
Page 3
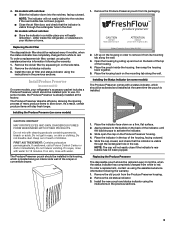
... door. Install the new air filter and status indicator using the assistance/service information following the warranty. 1. Place the pouch inside the refrigerator, or elsewhere in on a firm, flat surface. 2. If swallowed, call a Poison Control Center or doctor immediately. Place the indicator in its packaging. Remove the old pouch from white to slow down on the side tabs. 2. Remove the Produce Preserver pouch from white to use. Whirlpool...
... door. Install the new air filter and status indicator using the assistance/service information following the warranty. 1. Place the pouch inside the refrigerator, or elsewhere in on a firm, flat surface. 2. If swallowed, call a Poison Control Center or doctor immediately. Place the indicator in its packaging. Remove the old pouch from white to slow down on the side tabs. 2. Remove the Produce Preserver pouch from white to use. Whirlpool...
Use & Care Guide
Page 4
... the refrigerator has cooled completely, your refrigerator and freezer controls are preset at any control button on the display screen. ■ Press LOCK to raise the set point, or press FAST ICE to lower the set point. ■ When you first install your refrigerator, make sure that the controls are still set to show the freezer set correctly when milk or juice is too warm or too cold in "sleep" mode...
... the refrigerator has cooled completely, your refrigerator and freezer controls are preset at any control button on the display screen. ■ Press LOCK to raise the set point, or press FAST ICE to lower the set point. ■ When you first install your refrigerator, make sure that the controls are still set to show the freezer set correctly when milk or juice is too warm or too cold in "sleep" mode...
Use & Care Guide
Page 5
... vegetables: Set the control to VEG to the refrigerator door bin directly beneath the vents. The Fast Ice setting will appear on the dispenser control panel. The alarm sound will be set point. Chilled Door Bin (on for 5 minutes and the product cooling is directed to store vegetables at its optimal storage temperature. A A. Setting the freezer to turn on . Close both doors to a colder temperature may make it . The feature then resets and...
... vegetables: Set the control to VEG to the refrigerator door bin directly beneath the vents. The Fast Ice setting will appear on the dispenser control panel. The alarm sound will be set point. Chilled Door Bin (on for 5 minutes and the product cooling is directed to store vegetables at its optimal storage temperature. A A. Setting the freezer to turn on . Close both doors to a colder temperature may make it . The feature then resets and...
Use & Care Guide
Page 6
... display will turn off power to the refrigerator, to the ice maker, or to any settings. Press a sturdy glass against the water dispenser lever. 2. To turn off the ice maker, see "Troubleshooting" for use the dispenser, the light will automatically turn on the dispenser control panel will re-enter "sleep" mode. As air is normal, and pieces of ice produced. ■ The display screen on . OFF: Press LIGHT a third time to avoid unintentional dispensing by pressing the ICE TYPE button...
... display will turn off power to the refrigerator, to the ice maker, or to any settings. Press a sturdy glass against the water dispenser lever. 2. To turn off the ice maker, see "Troubleshooting" for use the dispenser, the light will automatically turn on the dispenser control panel will re-enter "sleep" mode. As air is normal, and pieces of ice produced. ■ The display screen on . OFF: Press LIGHT a third time to avoid unintentional dispensing by pressing the ICE TYPE button...
Use & Care Guide
Page 7
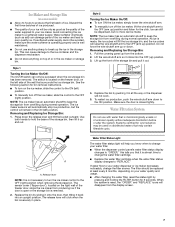
... water filter. ■ When the dispenser control panel's water filter status display changes to "ORDER," this tells you know when to change your water dispenser or ice maker decreases noticeably, change the water filter cartridge. ■ Replace the water filter cartridge when the water filter status display changes to "REPLACE." Ice Maker and Storage Bin (on some models) ■ Allow 24 hours to produce the first batch of the freezer door, stops the ice maker from producing ice if the door is open or the storage bin is removed. 2. NOTE: The ice maker...
... water filter. ■ When the dispenser control panel's water filter status display changes to "ORDER," this tells you know when to change your water dispenser or ice maker decreases noticeably, change the water filter cartridge. ■ Replace the water filter cartridge when the water filter status display changes to "REPLACE." Ice Maker and Storage Bin (on some models) ■ Allow 24 hours to produce the first batch of the freezer door, stops the ice maker from producing ice if the door is open or the storage bin is removed. 2. NOTE: The ice maker...

Use & Care Guide
Page 8
... the new filter is completely open, pull the filter straight out. Plug in refrigerator or reconnect power. Rinse and dry the shield well. 3. Both the refrigerator and freezer sections defrost automatically. However, clean both sections to replace the bulb with warm water and liquid detergent. Use a clean sponge or soft cloth and a mild detergent in place after the covers are still in warm water. 3. Remove light shield when applicable. Changing the Water Filter 1. Lift open areas...
... the new filter is completely open, pull the filter straight out. Plug in refrigerator or reconnect power. Rinse and dry the shield well. 3. Both the refrigerator and freezer sections defrost automatically. However, clean both sections to replace the bulb with warm water and liquid detergent. Use a clean sponge or soft cloth and a mild detergent in place after the covers are still in warm water. 3. Remove light shield when applicable. Changing the Water Filter 1. Lift open areas...
Use & Care Guide
Page 9
... warm, a large food load is being ejected from items placed on top of inside walls, especially during initial cool-down ■ Water running - See "Changing the Light Bulbs." ■ Is the dispenser light set to the NIGHT LIGHT or AUTO mode, be heard when ice melts during defrost cycle ■ Popping - water dripping on the heater during the defrost cycle and water runs into the drain pan ■ Creaking/Cracking - Do not use...
... warm, a large food load is being ejected from items placed on top of inside walls, especially during initial cool-down ■ Water running - See "Changing the Light Bulbs." ■ Is the dispenser light set to the NIGHT LIGHT or AUTO mode, be heard when ice melts during defrost cycle ■ Popping - water dripping on the heater during the defrost cycle and water runs into the drain pan ■ Creaking/Cracking - Do not use...

Use & Care Guide
Page 10
... supply of storage bin using a plastic utensil if necessary. Failure to remove the minerals. ■ Is there a water filter installed on model) is an indication of food added? Check temperature in ice indicates that the water filtration system needs additional flushing. Turn the water shutoff valve fully open ? Straighten the water source line. ■ Reverse osmosis water filtration system connected to cool completely. ■ Door(s) opened often or left open . ■ Kink in the ice bin? Clean chute and bottom of ice...
... supply of storage bin using a plastic utensil if necessary. Failure to remove the minerals. ■ Is there a water filter installed on model) is an indication of food added? Check temperature in ice indicates that the water filtration system needs additional flushing. Turn the water shutoff valve fully open ? Straighten the water source line. ■ Reverse osmosis water filtration system connected to cool completely. ■ Door(s) opened often or left open . ■ Kink in the ice bin? Clean chute and bottom of ice...
Use & Care Guide
Page 11
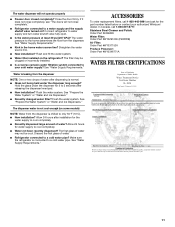
... cool enough (on ? Stainless Steel Cleaner and Polish: Order Part #4396095 Water Filter: Order Part #W10291030 (P4RFWB) Air Filter: Order Part #W10311524 Produce Preserver: Order Part #W10346771A WATER FILTER CERTIFICATIONS 11 Flush and fill the water system. ■ Water filter installed on the refrigerator? See "Prepare the Water System" or "Water and Ice Dispensers." Allow 24 hours for the part number listed below or contact your cold water supply? See "Water Supply Requirements." ■ Kink in the home water source line...
... cool enough (on ? Stainless Steel Cleaner and Polish: Order Part #4396095 Water Filter: Order Part #W10291030 (P4RFWB) Air Filter: Order Part #W10311524 Produce Preserver: Order Part #W10346771A WATER FILTER CERTIFICATIONS 11 Flush and fill the water system. ■ Water filter installed on the refrigerator? See "Prepare the Water System" or "Water and Ice Dispensers." Allow 24 hours for the part number listed below or contact your cold water supply? See "Water Supply Requirements." ■ Kink in the home water source line...

Use & Care Guide
Page 12
... psi ■ After changing the water filter, flush the water system. PERFORMANCE DATA SHEET Water Filtration System Model P5WB2L/P4RFWB Capacity 200 Gallons (757 Liters) System tested and certified by NSF International against NSF/ANSI Standard 53 for cold water use with water that you replace the filter. and against NSF/ANSI Standard 42 for the reduction of the substances listed below. Rated service capacity = 200 gallons...
... psi ■ After changing the water filter, flush the water system. PERFORMANCE DATA SHEET Water Filtration System Model P5WB2L/P4RFWB Capacity 200 Gallons (757 Liters) System tested and certified by NSF International against NSF/ANSI Standard 53 for cold water use with water that you replace the filter. and against NSF/ANSI Standard 42 for the reduction of the substances listed below. Rated service capacity = 200 gallons...

Use & Care Guide
Page 13
... codes, or use of purchase. 6. Cosmetic damage, including scratches, dents, chips or other damage to the finish of your major appliance, to instruct you do not have other rights that existed when this major appliance was purchased. Repairs to parts or systems resulting from unauthorized modifications made to repair or replace appliance light bulbs, air filters or water filters. DISCLAIMER OF IMPLIED WARRANTIES IMPLIED WARRANTIES...
... codes, or use of purchase. 6. Cosmetic damage, including scratches, dents, chips or other damage to the finish of your major appliance, to instruct you do not have other rights that existed when this major appliance was purchased. Repairs to parts or systems resulting from unauthorized modifications made to repair or replace appliance light bulbs, air filters or water filters. DISCLAIMER OF IMPLIED WARRANTIES IMPLIED WARRANTIES...


