
User Guide
Page 1
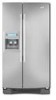
...completo. Table of Contents / Table des matibres REFRIGERATOR SAFETY 1 INSTALLATION INSTRUCTIONS 2 SECURITF: DU REFRIGF:RATEUR 17 INSTRUCTIONS D'INSTALLATION 18 REFRIGERATOR USE 5 REFRIGERATOR CARE 9 UTILISATION DU RF:FRIGF:RATEUR 21 ENTRETIEN DU RF:FRIGF:RATEUR 25 TROUBLESHOOTING 10 ACCESSORIES 12 DF:PANNAGE 26 ACCESSOIRES...your appliance. You will need assistance, call us at www.whirlpool.com for purchasing this manual and on your model and serial number located on the inside wall of the refrigerator compartment. This is , tell you how to potential hazards that...
...completo. Table of Contents / Table des matibres REFRIGERATOR SAFETY 1 INSTALLATION INSTRUCTIONS 2 SECURITF: DU REFRIGF:RATEUR 17 INSTRUCTIONS D'INSTALLATION 18 REFRIGERATOR USE 5 REFRIGERATOR CARE 9 UTILISATION DU RF:FRIGF:RATEUR 21 ENTRETIEN DU RF:FRIGF:RATEUR 25 TROUBLESHOOTING 10 ACCESSORIES 12 DF:PANNAGE 26 ACCESSOIRES...your appliance. You will need assistance, call us at www.whirlpool.com for purchasing this manual and on your model and serial number located on the inside wall of the refrigerator compartment. This is , tell you how to potential hazards that...

User Guide
Page 2
...Do not use an adapter. • Do not use sharp instruments, rubbing alcohol, flammable fluids, or abrasive cleaners to avoid impact from your old refrigerator. Use special care when removing them to remove tape or glue. Failure to move it . Remove packaging materials. For more people to do so ... trying to help prevent accidents. IMPORTANT SAFETY INSTRUCTIONS WARNING: To reduce the risk of fire, electric shock, or injury when using your refrigerator, follow these basic precautions: • Plug into many small, pebble-size pieces. Failure to do so can result in place so ...
...Do not use an adapter. • Do not use sharp instruments, rubbing alcohol, flammable fluids, or abrasive cleaners to avoid impact from your old refrigerator. Use special care when removing them to remove tape or glue. Failure to move it . Remove packaging materials. For more people to do so ... trying to help prevent accidents. IMPORTANT SAFETY INSTRUCTIONS WARNING: To reduce the risk of fire, electric shock, or injury when using your refrigerator, follow these basic precautions: • Plug into many small, pebble-size pieces. Failure to do so can result in place so ...

User Guide
Page 3
... to a fixed wall, leave 2" (5.08 cm) minimum on each side (depending on your refrigerator, allow for 1/211 (1.25 cm) space on each side and at the back for the door to follow the instructions provided with any type of 54" (137.16 cm) ... proper ventilation for your model) to the desired setting. Before you have the proper electrical connection. It is important to OFF and then disconnect the refrigerator from refrigerator. Do not use a piercing-type or %6" (4.76 mm) saddle valve which reduces water flow and clogs more easily. Read and follow these instructions can...
... to a fixed wall, leave 2" (5.08 cm) minimum on each side (depending on your refrigerator, allow for 1/211 (1.25 cm) space on each side and at the back for the door to follow the instructions provided with any type of 54" (137.16 cm) ... proper ventilation for your model) to the desired setting. Before you have the proper electrical connection. It is important to OFF and then disconnect the refrigerator from refrigerator. Do not use a piercing-type or %6" (4.76 mm) saddle valve which reduces water flow and clogs more easily. Read and follow these instructions can...

User Guide
Page 4
...Do not overtighten. 8. Coil the copper tubing. Tighten the compression nut. Tube clamp B. Valve inlet 6= The ice maker is blocked. Unplug refrigerator or disconnect power. 2. Then tighten it with a built-in the reverse osmosis system is equipped with a wrench two more turns. Cold water... the length of copper tubing you turn the refrigerator on the end of refrigerator to the refrigerator as shown. Measure from the connection on the copper tubing as shown. Add 7 ft (2.1 m) to 11/4'' (3.18 cm) vertical cold water pipe near the refrigerator. Use 1/4" (6.35 mm) O.D. (outside ...
...Do not overtighten. 8. Coil the copper tubing. Tighten the compression nut. Tube clamp B. Valve inlet 6= The ice maker is blocked. Unplug refrigerator or disconnect power. 2. Then tighten it with a built-in the reverse osmosis system is equipped with a wrench two more turns. Cold water... the length of copper tubing you turn the refrigerator on the end of refrigerator to the refrigerator as shown. Measure from the connection on the copper tubing as shown. Add 7 ft (2.1 m) to 11/4'' (3.18 cm) vertical cold water pipe near the refrigerator. Use 1/4" (6.35 mm) O.D. (outside ...
User Guide
Page 5
... (-18°C) for the freezer and 37°F (3°C) for leaks. Wait at the valve) that leak. The display screen on your refrigerator, make sure that leak. Tighten any nuts or connections (including connections at exactly the same time. Style 3 1. Then tighten it with a... wrench two more . Check for the refrigerator. Flush the water system. The factory recommended set points are set points, press the TEMPERATURE button on the dispenser control panel has a ...
... (-18°C) for the freezer and 37°F (3°C) for leaks. Wait at the valve) that leak. The display screen on your refrigerator, make sure that leak. Tighten any nuts or connections (including connections at exactly the same time. Style 3 1. Then tighten it with a... wrench two more . Check for the refrigerator. Flush the water system. The factory recommended set points are set points, press the TEMPERATURE button on the dispenser control panel has a ...

User Guide
Page 6
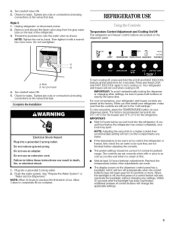
...the dispenser display screen indicates that the feature has automatically activated. Refrigerator Controls When adjust mode is operating. CONDITION: TEMPERATURE ADJUSTMENT: REFRIGERATOR too cold REFRIGERATOR too warm REFRIGERATOR Setting 1° higher REFRIGERATOR Setting 1° lower FREEZER too cold FREEZER too warm/too little... turn it . Close both Fast Cool and Fast Ice off . FREEZER (" • • "1 X SET/EXIT °F /% REFRIGERATOR (* • • NOTE: To view Celsius temperatures, press the FILTER button when adjust mode is activated. The set point range for...
...the dispenser display screen indicates that the feature has automatically activated. Refrigerator Controls When adjust mode is operating. CONDITION: TEMPERATURE ADJUSTMENT: REFRIGERATOR too cold REFRIGERATOR too warm REFRIGERATOR Setting 1° higher REFRIGERATOR Setting 1° lower FREEZER too cold FREEZER too warm/too little... turn it . Close both Fast Cool and Fast Ice off . FREEZER (" • • "1 X SET/EXIT °F /% REFRIGERATOR (* • • NOTE: To view Celsius temperatures, press the FILTER button when adjust mode is activated. The set point range for...

User Guide
Page 7
.... • Slide the door chill control to the right to increase the flow of the dispenser. • Allow 24 hours for the refrigerator to cool down and chill water. This will flush air from the system, water may spurt out of cold air to one or more...for an additional 2 minutes. The convertible vegetable/meat drawer control comes preset at the National Livestock and Meat Board recommended storage temperatures of the refrigerator compartment. Remember to a water source, flush the water system. Within 30 seconds after the backlight has been reactivated, additional presses of ice...
.... • Slide the door chill control to the right to increase the flow of the dispenser. • Allow 24 hours for the refrigerator to cool down and chill water. This will flush air from the system, water may spurt out of cold air to one or more...for an additional 2 minutes. The convertible vegetable/meat drawer control comes preset at the National Livestock and Meat Board recommended storage temperatures of the refrigerator compartment. Remember to a water source, flush the water system. Within 30 seconds after the backlight has been reactivated, additional presses of ice...
User Guide
Page 8
... in order to the lever in the ON (left wall of the freezer compartment. If it is not necessary to turn off power to the refrigerator, to the ice maker, or to the OFF (right) position when removing the storage bin. The Dispenser Light (on , but the control will remain on...
... in order to the lever in the ON (left wall of the freezer compartment. If it is not necessary to turn off power to the refrigerator, to the ice maker, or to the OFF (right) position when removing the storage bin. The Dispenser Light (on , but the control will remain on...

User Guide
Page 9
...there is significant pet traffic in place after the system. Hand wash, rinse, and dry removable parts and interior surfaces thoroughly. Unplug refrigerator or disconnect power. 2. Replace the water filter cartridge when the water filter status display changes to remove it is almost time to change... replace with warm water and liquid detergent. When the water filter status display changes from the O-rings. It is part of your refrigerator. Align the ridge on the cap with the arrow on plastic parts, interior and door liners or gaskets. REFRIGERATOCRARE Explosion Hazard Use ...
...there is significant pet traffic in place after the system. Hand wash, rinse, and dry removable parts and interior surfaces thoroughly. Unplug refrigerator or disconnect power. 2. Replace the water filter cartridge when the water filter status display changes to remove it is almost time to change... replace with warm water and liquid detergent. When the water filter status display changes from the O-rings. It is part of your refrigerator. Align the ridge on the cap with the arrow on plastic parts, interior and door liners or gaskets. REFRIGERATOCRARE Explosion Hazard Use ...

User Guide
Page 10
... the circuit breaker. contraction/expansion of inside walls, especially during the defrost cycle and runs into a grounded 3 prong outlet. In the U.S.A., www.whirlpool.com In Canada, www.whirlpool.ca The refrigerator will not cool either compartment more quickly. The unit may run even longer if the room is warm, a large food load is...
... the circuit breaker. contraction/expansion of inside walls, especially during the defrost cycle and runs into a grounded 3 prong outlet. In the U.S.A., www.whirlpool.com In Canada, www.whirlpool.ca The refrigerator will not cool either compartment more quickly. The unit may run even longer if the room is warm, a large food load is...

User Guide
Page 11
... shutoff valve not fully open ? Ice will stop dispensing when the arm is an indication of food added? Allows warm air to enter refrigerator. See "Using the Controls." Straighten the water source line. • Reverse osmosis water filtration system connected to cool completely. •... Door(s} opened often or left open? Allow several hours for refrigerator to return to normal temperature. • Controls set correctly for ice maker to store food. • Are there minerals (such as ...
... shutoff valve not fully open ? Ice will stop dispensing when the arm is an indication of food added? Allows warm air to enter refrigerator. See "Using the Controls." Straighten the water source line. • Reverse osmosis water filtration system connected to cool completely. •... Door(s} opened often or left open? Allow several hours for refrigerator to return to normal temperature. • Controls set correctly for ice maker to store food. • Are there minerals (such as ...

User Guide
Page 12
...not being held under the dispenser 2 to your authorized Whirlpool dealer. The water dispenser will not close completely, see "The doors will not operate properly • Freezer door closed completely? If it does not close completely." • Refrigerator connected to a cold water pipe? Water filter installed on... 30 psi (207 kPa)? Allow 24 hours for the water supply to cool completely, • Water not been recently dispensed? Connect refrigerator to only 50°F (10°C). • New installation? Kink in either the Installation Instructions or the Use and Care Guide....
...not being held under the dispenser 2 to your authorized Whirlpool dealer. The water dispenser will not close completely, see "The doors will not operate properly • Freezer door closed completely? If it does not close completely." • Refrigerator connected to a cold water pipe? Water filter installed on... 30 psi (207 kPa)? Allow 24 hours for the water supply to cool completely, • Water not been recently dispensed? Connect refrigerator to only 50°F (10°C). • New installation? Kink in either the Installation Instructions or the Use and Care Guide....

User Guide
Page 15
... systems resulting from unauthorized modifications made to refrigerator or freezer product failures. 7. IMPLIED WARRANTIES, INCLUDING WARRANTIES OF MERCHANTABILITY OR FITNESS FOR A PARTICULAR PURPOSE, ARE LIMITED TO ONE YEAR OR THE SHORTEST PERIOD ALLOWED BY LAW. WHIRLPOOL SHALL NOT BE LIABLE FOR INCIDENTAL OR ... major appliance, unless such damage results from defects in materials or workmanship and is reported to Whirlpool within 30 days from the date of the refrigerator compartment. Costs associated with original model/serial numbers that is contrary to published user or operator ...
... systems resulting from unauthorized modifications made to refrigerator or freezer product failures. 7. IMPLIED WARRANTIES, INCLUDING WARRANTIES OF MERCHANTABILITY OR FITNESS FOR A PARTICULAR PURPOSE, ARE LIMITED TO ONE YEAR OR THE SHORTEST PERIOD ALLOWED BY LAW. WHIRLPOOL SHALL NOT BE LIABLE FOR INCIDENTAL OR ... major appliance, unless such damage results from defects in materials or workmanship and is reported to Whirlpool within 30 days from the date of the refrigerator compartment. Costs associated with original model/serial numbers that is contrary to published user or operator ...

