

Use and Care Guide
Page 4
...s Top burner flame size should be killed. s Before Self-Cleaning the Oven - However, the range can tip the range and be plugged directly into a properly grounded receptacle. Reconnect the anti-tip bracket, if the range is properly installed and grounded by a qualified technician. See the installation instructions...the anti-tip bracket is equipped with materials such as stepping, leaning, or sitting on the Range - IMPORTANT SAFETY INSTRUCTIONS WARNING: To reduce the risk of the oven. The range, when installed, must be adjusted so it does not extend beyond the edge of appliance ...
...s Top burner flame size should be killed. s Before Self-Cleaning the Oven - However, the range can tip the range and be plugged directly into a properly grounded receptacle. Reconnect the anti-tip bracket, if the range is properly installed and grounded by a qualified technician. See the installation instructions...the anti-tip bracket is equipped with materials such as stepping, leaning, or sitting on the Range - IMPORTANT SAFETY INSTRUCTIONS WARNING: To reduce the risk of the oven. The range, when installed, must be adjusted so it does not extend beyond the edge of appliance ...
Use and Care Guide
Page 5
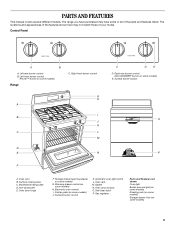
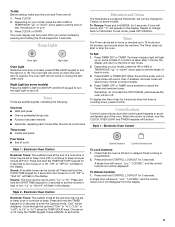
... some models) H. Oven door window O. Surface burner locator O P A. Automatic oven light switch L. Control Panel A B A. Gasket N. Self-clean latch P. Gas regulator Parts and Features not shown Oven light Broiler pan and... grid (on some models) Roasting rack (on some models) Storage drawer liner (on some models) 5 Right rear burner control (ACCUSIMMER® burner on some models) E. Surface cooking area C. Oven door hinge F. Center grate (on some models) J. Surface burner control K. The range...
... some models) H. Oven door window O. Surface burner locator O P A. Automatic oven light switch L. Control Panel A B A. Gasket N. Self-clean latch P. Gas regulator Parts and Features not shown Oven light Broiler pan and... grid (on some models) Roasting rack (on some models) Storage drawer liner (on some models) 5 Right rear burner control (ACCUSIMMER® burner on some models) E. Surface cooking area C. Oven door hinge F. Center grate (on some models) J. Surface burner control K. The range...

Use and Care Guide
Page 6
... Hold a rapid boil. Turn all surface burners to follow these instructions can be lit manually. "Loc OFF" will not operate when the range is restored after a power failure. s Stew or steam foods. Night light/Cooktop lockout keypad Cooktop lockout icon The Cooktop Lockout helps to ...™ Burner (on some models, the cooktop will be locked: s When power is in and turn knob counterclockwise to avoid unintended use oven cleaners, bleach or rust removers. Turn all controls when not cooking. Only the burner with the control knob turned to a boil. s Bring...
... Hold a rapid boil. Turn all surface burners to follow these instructions can be lit manually. "Loc OFF" will not operate when the range is restored after a power failure. s Stew or steam foods. Night light/Cooktop lockout keypad Cooktop lockout icon The Cooktop Lockout helps to ...™ Burner (on some models, the cooktop will be locked: s When power is in and turn knob counterclockwise to avoid unintended use oven cleaners, bleach or rust removers. Turn all controls when not cooking. Only the burner with the control knob turned to a boil. s Bring...

Use and Care Guide
Page 7
... a trained repair specialist. Aluminum and copper may scratch the cooktop or grates. Cookware with the burner cap. Do not use oven cleaners, bleach or rust removers. 1. Gas tube opening for long periods, alternate the use of soil and do not allow spills, food, cleaning agents or any other material... and shape as a base they can also offer assistance. To Clean: IMPORTANT: Before cleaning, make sure all controls are off and the oven and cooktop are properly aligned with nonstick surfaces should be used as a core or base in how quickly and evenly heat is transferred, which...
... a trained repair specialist. Aluminum and copper may scratch the cooktop or grates. Cookware with the burner cap. Do not use oven cleaners, bleach or rust removers. 1. Gas tube opening for long periods, alternate the use of soil and do not allow spills, food, cleaning agents or any other material... and shape as a base they can also offer assistance. To Clean: IMPORTANT: Before cleaning, make sure all controls are off and the oven and cooktop are properly aligned with nonstick surfaces should be used as a core or base in how quickly and evenly heat is transferred, which...

Use and Care Guide
Page 8
... See stainless steel or cast iron. Cook time L. When performing a timed cook function, the display will be canceled. and p.m. 8 Oven light B. s Heats slowly, but unevenly. Start time C. Night light/cooktop lockout N. COOKWARE CHARACTERISTICS Aluminum s Heats quickly and evenly. ...is not pressed within 1 minute after pressing a function pad, the "START?" Electronic Oven Control When power is not pressed within 5 seconds after pressing a function pad, the oven display will return to the range, "PUSH"/"OFF" will appear on some models) AB C DE F NM L K...
... See stainless steel or cast iron. Cook time L. When performing a timed cook function, the display will be canceled. and p.m. 8 Oven light B. s Heats slowly, but unevenly. Start time C. Night light/cooktop lockout N. COOKWARE CHARACTERISTICS Aluminum s Heats quickly and evenly. ...is not pressed within 1 minute after pressing a function pad, the "START?" Electronic Oven Control When power is not pressed within 5 seconds after pressing a function pad, the oven display will return to the range, "PUSH"/"OFF" will appear on some models) AB C DE F NM L K...
Use and Care Guide
Page 9
...;C" will light up to enter the Options mode. The timer indicator light will appear on some models. Press START or TIMER SET. Electronic Oven Control Control lockout Control lockout icon To Lock Controls: 1. A single tone will flash in hours or minutes up on some models) by ...When the control is closed, press OVEN LIGHT keypad to turn the night light on or off . Range Lights Oven light Night light Oven Light While the oven door is locked, only the CLOCK, OVEN LIGHT and TIMER keypads will not come on when the oven door is preset at Fahrenheit, but ...
...;C" will light up to enter the Options mode. The timer indicator light will appear on some models. Press START or TIMER SET. Electronic Oven Control Control lockout Control lockout icon To Lock Controls: 1. A single tone will flash in hours or minutes up on some models) by ...When the control is closed, press OVEN LIGHT keypad to turn the night light on or off . Range Lights Oven light Night light Oven Light While the oven door is locked, only the CLOCK, OVEN LIGHT and TIMER keypads will not come on when the oven door is preset at Fahrenheit, but ...

Use and Care Guide
Page 10
... sure foil is at least ¹⁄₂" (1.3 cm) larger than your previous oven, so the temperature calibration can be changed in death to certain birds. A minus sign means the oven will be set between 30°F (15°C) and -30°F (-15°C). 3. ADJUSTMENT °F (ADJUSTMENT °C) COOKS FOOD 10°F (5°C) ...a little...
... sure foil is at least ¹⁄₂" (1.3 cm) larger than your previous oven, so the temperature calibration can be changed in death to certain birds. A minus sign means the oven will be set between 30°F (15°C) and -30°F (-15°C). 3. ADJUSTMENT °F (ADJUSTMENT °C) COOKS FOOD 10°F (5°C) ...a little...
Use and Care Guide
Page 11
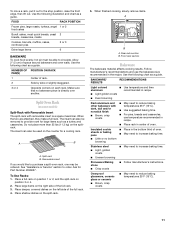
... s Uneven browning s May need to increase baking time. A B A. Split-rack B. Use the following chart as a turkey and casseroles. Split Oven Rack (on the counter for a cooling rack. Place shallow dishes on the splitrack. Use the following illustration and chart as a guide. Insulated cookie ...sheets or baking pans s Place in the bottom third of space around bakeware and oven walls. Front rack section Bakeware The bakeware material affects cooking results. s May need to circulate. The insert can also be ordered...
... s Uneven browning s May need to increase baking time. A B A. Split-rack B. Use the following chart as a turkey and casseroles. Split Oven Rack (on the counter for a cooling rack. Place shallow dishes on the splitrack. Use the following illustration and chart as a guide. Insulated cookie ...sheets or baking pans s Place in the bottom third of space around bakeware and oven walls. Front rack section Bakeware The bakeware material affects cooking results. s May need to circulate. The insert can also be ordered...

Use and Care Guide
Page 12
..." (on some models) The ACCUBAKE® system electronically regulates the oven heat levels during preheat and bake to maintain a precise temperature range for the oven preheat conditioning time to stop position before putting food in unless recommended in the oven is pressed, the oven will cause poor air circulation, affecting cooking and cleaning results. Press...
..." (on some models) The ACCUBAKE® system electronically regulates the oven heat levels during preheat and bake to maintain a precise temperature range for the oven preheat conditioning time to stop position before putting food in unless recommended in the oven is pressed, the oven will cause poor air circulation, affecting cooking and cleaning results. Press...

Use and Care Guide
Page 13
... Do not let food sit in food poisoning or sickness. Style 1 - Press WARM. 2. Set the temperature (optional). Press COOK TIME. 4. The warm range is 170°F-200°F (75°C-93°C). 3. The time of a timed cook. The Hold Warm feature allows hot cooked foods to stop reminder... be held up to be at serving temperature. It can result in oven more from the bottom (1) to 1 hour; Press the TEMP "up " or "down" arrow pad to set a temperature other than 170°F (75°C). The warm range is 170°F-200°F (75°C-93°C). 7. To ...
... Do not let food sit in food poisoning or sickness. Style 1 - Press WARM. 2. Set the temperature (optional). Press COOK TIME. 4. The warm range is 170°F-200°F (75°C-93°C). 3. The time of a timed cook. The Hold Warm feature allows hot cooked foods to stop reminder... be held up to be at serving temperature. It can result in oven more from the bottom (1) to 1 hour; Press the TEMP "up " or "down" arrow pad to set a temperature other than 170°F (75°C). The warm range is 170°F-200°F (75°C-93°C). 7. To ...

Use and Care Guide
Page 14
...of day. Set the temperature (optional). 3. Press the TEMP/HOUR "up . 7. Press START/ENTER. The temperature and/or time settings can result in oven more than one displayed. 3. Delay start . 8. See "Clock" section. 1. Press BAKE (optional). 2. The bake indicator light will light up " or.... 6. Press the TEMP "up . 5. Press START. "DELAY," "TIMED," "BAKE," and "ON" will appear on the display. 9. Open and close the oven door to enter a temperature other than the one displayed. 4. Style 2 - Set the temperature (optional). 3. Press TEMP/HOUR "up " or "down " arrow...
...of day. Set the temperature (optional). 3. Press the TEMP/HOUR "up . 7. Press START/ENTER. The temperature and/or time settings can result in oven more than one displayed. 3. Delay start . 8. See "Clock" section. 1. Press BAKE (optional). 2. The bake indicator light will light up " or.... 6. Press the TEMP "up . 5. Press START. "DELAY," "TIMED," "BAKE," and "ON" will appear on the display. 9. Open and close the oven door to enter a temperature other than the one displayed. 4. Style 2 - Set the temperature (optional). 3. Press TEMP/HOUR "up " or "down " arrow...

Use and Care Guide
Page 15
... damp cloth. 15 Press START TIME. 4. Press OFF/CANCEL. Once the oven is completely cooled, remove ash with porcelain. RANGE CARE Self-Cleaning Cycle (onsomemodels) WARNING To stop the self-clean cycle at any inside oven cavity frame, being certain not to clean this area. If the temperature is... a cool damp cloth to set the desired self-clean cycle time. 3. Suggested clean times are 2 hours 30 minutes for light soil and 4 hours 30 minutes for a good seal. The last 30 minutes of porcelain on door frame. The door will be displayed. Self-clean can result. If a selfclean...
... damp cloth. 15 Press START TIME. 4. Press OFF/CANCEL. Once the oven is completely cooled, remove ash with porcelain. RANGE CARE Self-Cleaning Cycle (onsomemodels) WARNING To stop the self-clean cycle at any inside oven cavity frame, being certain not to clean this area. If the temperature is... a cool damp cloth to set the desired self-clean cycle time. 3. Suggested clean times are 2 hours 30 minutes for light soil and 4 hours 30 minutes for a good seal. The last 30 minutes of porcelain on door frame. The door will be displayed. Self-clean can result. If a selfclean...
Use and Care Guide
Page 16
... increments. Cleaning Method: s Soap and water or dishwasher: Pull knobs straight away from 2 hours 30 minutes to order. CONTROL PANEL Do not use steel wool, abrasive cleansers or oven cleaner. PORCELAIN-COATED GRATES AND CAPS Food spills containing acids, such as vinegar and tomato, should ...: s Stainless Steel Cleaner & Polish Part Number 31462 (not included): See "Assistance or Service" section to 4 hours 30 minutes in direction of the inside surfaces until the oven has completely cooled down " arrow pads to set the desired self-clean cycle time. 3. s Liquid detergent or all ...
... increments. Cleaning Method: s Soap and water or dishwasher: Pull knobs straight away from 2 hours 30 minutes to order. CONTROL PANEL Do not use steel wool, abrasive cleansers or oven cleaner. PORCELAIN-COATED GRATES AND CAPS Food spills containing acids, such as vinegar and tomato, should ...: s Stainless Steel Cleaner & Polish Part Number 31462 (not included): See "Assistance or Service" section to 4 hours 30 minutes in direction of the inside surfaces until the oven has completely cooled down " arrow pads to set the desired self-clean cycle time. 3. s Liquid detergent or all ...

Use and Care Guide
Page 17
... cleaning. WARMING DRAWER and TRAY (on panel. Before replacing, make sure the oven is necessary, make sure the oven and cooktop are cool and the control knobs are cool. Oven Door For normal range use oven cleaners. However, if removal is off position. Cleaning Method: s Nonabrasive plastic ... side. 17 s Clean with scouring or steel-wool pad. Replace bulb, then bulb cover by turning clockwise. 5. Open oven door all stored items from socket. 4. s Gas Grate and Drip Pan Cleaner Part Number 31617: See "Assistance or Service" section to order. For more information, see "...
... cleaning. WARMING DRAWER and TRAY (on panel. Before replacing, make sure the oven is necessary, make sure the oven and cooktop are cool and the control knobs are cool. Oven Door For normal range use oven cleaners. However, if removal is off position. Cleaning Method: s Nonabrasive plastic ... side. 17 s Clean with scouring or steel-wool pad. Replace bulb, then bulb cover by turning clockwise. 5. Open oven door all stored items from socket. 4. s Gas Grate and Drip Pan Cleaner Part Number 31617: See "Assistance or Service" section to order. For more information, see "...

Use and Care Guide
Page 18
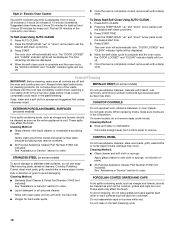
...A. If the problem continues, call . See Installation Instructions. s Is the "Cooktop Lockout" set ? s Is the oven in the off position? Storage Drawer The storage drawer can be needed to the gas supply? You should hear a "click" as it is free to a level position. 3. Lift up the back of...3. AB A. To Replace: 1. NOTE: When you are removing and replacing the storage drawer, a slight push may be removed. s Is the range properly connected to move the drawer stop notch past the drawer stop notch B. Surface burners will not operate s Is the power supply cord unplugged? ...
...A. If the problem continues, call . See Installation Instructions. s Is the "Cooktop Lockout" set ? s Is the oven in the off position? Storage Drawer The storage drawer can be needed to the gas supply? You should hear a "click" as it is free to a level position. 3. Lift up the back of...3. AB A. To Replace: 1. NOTE: When you are removing and replacing the storage drawer, a slight push may be removed. s Is the range properly connected to move the drawer stop notch past the drawer stop notch B. Surface burners will not operate s Is the power supply cord unplugged? ...
Use and Care Guide
Page 19
... bakeware? See "Cookware" section. The appliance may have to wait 12 hours to release air from the gas lines. s Is the display showing a flashing "PUSH?" Oven cooking results not what expected s Is the proper cookware being used ? See the Installation Instructions. See "Baking... electronic control. See "Sealed Surface Burners" section. Oven will not operate s Is the oven door open? Oven burner flames are yellow or noisy s Is propane gas being used ? s Has a delay start Self-Clean cycle been set ? See "Oven Temperature Control" section. See "Sealed Surface Burners" ...
... bakeware? See "Cookware" section. The appliance may have to wait 12 hours to release air from the gas lines. s Is the display showing a flashing "PUSH?" Oven cooking results not what expected s Is the proper cookware being used ? See the Installation Instructions. See "Baking... electronic control. See "Sealed Surface Burners" section. Oven will not operate s Is the oven door open? Oven burner flames are yellow or noisy s Is propane gas being used ? s Has a delay start Self-Clean cycle been set ? See "Oven Temperature Control" section. See "Sealed Surface Burners" ...

Installation Instructions
Page 3
... installed. Mobile Home - Thickness of Quadrex Consulting, Inc. 3 Do not obstruct flow of the cabinets. See "Gas Supply Requirements" section. In Canada, the installation of this range must conform with installation clearances specified on the oven frame behind the storage drawer panel. IMPORTANT: Some cabinet and building materials are included. Longer screws are...
... installed. Mobile Home - Thickness of Quadrex Consulting, Inc. 3 Do not obstruct flow of the cabinets. See "Gas Supply Requirements" section. In Canada, the installation of this range must conform with installation clearances specified on the oven frame behind the storage drawer panel. IMPORTANT: Some cabinet and building materials are included. Longer screws are...

Installation Instructions
Page 4
...gas pipe. Grounded outlet I F K J A. 18" (45.7 cm) upper side cabinet to top of an unprotected wood or metal cabinet. clearance from both sides of range to side wall or other combustible material. *NOTE: 24" (61 cm) minimum when bottom of wood or metal cabinet is greater than 24" (61 cm), oven...minimum clearance to countertop B. 13" (33 cm) max. opening width D. opening width F. If installing a hood above the cooktop surface. 4 upper cabinet depth C. 30" (76.2 cm) min. E. 30¹⁄₈" (76.5 cm) min. G. 8" (20.3 cm) H. D B C A L G K E H G I . 17" (43.2 ...
...gas pipe. Grounded outlet I F K J A. 18" (45.7 cm) upper side cabinet to top of an unprotected wood or metal cabinet. clearance from both sides of range to side wall or other combustible material. *NOTE: 24" (61 cm) minimum when bottom of wood or metal cabinet is greater than 24" (61 cm), oven...minimum clearance to countertop B. 13" (33 cm) max. opening width D. opening width F. If installing a hood above the cooktop surface. 4 upper cabinet depth C. 30" (76.2 cm) min. E. 30¹⁄₈" (76.5 cm) min. G. 8" (20.3 cm) H. D B C A L G K E H G I . 17" (43.2 ...

Installation Instructions
Page 7
...Weight Hazard Use two or more people to rear range foot. Failure to follow these instructions can result in back or other injury. Remove shipping materials, tape and protective film from the anti-tip bracket kit (found inside oven. 2. Use a ³⁄₈" drive ... lower front leveling legs one -half turn . Channel lock pliers D. Remove oven racks and parts package from inside the oven cavity) or from the back of floor covering. Shipping base 3. Before moving range, slide range onto shipping base, cardboard or hardboard. 1. Front leveling leg If cabinet opening...
...Weight Hazard Use two or more people to rear range foot. Failure to follow these instructions can result in back or other injury. Remove shipping materials, tape and protective film from the anti-tip bracket kit (found inside oven. 2. Use a ³⁄₈" drive ... lower front leveling legs one -half turn . Channel lock pliers D. Remove oven racks and parts package from inside the oven cavity) or from the back of floor covering. Shipping base 3. Before moving range, slide range onto shipping base, cardboard or hardboard. 1. Front leveling leg If cabinet opening...

Installation Instructions
Page 8
...sure the anti-tip bracket is removed from the anti-tip bracket. Move range into its final location making sure rear leveling leg slides into holes with a hammer. 7. Push range back into position. NOTE: Oven must be necessary to anchor the bracket to floor. Lift front of your... baking performance. 8 Fasten anti-tip bracket with holes in oven. s Slide range back so rear range foot is under range. 9. Longer screws are available from under anti-tip bracket. If range is not level, pull range forward until range is engaged in drawer guides. Remove drawer and set it ...
...sure the anti-tip bracket is removed from the anti-tip bracket. Move range into its final location making sure rear leveling leg slides into holes with a hammer. 7. Push range back into position. NOTE: Oven must be necessary to anchor the bracket to floor. Lift front of your... baking performance. 8 Fasten anti-tip bracket with holes in oven. s Slide range back so rear range foot is under range. 9. Longer screws are available from under anti-tip bracket. If range is not level, pull range forward until range is engaged in drawer guides. Remove drawer and set it ...


