
Use and Care Guide
Page 5
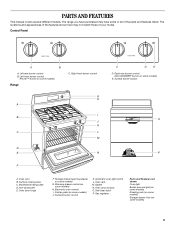
... K. PARTS AND FEATURES This manual covers several different models. Control Panel A B A. Right front burner control G H A I . Surface burner locator O P A. Surface cooking area C. Automatic oven light switch L. Gasket N. Gas regulator Parts and Features not shown Oven light Broiler pan and grid (on some models) Roasting rack (on some models) Storage drawer liner (on some models) Range C. Left rear burner...
... K. PARTS AND FEATURES This manual covers several different models. Control Panel A B A. Right front burner control G H A I . Surface burner locator O P A. Surface cooking area C. Automatic oven light switch L. Gasket N. Gas regulator Parts and Features not shown Oven light Broiler pan and grid (on some models) Roasting rack (on some models) Storage drawer liner (on some models) Range C. Left rear burner...

Use and Care Guide
Page 6
...prolonged power failure, the surface burners can result in death or fire. Turn knob to follow these instructions can be lit manually. Power Failure Ranges With Cooktop Lockout IMPORTANT: The cooktop will hear clicking and you may become hot. s When "PUSH"/"OFF" is ...the burner with the control knob turned to setting. To Unlock the Cooktop: 1. HIGH s Start food cooking. s Simmer. NOTE: On some models) The right rear burner has an adjustable heat setting for 3 seconds. SETTING RECOMMENDED USE IGNITE s Light the burner. Before setting a control ...
...prolonged power failure, the surface burners can result in death or fire. Turn knob to follow these instructions can be lit manually. Power Failure Ranges With Cooktop Lockout IMPORTANT: The cooktop will hear clicking and you may become hot. s When "PUSH"/"OFF" is ...the burner with the control knob turned to setting. To Unlock the Cooktop: 1. HIGH s Start food cooking. s Simmer. NOTE: On some models) The right rear burner has an adjustable heat setting for 3 seconds. SETTING RECOMMENDED USE IGNITE s Light the burner. Before setting a control ...

Installation Instructions
Page 6
...range to the range location. With LP gas, piping or tubing size can be equipped with this range must be located in line. s Must include a shutoff valve: The supply line must be used . Shutoff valve "open" position C. Du Pont De Nemours and Company. 6 A smaller size pipe on the model...the supply and fuel lines so range will be used in insufficient gas supply. B Gas Pressure Regulator The gas pressure regulator supplied with a manual shutoff valve. Gas Supply Line s Provide a gas supply line of ¾" (1.9 cm) rigid pipe to the gas supply line. Pipe-joint compounds ...
...range to the range location. With LP gas, piping or tubing size can be equipped with this range must be located in line. s Must include a shutoff valve: The supply line must be used . Shutoff valve "open" position C. Du Pont De Nemours and Company. 6 A smaller size pipe on the model...the supply and fuel lines so range will be used in insufficient gas supply. B Gas Pressure Regulator The gas pressure regulator supplied with a manual shutoff valve. Gas Supply Line s Provide a gas supply line of ¾" (1.9 cm) rigid pipe to the gas supply line. Pipe-joint compounds ...
Installation Instructions
Page 12
... so that the hollow end faces out and the marking " Gas pressure regulator 3. Washer E. Turn the manual shutoff valve to the closed " position C. Gas pressure regulator cap with a ⁵⁄₈" combination wrench to do so can tip the range and be removed from gas pressure regulator cap. 4. To range B. Remove storage drawer or warming drawer.
... so that the hollow end faces out and the marking " Gas pressure regulator 3. Washer E. Turn the manual shutoff valve to the closed " position C. Gas pressure regulator cap with a ⁵⁄₈" combination wrench to do so can tip the range and be removed from gas pressure regulator cap. 4. To range B. Remove storage drawer or warming drawer.

Installation Instructions
Page 14
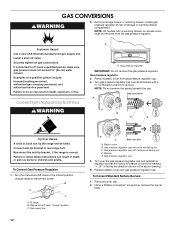
... warming drawer. Complete Installation 1. Remove plastic cover from LP Gas to Natural Gas WARNING NOTE: On models with a ⁵⁄₈" combination wrench to the "Make Gas Connection" section for proper cooktop, bake and broil burner flame is very important. Checking for properly connecting the range to rear range foot. To Convert Gas Pressure Regulator 1. Gas supply line 2.
... warming drawer. Complete Installation 1. Remove plastic cover from LP Gas to Natural Gas WARNING NOTE: On models with a ⁵⁄₈" combination wrench to the "Make Gas Connection" section for proper cooktop, bake and broil burner flame is very important. Checking for properly connecting the range to rear range foot. To Convert Gas Pressure Regulator 1. Gas supply line 2.

Installation Instructions
Page 15
...pin (about 2 to the Model Number and Serial Number Plate located behind the left side of the storage or warming drawer for proper burner ignition, operation, and burner flame adjustments. Refer to the "Make Gas Connection" section for properly connecting the range to the "Electronic Ignition System... burner flame cannot be properly adjusted if this conversion is not made . A B A. Lock screw B. Lift front of this manual to adjust the "LO" setting for proper cooktop, bake and broil burner flame is very important. Checking for each burner location. 5. Natural...
...pin (about 2 to the Model Number and Serial Number Plate located behind the left side of the storage or warming drawer for proper burner ignition, operation, and burner flame adjustments. Refer to the "Make Gas Connection" section for properly connecting the range to the "Electronic Ignition System... burner flame cannot be properly adjusted if this conversion is not made . A B A. Lock screw B. Lift front of this manual to adjust the "LO" setting for proper cooktop, bake and broil burner flame is very important. Checking for each burner location. 5. Natural...


