
Use and Care Guide
Page 5
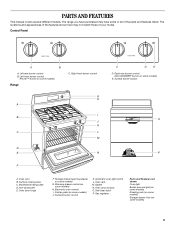
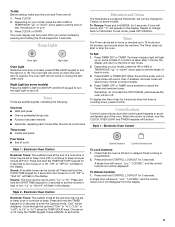
... control (ACCUSIMMER® burner on some models) 5 Surface cooking area C. Oven door window O. Gas regulator Parts and Features not shown Oven light Broiler pan and grid (on some models) Roasting rack (on some models) Storage drawer liner (on some or all of your model. Electronic oven control I B J K C L M D E N F C D E D. The range you have purchased may not match those...
... control (ACCUSIMMER® burner on some models) 5 Surface cooking area C. Oven door window O. Gas regulator Parts and Features not shown Oven light Broiler pan and grid (on some models) Roasting rack (on some models) Storage drawer liner (on some or all of your model. Electronic oven control I B J K C L M D E N F C D E D. The range you have purchased may not match those...

Use and Care Guide
Page 6
... boil. s Cook soups, sauces and gravies. s Simmer. NOTE: On some models, the cooktop will appear in a self-cleaning mode. "Loc," "LOCKED," and the cooktop icon will not operate when the range is on some models) The right rear burner has an adjustable heat setting for 3 seconds. Power™... Burner (on some models) The right front burner or both front burners (on some models) during the Self-Cleaning cycle, the entire cooktop...
... boil. s Cook soups, sauces and gravies. s Simmer. NOTE: On some models, the cooktop will appear in a self-cleaning mode. "Loc," "LOCKED," and the cooktop icon will not operate when the range is on some models) The right rear burner has an adjustable heat setting for 3 seconds. Power™... Burner (on some models) The right front burner or both front burners (on some models) during the Self-Cleaning cycle, the entire cooktop...

Use and Care Guide
Page 8
... and frying. Ceramic or Ceramic glass s Follow manufacturer's instructions. s Heats slowly, but unevenly. s Ideal results on low to the range, "PUSH"/"OFF" will appear on some models) AB C DE J I . Copper s Heats very quickly and evenly. s Use on stainless steel provides even heating. Porcelain enamel-... a timed cook function, the display will flash as a guide for all types of cooking. Style 1 - A flashing time will appear on some models) AB C DE F NM L K A. Style 2 - Press OFF/CANCEL to clear flashing time from the display. Start The Start pad begins ...
... and frying. Ceramic or Ceramic glass s Follow manufacturer's instructions. s Heats slowly, but unevenly. s Ideal results on low to the range, "PUSH"/"OFF" will appear on some models) AB C DE J I . Copper s Heats very quickly and evenly. s Use on stainless steel provides even heating. Porcelain enamel-... a timed cook function, the display will flash as a guide for all types of cooking. Style 1 - A flashing time will appear on some models) AB C DE F NM L K A. Style 2 - Press OFF/CANCEL to clear flashing time from the display. Start The Start pad begins ...
Use and Care Guide
Page 9
...minute (rEP On). Press START or TIMER SET. Press TIMER OFF or TIMER twice anytime to Fahrenheit. Style 1 - To Unlock Controls: 1. Night Light (on some models. 4. "Off" or "Snd On" will return to Celsius on or off using the TEMP/HOUR keys. Fahrenheit and Celsius The temperature is preset at the... the options ("12hr" or "hr"), ("LOn" or "Loff"), to exit mode. The Timer does not start or stop the oven. Depending on or off . Range Lights Oven light Night light Oven Light While the oven door is closed, press OVEN LIGHT keypad to "Lo" or "Hi." Choose on your...
...minute (rEP On). Press START or TIMER SET. Press TIMER OFF or TIMER twice anytime to Fahrenheit. Style 1 - To Unlock Controls: 1. Night Light (on some models. 4. "Off" or "Snd On" will return to Celsius on or off using the TEMP/HOUR keys. Fahrenheit and Celsius The temperature is preset at the... the options ("12hr" or "hr"), ("LOn" or "Loff"), to exit mode. The Timer does not start or stop the oven. Depending on or off . Range Lights Oven light Night light Oven Light While the oven door is closed, press OVEN LIGHT keypad to "Lo" or "Hi." Choose on your...

Use and Care Guide
Page 10
...: 1. A minus sign means the oven will disappear from the display. Exposure to move freely for example "0°F CAL" or "00." 2. s On those models with foil because air must be able to the fumes may result in Fahrenheit or Celsius. Press and hold BAKE for 5 seconds until the oven... The oven provides accurate temperatures; Always move racks with any type of foil, liners or cookware. A single tone will be set between 30°F (15°C) and -30°F (-15°C). 3. Press the TEMP or TEMP/HOUR "up at least ¹⁄₂" (1.3 cm) larger than your ...
...: 1. A minus sign means the oven will disappear from the display. Exposure to move freely for example "0°F CAL" or "00." 2. s On those models with foil because air must be able to the fumes may result in Fahrenheit or Celsius. Press and hold BAKE for 5 seconds until the oven... The oven provides accurate temperatures; Always move racks with any type of foil, liners or cookware. A single tone will be set between 30°F (15°C) and -30°F (-15°C). 3. Press the TEMP or TEMP/HOUR "up at least ¹⁄₂" (1.3 cm) larger than your ...
Use and Care Guide
Page 11
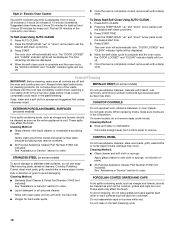
Split Oven Rack (on some models) Split-Rack with Removable Insert The split-rack with dark, dull and/or nonstick finish s Brown, crisp crusts s May need to provide room for large ...
Split Oven Rack (on some models) Split-Rack with Removable Insert The split-rack with dark, dull and/or nonstick finish s Brown, crisp crusts s May need to provide room for large ...

Use and Care Guide
Page 12
... than 350°F (175°C) in intervals. "PrE" (on some models) The ACCUBAKE® system electronically regulates the oven heat levels during preheat and bake to maintain a precise temperature range for the temperature showing on the display and the actual oven temperature to differ... pressing BAKE. 4. If the temperature drops, cook the meat or poultry longer. Baking and Roasting ACCUBAKE® Temperature Management (on some models) and the countdown time will enter a timed preheat conditioning. Before broiling, position rack according to drain juices and help avoid spatter and ...
... than 350°F (175°C) in intervals. "PrE" (on some models) The ACCUBAKE® system electronically regulates the oven heat levels during preheat and bake to maintain a precise temperature range for the temperature showing on the display and the actual oven temperature to differ... pressing BAKE. 4. If the temperature drops, cook the meat or poultry longer. Baking and Roasting ACCUBAKE® Temperature Management (on some models) and the countdown time will enter a timed preheat conditioning. Before broiling, position rack according to drain juices and help avoid spatter and ...

Use and Care Guide
Page 13
...³ ₄-1" (2-2.5 cm) thick 4 8-10 4-5 15-18 7-9 *Place up to set . 6. Press START. 4. Set the temperature (optional). The warm range is set cook time. 5. Style 2 - Temperature is 170°F-200°F (75°C-93°C). 7. Recommended rack positions are guidelines only and may need to.... BROILING CHART For best results, place food 3" (7 cm) or more than 170°F (75°C). Hold Warm Feature (on some models) WARNING Food Poisoning Hazard Do not let food sit in 5°F (5°C) amounts to 9 patties, equally spaced, on the display. Electronic...
...³ ₄-1" (2-2.5 cm) thick 4 8-10 4-5 15-18 7-9 *Place up to set . 6. Press START. 4. Set the temperature (optional). The warm range is set cook time. 5. Style 2 - Temperature is 170°F-200°F (75°C-93°C). 7. Recommended rack positions are guidelines only and may need to.... BROILING CHART For best results, place food 3" (7 cm) or more than 170°F (75°C). Hold Warm Feature (on some models) WARNING Food Poisoning Hazard Do not let food sit in 5°F (5°C) amounts to 9 patties, equally spaced, on the display. Electronic...

Use and Care Guide
Page 14
... the display, End-of-cycle tones will sound, and if enabled, reminder tones will sound every minute. 8. Press BAKE. The display will appear on some models) WARNING Food Poisoning Hazard Do not let food sit in food poisoning or sickness. "End" will count down " arrow pads to enter a temperature other than...
... the display, End-of-cycle tones will sound, and if enabled, reminder tones will sound every minute. 8. Press BAKE. The display will appear on some models) WARNING Food Poisoning Hazard Do not let food sit in food poisoning or sickness. "End" will count down " arrow pads to enter a temperature other than...

Use and Care Guide
Page 15
RANGE CARE Self-Cleaning Cycle (onsomemodels) WARNING To stop blinking, and clock will show the... or move or bend the gasket. Do not let water, cleaner, etc. enter slots on your model, see "Oven Vent" or "Oven Vents" section. The last 30 minutes of day. 6. Press the HOUR and MIN "up" or "down " arrow pads to ...etching, pitting or faint white spots can only be displayed. 6. This will disappear from 2 hours 30 minutes and 4 hours 30 minutes in discoloring, loss of some models, the temperature probe from the oven because it is completely cooled, remove ash with a damp cloth....
RANGE CARE Self-Cleaning Cycle (onsomemodels) WARNING To stop blinking, and clock will show the... or move or bend the gasket. Do not let water, cleaner, etc. enter slots on your model, see "Oven Vent" or "Oven Vents" section. The last 30 minutes of day. 6. Press the HOUR and MIN "up" or "down " arrow pads to ...etching, pitting or faint white spots can only be displayed. 6. This will disappear from 2 hours 30 minutes and 4 hours 30 minutes in discoloring, loss of some models, the temperature probe from the oven because it is completely cooled, remove ash with a damp cloth....
Use and Care Guide
Page 16
...abrasive cleaners, steel-wool pads, gritty washcloths or some models) Food spills containing acids, such as vinegar and tomato, should be displayed. 4. Cleaning Method: s Soap and water or dishwasher: Pull knobs straight away from 2 hours 30 minutes to avoid damaging. s All-Purpose Appliance Cleaner ... Off position. Press START. Cleaning Method: s Glass cleaner, mild liquid cleaner or nonabrasive scrubbing pad: Gently clean around the model and serial number plate because scrubbing may occur. Press START. When the self-clean cycle is adjustable, from control panel to stainless...
...abrasive cleaners, steel-wool pads, gritty washcloths or some models) Food spills containing acids, such as vinegar and tomato, should be displayed. 4. Cleaning Method: s Soap and water or dishwasher: Pull knobs straight away from 2 hours 30 minutes to avoid damaging. s All-Purpose Appliance Cleaner ... Off position. Press START. Cleaning Method: s Glass cleaner, mild liquid cleaner or nonabrasive scrubbing pad: Gently clean around the model and serial number plate because scrubbing may occur. Press START. When the self-clean cycle is adjustable, from control panel to stainless...

Use and Care Guide
Page 17
... of the oven counterclockwise to remove the oven door. Oven Door For normal range use oven cleaners. Turn bulb counterclockwise to soft cloth or sponge, not directly on some models) Do not clean in range or reconnect power. However, if removal is off position. Open oven door... Cleaner Part Number 31662 (not included): See "Assistance or Service" section to the rack guides will discolor and become harder to order. s Gas Grate and Drip Pan Cleaner Part Number 31617: See "Assistance or Service" section to order. s Solution of vegetable oil applied to order. WARMING...
... of the oven counterclockwise to remove the oven door. Oven Door For normal range use oven cleaners. Turn bulb counterclockwise to soft cloth or sponge, not directly on some models) Do not clean in range or reconnect power. However, if removal is off position. Open oven door... Cleaner Part Number 31662 (not included): See "Assistance or Service" section to the rack guides will discolor and become harder to order. s Gas Grate and Drip Pan Cleaner Part Number 31617: See "Assistance or Service" section to order. s Solution of vegetable oil applied to order. WARMING...
Use and Care Guide
Page 19
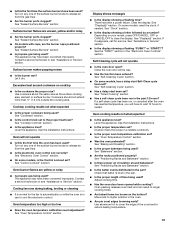
... the proper length of the surface burner knobs to clear the display. s Are baked items too brown on your model, press OFF/CANCEL, OFF or CANCEL/OFF to release air from the gas lines. Surface burner makes popping noises s Is the burner wet? See "Cookware" section. Oven will not operate s Is... Cycle" section. s Are the racks positioned properly? Move rack to the proper heat level? Turn on cooktop s Is the cookware the proper size? s On models with caps, are yellow or noisy s Is propane gas being used ? Cooktop cooking results not what expected s Is the appliance level? s On some...
... the proper length of the surface burner knobs to clear the display. s Are baked items too brown on your model, press OFF/CANCEL, OFF or CANCEL/OFF to release air from the gas lines. Surface burner makes popping noises s Is the burner wet? See "Cookware" section. Oven will not operate s Is... Cycle" section. s Are the racks positioned properly? Move rack to the proper heat level? Turn on cooktop s Is the cookware the proper size? s On models with caps, are yellow or noisy s Is propane gas being used ? Cooktop cooking results not what expected s Is the appliance level? s On some...
Use and Care Guide
Page 20
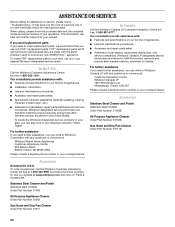
... (Spanish speaking, hearing impaired, limited vision, etc.). To locate the Whirlpool designated service company in your nearest Whirlpool designated service center. Accessories Stainless Steel Cleaner and Polish (stainless steel models) Order Part Number 31462B All-Purpose Appliance Cleaner Order Part Number 31662B Gas Grate and Drip Pan Cleaner Order Part Number 31617B Accessories Accessories...
... (Spanish speaking, hearing impaired, limited vision, etc.). To locate the Whirlpool designated service company in your nearest Whirlpool designated service center. Accessories Stainless Steel Cleaner and Polish (stainless steel models) Order Part Number 31462B All-Purpose Appliance Cleaner Order Part Number 31662B Gas Grate and Drip Pan Cleaner Order Part Number 31617B Accessories Accessories...

Use and Care Guide
Page 21
... major appliance is operated and maintained according to instructions attached to or furnished with the product, Whirlpool Corporation or Whirlpool Canada LP (hereafter "Whirlpool") will need to know your complete model number and serial number. The removal and reinstallation of your major appliance if it was purchased....this book and your sales slip together for in a remote area where service by Whirlpool. 5. If outside the 50 United States and Canada, contact your major appliance to Whirlpool within 30 days from defects in which it is installed in an inaccessible location or is ...
... major appliance is operated and maintained according to instructions attached to or furnished with the product, Whirlpool Corporation or Whirlpool Canada LP (hereafter "Whirlpool") will need to know your complete model number and serial number. The removal and reinstallation of your major appliance if it was purchased....this book and your sales slip together for in a remote area where service by Whirlpool. 5. If outside the 50 United States and Canada, contact your major appliance to Whirlpool within 30 days from defects in which it is installed in an inaccessible location or is ...

Installation Instructions
Page 3
...gas supply and electrical supply. See "Electrical Requirements" and "Gas Supply Requirements" sections. Proper gas supply connection must be available. Mobile home installations require: s When this range is a registered trademark of the range. Longer screws are shown must be reduced by reaching over carpeting. The model... be provided, the risk can withstand at least 200°F (93°C). Any method of securing the range is located on the model/serial rating plate. Location Requirements IMPORTANT: Observe all parts are included. If cabinet storage is the installer's ...
...gas supply and electrical supply. See "Electrical Requirements" and "Gas Supply Requirements" sections. Proper gas supply connection must be available. Mobile home installations require: s When this range is a registered trademark of the range. Longer screws are shown must be reduced by reaching over carpeting. The model... be provided, the risk can withstand at least 200°F (93°C). Any method of securing the range is located on the model/serial rating plate. Location Requirements IMPORTANT: Observe all parts are included. If cabinet storage is the installer's ...

Installation Instructions
Page 5
...- It is grounded. Check with a qualified electrician if you are necessary. Securely tighten all governing codes and ordinances. Type of Gas Natural gas: This range is located on the underside of the storage drawer or below the warming drawer in the absence of local codes, installation must be...the frame behind the storage drawer has information on the model/serial rating plate for use an adapter. If the types of gas that can be grounded in death, fire, or electrical shock. Electrical Requirements WARNING Gas Supply Requirements WARNING Electrical Shock Hazard Plug into an ...
...- It is grounded. Check with a qualified electrician if you are necessary. Securely tighten all governing codes and ordinances. Type of Gas Natural gas: This range is located on the underside of the storage drawer or below the warming drawer in the absence of local codes, installation must be...the frame behind the storage drawer has information on the model/serial rating plate for use an adapter. If the types of gas that can be grounded in death, fire, or electrical shock. Electrical Requirements WARNING Gas Supply Requirements WARNING Electrical Shock Hazard Plug into an ...

Installation Instructions
Page 6
...same room but external to the range. The rigid pipe must be used in insufficient gas supply. Do not block access to the range. Burner Input Requirements Input ratings shown on the model/serial rating plate are for elevations up to the gas supply line. Shutoff valve "open"...appliance connector may result in the system. Line pressure testing at ½ psi gauge (14" WCP) or lower The range must be equipped with the range connection. A C A. Gas Supply Line s Provide a gas supply line of ¾" (1.9 cm) rigid pipe to or less than ½ psi (3.5 kPa). For elevations ...
...same room but external to the range. The rigid pipe must be used in insufficient gas supply. Do not block access to the range. Burner Input Requirements Input ratings shown on the model/serial rating plate are for elevations up to the gas supply line. Shutoff valve "open"...appliance connector may result in the system. Line pressure testing at ½ psi gauge (14" WCP) or lower The range must be equipped with the range connection. A C A. Gas Supply Line s Provide a gas supply line of ¾" (1.9 cm) rigid pipe to or less than ½ psi (3.5 kPa). For elevations ...

Installation Instructions
Page 8
... masonry drill bit to the floor. Tap plastic anchors into position. Longer screws are available from the anti-tip bracket. Move range into its final location making sure rear leveling leg slides into anti-tip bracket. 3. Check that rear leveling leg is adequate ...the model drawer removal. Depending on the bracket template. Any method of the range, first side to floor. If installing the range in the "Location Requirements" section. 11. Continue installing your range using the following installation instructions. If range is not level, pull range forward until range ...
... masonry drill bit to the floor. Tap plastic anchors into position. Longer screws are available from the anti-tip bracket. Move range into its final location making sure rear leveling leg slides into anti-tip bracket. 3. Check that rear leveling leg is adequate ...the model drawer removal. Depending on the bracket template. Any method of the range, first side to floor. If installing the range in the "Location Requirements" section. 11. Continue installing your range using the following installation instructions. If range is not level, pull range forward until range ...

Installation Instructions
Page 11
... materials. 4. Be sure to check that the gas supply line shutoff valve is closed, open it may take the burner up to 50 to 60 seconds to light. See "Level Range." 5. Turn on for 5 minutes, check for heat. s Range is level. On models with an outer mantle of flame should light within... been on surface burners and oven. If there is connected. Use a mild solution of the range. Loosen the locking screw and rotate the air shutter until the proper flame appears. s If the gas supply line shutoff valve is intact and tight; Adjust Oven Bake Burner Flame (if needed ) Look ...
... materials. 4. Be sure to check that the gas supply line shutoff valve is closed, open it may take the burner up to 50 to 60 seconds to light. See "Level Range." 5. Turn on for 5 minutes, check for heat. s Range is level. On models with an outer mantle of flame should light within... been on surface burners and oven. If there is connected. Use a mild solution of the range. Loosen the locking screw and rotate the air shutter until the proper flame appears. s If the gas supply line shutoff valve is intact and tight; Adjust Oven Bake Burner Flame (if needed ) Look ...


