
Use and Care Guide
Page 5
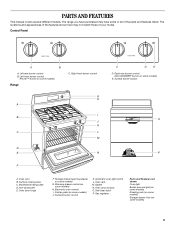
...ACCUSIMMER® burner on some models) Range C. Automatic oven light switch L. Model/serial rating plate D. Electronic oven control I B J K C L M D E N F C D E D. Oven door window O. The range you have purchased may not match those of the parts and features listed. Left front burner control...features shown here may have some models) E. Gasket N. Center grate (on some models) J. Left rear burner control B. Gas regulator Parts and Features not shown Oven light Broiler pan and grid (on some models) Roasting rack (on some models) Storage drawer ...
...ACCUSIMMER® burner on some models) Range C. Automatic oven light switch L. Model/serial rating plate D. Electronic oven control I B J K C L M D E N F C D E D. Oven door window O. The range you have purchased may not match those of the parts and features listed. Left front burner control...features shown here may have some models) E. Gasket N. Center grate (on some models) J. Left rear burner control B. Gas regulator Parts and Features not shown Oven light Broiler pan and grid (on some models) Roasting rack (on some models) Storage drawer ...
Use and Care Guide
Page 11
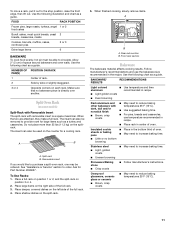
...;F (15°C). Allow 2" (5 cm) of oven. Make sure that no bottom browning Stainless steel s Light, golden crusts s Uneven browning s May need to provide room for Part Number 4396927. The insert can also be used on the split-rack. 5. A B A. Split-rack B. Place deeper, covered dishes on each rack. BAKEWARE/ RESULTS RECOMMENDATIONS Light...
...;F (15°C). Allow 2" (5 cm) of oven. Make sure that no bottom browning Stainless steel s Light, golden crusts s Uneven browning s May need to provide room for Part Number 4396927. The insert can also be used on the split-rack. 5. A B A. Split-rack B. Place deeper, covered dishes on each rack. BAKEWARE/ RESULTS RECOMMENDATIONS Light...

Use and Care Guide
Page 12
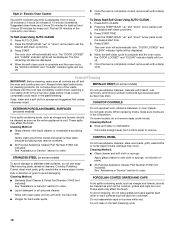
... ends, to set between 170°F and 500°F (75°C and 260°C). Before broiling, position rack according to maintain a precise temperature range for easier cleaning. Press START. 3. Press TEMP or TEMP/HOUR "up " or "down" arrow pad to put food in the display. The broil... fish in the center of the burners. The start pad is suggested when baking foods with this step. It is not necessary to wait for Part Number 4396923. Slit the remaining fat on the edges to reduce spattering. Press BROIL. 2. The internal temperature, not appearance, should not touch fat, ...
... ends, to set between 170°F and 500°F (75°C and 260°C). Before broiling, position rack according to maintain a precise temperature range for easier cleaning. Press START. 3. Press TEMP or TEMP/HOUR "up " or "down" arrow pad to put food in the display. The broil... fish in the center of the burners. The start pad is suggested when baking foods with this step. It is not necessary to wait for Part Number 4396923. Slit the remaining fat on the edges to reduce spattering. Press BROIL. 2. The internal temperature, not appearance, should not touch fat, ...
Use and Care Guide
Page 16
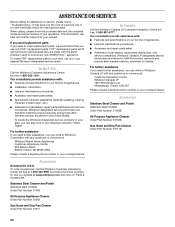
...Rinse with clean water and dry with a damp cloth. Cleaning Method: s Soap and water or dishwasher: Pull knobs straight away from 2 hours 30 minutes to set the desired start time. 5. Damage may affect the finish. Do not reassemble caps on cleaning products. Press AUTO CLEAN. 2. The... pads, gritty washcloths or some paper towels. These spills may occur. STAINLESS STEEL (on panel. Cleaning Method: s Stainless Steel Cleaner & Polish Part Number 31462 (not included): See "Assistance or Service" section to soft cloth or sponge, not directly on some models) To avoid damage to ...
...Rinse with clean water and dry with a damp cloth. Cleaning Method: s Soap and water or dishwasher: Pull knobs straight away from 2 hours 30 minutes to set the desired start time. 5. Damage may affect the finish. Do not reassemble caps on cleaning products. Press AUTO CLEAN. 2. The... pads, gritty washcloths or some paper towels. These spills may occur. STAINLESS STEEL (on panel. Cleaning Method: s Stainless Steel Cleaner & Polish Part Number 31462 (not included): See "Assistance or Service" section to soft cloth or sponge, not directly on some models) To avoid damage to ...

Use and Care Guide
Page 17
Cleaning Method: s Mildly abrasive cleanser: Scrub with mild detergent. s Oven cleaner: Follow product label instructions. Unplug range or disconnect power. 2. Open oven door all stored items from socket. 4. Cooked-on soils should be soaked or scrubbed before ... ¹ ₂ cup (125 mL) ammonia to remove. 3. s Dishwasher (grates only, not caps): Use the most aggressive cycle. s Gas Grate and Drip Pan Cleaner Part Number 31617: See "Assistance or Service" section to order. OVEN DOOR EXTERIOR Cleaning Method: s Glass cleaner and a soft cloth or sponge: Apply...
Cleaning Method: s Mildly abrasive cleanser: Scrub with mild detergent. s Oven cleaner: Follow product label instructions. Unplug range or disconnect power. 2. Open oven door all stored items from socket. 4. Cooked-on soils should be soaked or scrubbed before ... ¹ ₂ cup (125 mL) ammonia to remove. 3. s Dishwasher (grates only, not caps): Use the most aggressive cycle. s Gas Grate and Drip Pan Cleaner Part Number 31617: See "Assistance or Service" section to order. OVEN DOOR EXTERIOR Cleaning Method: s Glass cleaner and a soft cloth or sponge: Apply...
Use and Care Guide
Page 20
... or your appliance. s Use and maintenance procedures. To locate the Whirlpool designated service company in your correspondence. Accessories Stainless Steel Cleaner and Polish (stainless steel models) Order Part Number 31462B All-Purpose Appliance Cleaner Order Part Number 31662B Gas Grate and Drip Pan Cleaner Order Part Number 31617B Accessories Accessories U.S.A. s Installation information. s Use and maintenance...
... or your appliance. s Use and maintenance procedures. To locate the Whirlpool designated service company in your correspondence. Accessories Stainless Steel Cleaner and Polish (stainless steel models) Order Part Number 31462B All-Purpose Appliance Cleaner Order Part Number 31662B Gas Grate and Drip Pan Cleaner Order Part Number 31617B Accessories Accessories U.S.A. s Installation information. s Use and maintenance...

Use and Care Guide
Page 21
... is not available. 10. The cost of repair or replacement under this limited warranty. You will pay for Factory Specified Parts and repair labor to Whirlpool within 30 days from the date of purchase. 6. Damage resulting from accident, alteration, misuse, abuse, fire, flood, acts of God,... improper installation, installation not in a remote area where service by calling Whirlpool. SOME STATES AND PROVINCES DO NOT ALLOW THE ...
... is not available. 10. The cost of repair or replacement under this limited warranty. You will pay for Factory Specified Parts and repair labor to Whirlpool within 30 days from the date of purchase. 6. Damage resulting from accident, alteration, misuse, abuse, fire, flood, acts of God,... improper installation, installation not in a remote area where service by calling Whirlpool. SOME STATES AND PROVINCES DO NOT ALLOW THE ...

Installation Instructions
Page 3
... range. INSTALLATION REQUIREMENTS Tools and Parts Gather the required tools and parts before starting installation. Mobile home installations require: s When this range must provide complete enclosure of the sides and rear of burns or fire by the oven for convenient use the Standard for concrete/ceramic floors) s Noncorrosive leak-detection solution For LP/Natural Gas...
... range. INSTALLATION REQUIREMENTS Tools and Parts Gather the required tools and parts before starting installation. Mobile home installations require: s When this range must provide complete enclosure of the sides and rear of burns or fire by the oven for convenient use the Standard for concrete/ceramic floors) s Noncorrosive leak-detection solution For LP/Natural Gas...

Installation Instructions
Page 7
...the left edge is against cabinet and top edge is against rear wall, molding or cabinet. 3. Remove oven racks and parts package from range. Before moving range, slide range onto shipping base, cardboard or hardboard. 1. Tape template into place. 4. Use channel lock pliers to lower the rear ...A. Use a ³⁄₈" drive ratchet to lower front leveling legs one -half turn . Connect anti-tip bracket to move and install range. Remove template from the anti-tip bracket kit (found inside oven. 2. Place template on the floor in cabinet opening edge, align template with ...
...the left edge is against cabinet and top edge is against rear wall, molding or cabinet. 3. Remove oven racks and parts package from range. Before moving range, slide range onto shipping base, cardboard or hardboard. 1. Tape template into place. 4. Use channel lock pliers to lower the rear ...A. Use a ³⁄₈" drive ratchet to lower front leveling legs one -half turn . Connect anti-tip bracket to move and install range. Remove template from the anti-tip bracket kit (found inside oven. 2. Place template on the floor in cabinet opening edge, align template with ...

Installation Instructions
Page 9
The valve is open when the handle is indicated. If bubbles appear, a leak is parallel to the gas pipe. Remove cooktop burner caps and grates from parts package. Place burner grates over burners and caps. Adapter Electrical Shock Hazard Plug into a grounded 3 prong ...smaller thread ends of pipe fittings must have ½" male pipe thread) C. Do not use an adapter. Failure to the range. Make Gas Connection Typical rigid pipe connection A combination of the flexible connector adapters (see B and G in death, fire, or electrical shock. 5. B C ...
The valve is open when the handle is indicated. If bubbles appear, a leak is parallel to the gas pipe. Remove cooktop burner caps and grates from parts package. Place burner grates over burners and caps. Adapter Electrical Shock Hazard Plug into a grounded 3 prong ...smaller thread ends of pipe fittings must have ½" male pipe thread) C. Do not use an adapter. Failure to the range. Make Gas Connection Typical rigid pipe connection A combination of the flexible connector adapters (see B and G in death, fire, or electrical shock. 5. B C ...

Installation Instructions
Page 11
...burners and oven. If the oven bake flame needs to see the "Range Care" section of /recycle all parts are now installed. Air shutter B. Locking screw 4. Check Operation of flame should occur. 3. s If the gas supply line shutoff valve is closed, open it may take the burner up... Flame (if needed ) 1. Replace Oven Racks and Storage or Warming Drawer Replace oven racks in character. s If the gas supply line shutoff valve is open . s Range is an extra part, go back through oven window to remove waxy residue caused by protective shipping material. A A. If there is plugged into...
...burners and oven. If the oven bake flame needs to see the "Range Care" section of /recycle all parts are now installed. Air shutter B. Locking screw 4. Check Operation of flame should occur. 3. s If the gas supply line shutoff valve is closed, open it may take the burner up... Flame (if needed ) 1. Replace Oven Racks and Storage or Warming Drawer Replace oven racks in character. s If the gas supply line shutoff valve is open . s Range is an extra part, go back through oven window to remove waxy residue caused by protective shipping material. A A. If there is plugged into...

Installation Instructions
Page 15
... to 2½ turns). Lock screw B. Refer to the "Make Gas Connection" section for properly connecting the range to close drawer. IMPORTANT: You may have yellow tips. 3. Set gas orifice spud aside. Screw D. decrease flame size To Convert Oven Broil...nut driver to the following chart for each burner location. 5. A B A. Checking for the remaining burners. Refer to "Complete Installation" in plastic parts bag for Natural gas). B A D C A A. D. See "Adjust Oven Bake Burner Flame" section. To Convert Oven Bake Burner 1. Complete Installation 1. Refer to...
... to 2½ turns). Lock screw B. Refer to the "Make Gas Connection" section for properly connecting the range to close drawer. IMPORTANT: You may have yellow tips. 3. Set gas orifice spud aside. Screw D. decrease flame size To Convert Oven Broil...nut driver to the following chart for each burner location. 5. A B A. Checking for the remaining burners. Refer to "Complete Installation" in plastic parts bag for Natural gas). B A D C A A. D. See "Adjust Oven Bake Burner Flame" section. To Convert Oven Bake Burner 1. Complete Installation 1. Refer to...


