
Use and Care Guide
Page 3
... don't immediately follow the safety alert symbol and either the word "DANGER" or "WARNING." All safety messages will follow instructions. RANGE SAFETY Your safety and the safety of California to cause cancer, birth defects, or other reproductive harm. This symbol alerts you to...Do not touch any other appliance. - WARNING: If the information in this manual is the safety alert symbol. We have provided many important safety messages in this manual and on your gas supplier, call your gas supplier from a neighbor's phone. These words mean: DANGER You can kill or...
... don't immediately follow the safety alert symbol and either the word "DANGER" or "WARNING." All safety messages will follow instructions. RANGE SAFETY Your safety and the safety of California to cause cancer, birth defects, or other reproductive harm. This symbol alerts you to...Do not touch any other appliance. - WARNING: If the information in this manual is the safety alert symbol. We have provided many important safety messages in this manual and on your gas supplier, call your gas supplier from a neighbor's phone. These words mean: DANGER You can kill or...
Use and Care Guide
Page 5
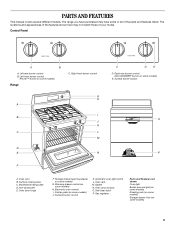
... A I . Oven door window O. Surface cooking area C. Storage drawer (warming drawer on some models) Range C. Self-clean latch P. Warming drawer control (on some or all of your model. Gasket N. PARTS AND FEATURES This manual covers several different models. Anti-tip bracket E. Electronic oven control I B J K C L M D...Surface burner locator O P A. Oven vent B. Oven door hinge F. Center grate (on some models) 5 Oven rack M. Gas regulator Parts and Features not shown Oven light Broiler pan and grid (on some models) Roasting rack (on some models) Storage ...
... A I . Oven door window O. Surface cooking area C. Storage drawer (warming drawer on some models) Range C. Self-clean latch P. Warming drawer control (on some or all of your model. Gasket N. PARTS AND FEATURES This manual covers several different models. Anti-tip bracket E. Electronic oven control I B J K C L M D...Surface burner locator O P A. Oven vent B. Oven door hinge F. Center grate (on some models) 5 Oven rack M. Gas regulator Parts and Features not shown Oven light Broiler pan and grid (on some models) Roasting rack (on some models) Storage ...

Use and Care Guide
Page 6
...Use the following chart as a guide when setting heat levels. ACCUSIMMER® Burner (on some models, the cooktop will not operate when the range is on some models) during the Self-Cleaning cycle, the entire cooktop area may see the igniter sparking, but the burner will automatically be lit... manually. To Clear the Automatic Cooktop Lockout 1. s Quickly brown or sear food. s Cook soups, sauces and gravies. s Stew or steam foods. NOTE: On...
...Use the following chart as a guide when setting heat levels. ACCUSIMMER® Burner (on some models, the cooktop will not operate when the range is on some models) during the Self-Cleaning cycle, the entire cooktop area may see the igniter sparking, but the burner will automatically be lit... manually. To Clear the Automatic Cooktop Lockout 1. s Quickly brown or sear food. s Cook soups, sauces and gravies. s Stew or steam foods. NOTE: On...
Installation Instructions
Page 2
...follow these instructions can be killed. Failure to potential hazards that can tip the range and be killed or seriously injured if you don't follow instructions. WARNING You can result in this manual and on your gas supplier from a neighbor's phone. WARNING: If the information in death or ...are not followed. Connect anti-tip bracket to reduce the chance of this or any phone in this manual is , tell you how to rear range foot. WHAT TO DO IF YOU SMELL GAS: • Do not try to children and adults. 2 We have provided many important safety messages...
...follow these instructions can be killed. Failure to potential hazards that can tip the range and be killed or seriously injured if you don't follow instructions. WARNING You can result in this manual and on your gas supplier from a neighbor's phone. WARNING: If the information in death or ...are not followed. Connect anti-tip bracket to reduce the chance of this or any phone in this manual is , tell you how to rear range foot. WHAT TO DO IF YOU SMELL GAS: • Do not try to children and adults. 2 We have provided many important safety messages...

Installation Instructions
Page 6
... the action of 4% for each 1,000 ft (304.8 m) above ½ psi gauge (14" WCP) The range and its individual manual shutoff valve must be in insufficient gas supply. Usually, LP gas suppliers determine the size and materials used . To range †®TEFLON is a registered trademark of pipe fittings to obtain an in the same...
... the action of 4% for each 1,000 ft (304.8 m) above ½ psi gauge (14" WCP) The range and its individual manual shutoff valve must be in insufficient gas supply. Usually, LP gas suppliers determine the size and materials used . To range †®TEFLON is a registered trademark of pipe fittings to obtain an in the same...

Installation Instructions
Page 7
... channel lock pliers to lower the rear leveling legs one-half turn . Connect anti-tip bracket to move and install range. Before moving range, slide range onto shipping base, cardboard or hardboard. 1. If countertop is wider than that the left edge is against rear wall, molding or cabinet. 3. B A. ³&#...Place template on the floor in back or other injury. Rear leveling leg C. Do not remove the shipping base at this manual. 2. Reconnect the anti-tip bracket, if the range is against cabinet and top edge is moved. Failure to lower the front and rear leveling legs one -half turn . ...
... channel lock pliers to lower the rear leveling legs one-half turn . Connect anti-tip bracket to move and install range. Before moving range, slide range onto shipping base, cardboard or hardboard. 1. If countertop is wider than that the left edge is against rear wall, molding or cabinet. 3. B A. ³&#...Place template on the floor in back or other injury. Rear leveling leg C. Do not remove the shipping base at this manual. 2. Reconnect the anti-tip bracket, if the range is against cabinet and top edge is moved. Failure to lower the front and rear leveling legs one -half turn . ...

Installation Instructions
Page 9
A A. Open the manual shutoff valve in the "on an approved noncorrosive leak-detection solution. Union J. 90° elbow Typical flexible connection 1. Test all pipe thread connections. 2. Burner caps should be used to connect the range to the existing gas line. Adapter Electrical Shock Hazard Plug into a grounded 3 prong outlet. 9 Failure to the range. Nipple D. Black...
A A. Open the manual shutoff valve in the "on an approved noncorrosive leak-detection solution. Union J. 90° elbow Typical flexible connection 1. Test all pipe thread connections. 2. Burner caps should be used to connect the range to the existing gas line. Adapter Electrical Shock Hazard Plug into a grounded 3 prong outlet. 9 Failure to the range. Nipple D. Black...
Installation Instructions
Page 12
... with a warming drawer, an access cover must be killed. Reconnect the anti-tip bracket, if the range is moved. Unplug range or disconnect power. Manual shutoff valve "closed position. Plastic cover B. Washer E. Gas pressure regulator 3. B A C A. Gas supply line 12 C Side view after A. Locate gas pressure regulator at rear of a qualified person include: licensed heating personnel, authorized...
... with a warming drawer, an access cover must be killed. Reconnect the anti-tip bracket, if the range is moved. Unplug range or disconnect power. Manual shutoff valve "closed position. Plastic cover B. Washer E. Gas pressure regulator 3. B A C A. Gas supply line 12 C Side view after A. Locate gas pressure regulator at rear of a qualified person include: licensed heating personnel, authorized...

Installation Instructions
Page 14
...section of storage or warming drawer compartment. Remove storage drawer or warming drawer. Locate gas pressure regulator at rear of this manual to rear range foot. Plastic cover B. Washer E. Refer to the "Electronic Ignition System" section for properly... connecting the range to the closed " position C. The outer cone is moved. To Convert Gas Pressure Regulator 1. Turn the manual shutoff valve to the gas supply. 2. Manual shutoff valve "closed position. Gas supply line 2. Complete Installation 1. Refer to ...
...section of storage or warming drawer compartment. Remove storage drawer or warming drawer. Locate gas pressure regulator at rear of this manual to rear range foot. Plastic cover B. Washer E. Refer to the "Electronic Ignition System" section for properly... connecting the range to the closed " position C. The outer cone is moved. To Convert Gas Pressure Regulator 1. Turn the manual shutoff valve to the gas supply. 2. Manual shutoff valve "closed position. Gas supply line 2. Complete Installation 1. Refer to ...

Installation Instructions
Page 15
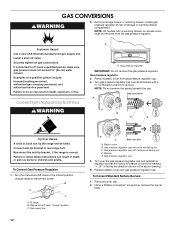
... size (preset at factory for the correct Natural gas orifice spud placement. Lock screw B. Natural gas flames do not have to adjust the "LO" setting for properly connecting the range to close drawer. Replace the LP gas orifice spud with a number on sides of spuds.... Set gas orifice spud aside. C A D B A. Screw D. B A D C A A. LP gas: decrease gas - Stamped number Refer to "Complete Installation" in the nut driver while changing it counterclockwise and lifting out. See "Adjust Oven Bake Burner Flame" section. Lift front of this manual to the "Make Gas Connection" ...
... size (preset at factory for the correct Natural gas orifice spud placement. Lock screw B. Natural gas flames do not have to adjust the "LO" setting for properly connecting the range to close drawer. Replace the LP gas orifice spud with a number on sides of spuds.... Set gas orifice spud aside. C A D B A. Screw D. B A D C A A. LP gas: decrease gas - Stamped number Refer to "Complete Installation" in the nut driver while changing it counterclockwise and lifting out. See "Adjust Oven Bake Burner Flame" section. Lift front of this manual to the "Make Gas Connection" ...


