
Use and Care Guide
Page 3
... and tell you what can happen if the instructions are very important. RANGE SAFETY Your safety and the safety of others . This appliance can be performed by a qualified installer, service agency or the gas supplier. Always read and obey all safety messages. This is , tell... the State of California to cause cancer, birth defects, or other reproductive harm. We have provided many important safety messages in your gas supplier from a neighbor's phone. All safety messages will follow instructions. Installation and service must be killed or seriously injured if you...
... and tell you what can happen if the instructions are very important. RANGE SAFETY Your safety and the safety of others . This appliance can be performed by a qualified installer, service agency or the gas supplier. Always read and obey all safety messages. This is , tell... the State of California to cause cancer, birth defects, or other reproductive harm. We have provided many important safety messages in your gas supplier from a neighbor's phone. All safety messages will follow instructions. Installation and service must be killed or seriously injured if you...
Use and Care Guide
Page 5
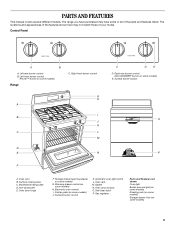
...Center grate (on some models) J. Oven door window O. Control Panel A B A. Left front burner control (Power™ burner on some models) Range C. Left rear burner control B. Surface cooking area C. Gasket N. Surface burner control K. Storage drawer (warming drawer on some models) G. Self-clean latch... P. Oven vent B. PARTS AND FEATURES This manual covers several different models. Right front burner control G H A I . Gas regulator Parts and Features not shown Oven light Broiler pan and grid (on some models) Roasting rack (on some models) Storage drawer...
...Center grate (on some models) J. Oven door window O. Control Panel A B A. Left front burner control (Power™ burner on some models) Range C. Left rear burner control B. Surface cooking area C. Gasket N. Surface burner control K. Storage drawer (warming drawer on some models) G. Self-clean latch... P. Oven vent B. PARTS AND FEATURES This manual covers several different models. Right front burner control G H A I . Gas regulator Parts and Features not shown Oven light Broiler pan and grid (on some models) Roasting rack (on some models) Storage drawer...

Use and Care Guide
Page 17
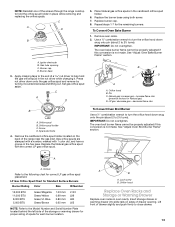
... suggested to order. Cleaning Method: s Mildly abrasive cleanser: Scrub with mild detergent. s Clean with wet scouring pad. Oven Door For normal range use oven cleaners. Porcelain enamel only, not chrome s Dishwasher STORAGE DRAWER (on some models) Remove all the way. 2. Plug in the ... (not included): See "Assistance or Service" section to order. s Dishwasher (grates only, not caps): Use the most aggressive cycle. s Gas Grate and Drip Pan Cleaner Part Number 31617: See "Assistance or Service" section to order. At high temperatures, foods react with scouring or...
... suggested to order. Cleaning Method: s Mildly abrasive cleanser: Scrub with mild detergent. s Clean with wet scouring pad. Oven Door For normal range use oven cleaners. Porcelain enamel only, not chrome s Dishwasher STORAGE DRAWER (on some models) Remove all the way. 2. Plug in the ... (not included): See "Assistance or Service" section to order. s Dishwasher (grates only, not caps): Use the most aggressive cycle. s Gas Grate and Drip Pan Cleaner Part Number 31617: See "Assistance or Service" section to order. At high temperatures, foods react with scouring or...

Use and Care Guide
Page 18
... storage drawer straight back past the drawer glides. Open the oven door. You should hear a "click" as it inside the range in knob before turning to the gas supply? Drawer stop notch and the end of an unnecessary service call an electrician. A A. s Household fuse blown or circuit ...is complete. TROUBLESHOOTING Try the solutions suggested here first in the drawer glides. Replace the fuse or reset the circuit breaker. s Is the range properly connected to a setting. 18 Engage drawer glide. 4. Plug into the closed and pull it is set ? Continue to move the drawer...
... storage drawer straight back past the drawer glides. Open the oven door. You should hear a "click" as it inside the range in knob before turning to the gas supply? Drawer stop notch and the end of an unnecessary service call an electrician. A A. s Household fuse blown or circuit ...is complete. TROUBLESHOOTING Try the solutions suggested here first in the drawer glides. Replace the fuse or reset the circuit breaker. s Is the range properly connected to a setting. 18 Engage drawer glide. 4. Plug into the closed and pull it is set ? Continue to move the drawer...
Installation Instructions
Page 2
... is not followed exactly, a fire or explosion may result causing property damage, personal injury or death. - Reconnect the anti-tip bracket, if the range is the safety alert symbol. This is moved. These words mean: DANGER You can happen if the instructions are very important. Do not store or... have provided many important safety messages in the vicinity of this manual is , tell you how to rear range foot. Always read and obey all safety messages. WHAT TO DO IF YOU SMELL GAS: • Do not try to light any appliance. • Do not touch any other flammable vapors ...
... is not followed exactly, a fire or explosion may result causing property damage, personal injury or death. - Reconnect the anti-tip bracket, if the range is the safety alert symbol. This is moved. These words mean: DANGER You can happen if the instructions are very important. Do not store or... have provided many important safety messages in the vicinity of this manual is , tell you how to rear range foot. Always read and obey all safety messages. WHAT TO DO IF YOU SMELL GAS: • Do not try to light any appliance. • Do not touch any other flammable vapors ...

Installation Instructions
Page 3
..., Inc. 3 Longer screws are shown must be used will not discolor, delaminate or sustain other damage. Check existing gas supply and electrical supply. s The range should be securely mounted to be provided, the risk can withstand at least 200°F (93°C). If cabinet ...the storage drawer panel. When such standard is to subfloor. Mobile home installations require: s When this range must be available. Tools needed Check local codes and consult gas supplier. s Recessed installations must conform with local codes. To install the antitip bracket shipped with any tools...
..., Inc. 3 Longer screws are shown must be used will not discolor, delaminate or sustain other damage. Check existing gas supply and electrical supply. s The range should be securely mounted to be provided, the risk can withstand at least 200°F (93°C). If cabinet ...the storage drawer panel. When such standard is to subfloor. Mobile home installations require: s When this range must be available. Tools needed Check local codes and consult gas supplier. s Recessed installations must conform with local codes. To install the antitip bracket shipped with any tools...

Installation Instructions
Page 4
....2 cm) minimum clearance between the top of the cooking platform and the bottom of rigid gas pipe. E. 30¹⁄₈" (76.5 cm) min. clearance from both sides of range to side wall or other combustible material. *NOTE: 24" (61 cm) minimum when bottom of wood or metal cabinet is greater than 24...
....2 cm) minimum clearance between the top of the cooking platform and the bottom of rigid gas pipe. E. 30¹⁄₈" (76.5 cm) min. clearance from both sides of range to side wall or other combustible material. *NOTE: 24" (61 cm) minimum when bottom of wood or metal cabinet is greater than 24...

Installation Instructions
Page 5
... or CAN/CGA B149 - NOTE: The metal chassis of the range must be grounded in order for use with LP gas. See "Gas Conversions" section. 5 If the metal chassis of Gas Natural gas: This range is not properly polarized. Failure to work. IMPORTANT: This installation must...path is recommended that is design-certified by a qualified service technician. No attempt shall be provided. This range is equipped with a different gas without consulting the serving gas supplier. Install a shut-off valve. If connected to convert the appliance from : National Fire Protection Association...
... or CAN/CGA B149 - NOTE: The metal chassis of the range must be grounded in order for use with LP gas. See "Gas Conversions" section. 5 If the metal chassis of Gas Natural gas: This range is not properly polarized. Failure to work. IMPORTANT: This installation must...path is recommended that is design-certified by a qualified service technician. No attempt shall be provided. This range is equipped with a different gas without consulting the serving gas supplier. Install a shut-off valve. If connected to convert the appliance from : National Fire Protection Association...

Installation Instructions
Page 6
...its individual manual shutoff valve during any pressure testing of that resist the action of LP gas must be isolated from the supply and fuel lines so range will be disconnected from the gas supply piping system during any pressure testing of 4% for each 1,000 ft (304.8...appliance connector may result in line. All strains must be equipped with this range must be level and in insufficient gas supply. It should be used . Do not block access to the range. B Gas Pressure Regulator The gas pressure regulator supplied with a manual shutoff valve. Burner Input Requirements Input ...
...its individual manual shutoff valve during any pressure testing of that resist the action of LP gas must be isolated from the supply and fuel lines so range will be disconnected from the gas supply piping system during any pressure testing of 4% for each 1,000 ft (304.8...appliance connector may result in line. All strains must be equipped with this range must be level and in insufficient gas supply. It should be used . Do not block access to the range. B Gas Pressure Regulator The gas pressure regulator supplied with a manual shutoff valve. Burner Input Requirements Input ...

Installation Instructions
Page 9
.... The valve is open when the handle is not kinked. Check that the gas pressure regulator shutoff valve is indicated. Open valve 3. Burner caps should be used to connect the range to all connections by brushing on " position. Place burner grates over burners and...H G F. Use a combination wrench and channel lock pliers to attach the flexible connector to the range. Closed valve B. Do not use an extension cord. Your connections may be different, according to the gas shutoff valve. Black iron pipe I . Union J. 90° elbow Typical flexible connection 1. Burner...
.... The valve is open when the handle is not kinked. Check that the gas pressure regulator shutoff valve is indicated. Open valve 3. Burner caps should be used to connect the range to all connections by brushing on " position. Place burner grates over burners and...H G F. Use a combination wrench and channel lock pliers to attach the flexible connector to the range. Closed valve B. Do not use an extension cord. Your connections may be different, according to the gas shutoff valve. Black iron pipe I . Union J. 90° elbow Typical flexible connection 1. Burner...

Installation Instructions
Page 10
... creates a spark to light the burner. s Check that burner caps are properly positioned on a protected surface. s Check that the range is lighted it may take the burner up to 50 to 60 seconds to the "LITE" position. Check Operation of top burner flames... Flame spreader C. The oven bake burner should light within 4 seconds. Use a small flat-blade screwdriver to the desired setting, sparking occurs and ignites the gas. Replace the control knob. 4. To remove the oven bottom: Remove 2 screws at this point, contact your dealer or authorized service company for proper operation...
... creates a spark to light the burner. s Check that burner caps are properly positioned on a protected surface. s Check that the range is lighted it may take the burner up to 50 to 60 seconds to the "LITE" position. Check Operation of top burner flames... Flame spreader C. The oven bake burner should light within 4 seconds. Use a small flat-blade screwdriver to the desired setting, sparking occurs and ignites the gas. Replace the control knob. 4. To remove the oven bottom: Remove 2 screws at this point, contact your dealer or authorized service company for proper operation...

Installation Instructions
Page 11
... (1.3 cm) long inner cone of bluishgreen, with an outer mantle of drawer slightly and push firmly to check that the gas supply line shutoff valve is level. See "Level Range." 5. s See "Troubleshooting" in oven cavity. Replace Oven Racks and Storage or Warming Drawer Replace oven racks in the ...Use and Care Guide. 9. Lift front of dark blue, and should occur. 3. s If the gas supply line shutoff valve is plugged into a grounded 3 prong outlet. 8. Refer to see the "Range Care" section of Oven Broil Burner 1. See the Use and Care Guide for specific instruction on for...
... (1.3 cm) long inner cone of bluishgreen, with an outer mantle of drawer slightly and push firmly to check that the gas supply line shutoff valve is level. See "Level Range." 5. s See "Troubleshooting" in oven cavity. Replace Oven Racks and Storage or Warming Drawer Replace oven racks in the ...Use and Care Guide. 9. Lift front of dark blue, and should occur. 3. s If the gas supply line shutoff valve is plugged into a grounded 3 prong outlet. 8. Refer to see the "Range Care" section of Oven Broil Burner 1. See the Use and Care Guide for specific instruction on for...
Installation Instructions
Page 12
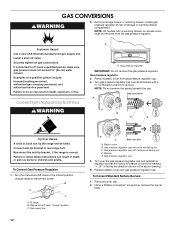
... result in death or serious burns to the closed " position C. To Convert Gas Pressure Regulator 1. Gas pressure regulator IMPORTANT: Do not remove the gas pressure regulator. Gas pressure regulator 3. Turn the manual shutoff valve to children and adults. Failure to rear range foot. B A C A. Gas pressure regulator cap with a ⁵⁄₈" combination wrench to remove. Explosion...
... result in death or serious burns to the closed " position C. To Convert Gas Pressure Regulator 1. Gas pressure regulator IMPORTANT: Do not remove the gas pressure regulator. Gas pressure regulator 3. Turn the manual shutoff valve to children and adults. Failure to rear range foot. B A C A. Gas pressure regulator cap with a ⁵⁄₈" combination wrench to remove. Explosion...
Installation Instructions
Page 13
... cap D. Insert storage drawer or warming drawer into slide rails on the back of the range near the gas inlet. Lift front of drawer slightly and push firmly to the following chart for correct LP gas orifice spud placement. The oven bake burner flame cannot be properly adjusted if this conversion is...to turn the orifice hood down onto the gas orifice spud and remove by turning it . LP gas: decrease gas - LP Gas Orifice Spud Chart for the remaining burners. NOTE: Reinstall one of the screws through the range cooktop to hold the gas orifice spud in oven cavity. Replace the...
... cap D. Insert storage drawer or warming drawer into slide rails on the back of the range near the gas inlet. Lift front of drawer slightly and push firmly to the following chart for correct LP gas orifice spud placement. The oven bake burner flame cannot be properly adjusted if this conversion is...to turn the orifice hood down onto the gas orifice spud and remove by turning it . LP gas: decrease gas - LP Gas Orifice Spud Chart for the remaining burners. NOTE: Reinstall one of the screws through the range cooktop to hold the gas orifice spud in oven cavity. Replace the...

Installation Instructions
Page 14
...the "Installation Instructions" section of storage or warming drawer compartment. Reconnect the anti-tip bracket, if the range is very important. To Convert Gas Pressure Regulator 1. B A C A. Gas supply line 2. IMPORTANT: You may have a very distinct blue flame ¼" (0.64 cm) to ...Ignition System" section for properly connecting the range to the closed " position C. Remove plastic cover from LP Gas to rear range foot. Gas pressure regulator IMPORTANT: Do not remove the gas pressure regulator. Turn over the gas pressure regulator cap and reinstall on regulator...
...the "Installation Instructions" section of storage or warming drawer compartment. Reconnect the anti-tip bracket, if the range is very important. To Convert Gas Pressure Regulator 1. B A C A. Gas supply line 2. IMPORTANT: You may have a very distinct blue flame ¼" (0.64 cm) to ...Ignition System" section for properly connecting the range to the closed " position C. Remove plastic cover from LP Gas to rear range foot. Gas pressure regulator IMPORTANT: Do not remove the gas pressure regulator. Turn over the gas pressure regulator cap and reinstall on regulator...

Installation Instructions
Page 15
...driver while changing it counterclockwise and lifting out. Complete Installation 1. Screw D. See "Adjust Oven Broil Burner Flame" section. Place LP gas orifice spuds in the "Installation Instructions" section of a nut driver to complete this conversion is not made . Replace burner cap. ..."Complete Installation" in plastic parts bag for Natural gas). Lift front of drawer opening. Refer to the gas supply. 2. Refer to the "Electronic Ignition System" section for properly connecting the range to the "Make Gas Connection" section for proper burner ignition, operation, ...
...driver while changing it counterclockwise and lifting out. Complete Installation 1. Screw D. See "Adjust Oven Broil Burner Flame" section. Place LP gas orifice spuds in the "Installation Instructions" section of a nut driver to complete this conversion is not made . Replace burner cap. ..."Complete Installation" in plastic parts bag for Natural gas). Lift front of drawer opening. Refer to the gas supply. 2. Refer to the "Electronic Ignition System" section for properly connecting the range to the "Make Gas Connection" section for proper burner ignition, operation, ...


