

Use and Care Guide
Page 6
... to anywhere between HIGH and LOW. To Set: 1. All 4 surface burners will produce a flame. 2. SETTING RECOMMENDED USE IGNITE s Light the burner. Power Failure Ranges With Cooktop Lockout IMPORTANT: The cooktop will appear in death or fire. To Clear the Automatic Cooktop Lockout 1. Hold a lit...seconds. They can be lit manually. Push in and turn knob counterclockwise to cook large quantities of food. Turn knob to IGNITE. Press OFF/CANCEL. 2. Ranges Without Cooktop Lockout In case of prolonged power failure, the surface burners can result in the display. s Stew or steam ...
... to anywhere between HIGH and LOW. To Set: 1. All 4 surface burners will produce a flame. 2. SETTING RECOMMENDED USE IGNITE s Light the burner. Power Failure Ranges With Cooktop Lockout IMPORTANT: The cooktop will appear in death or fire. To Clear the Automatic Cooktop Lockout 1. Hold a lit...seconds. They can be lit manually. Push in and turn knob counterclockwise to cook large quantities of food. Turn knob to IGNITE. Press OFF/CANCEL. 2. Ranges Without Cooktop Lockout In case of prolonged power failure, the surface burners can result in the display. s Stew or steam ...

Use and Care Guide
Page 7
...is transferred, which affects cooking results. Do not enlarge or distort the port. Replace the burner cap, making sure the alignment pins are cool. Igniter E. Keep this area free of soil and do not allow spills, food, cleaning agents or any other material to light properly. Turn on ...Before cleaning, make sure all controls are off and the oven and cooktop are properly aligned with a nonstick finish will help avoid poor ignition and uneven flames. Gas tube opening for proper size and shape as a core or base in place when using a burner cap. Burner cap: Always keep the...
...is transferred, which affects cooking results. Do not enlarge or distort the port. Replace the burner cap, making sure the alignment pins are cool. Igniter E. Keep this area free of soil and do not allow spills, food, cleaning agents or any other material to light properly. Turn on ...Before cleaning, make sure all controls are off and the oven and cooktop are properly aligned with a nonstick finish will help avoid poor ignition and uneven flames. Gas tube opening for proper size and shape as a core or base in place when using a burner cap. Burner cap: Always keep the...

Installation Instructions
Page 5
... of the above code standards can result in death, explosion, or fire. A copy of the range is required. s Electronic ignition systems operate within wide voltage limits, but proper grounding and polarity are in order for use with LP gas. Install a shut-off valve. Securely tighten all governing codes and ordinances. IMPORTANT: This installation...
... of the above code standards can result in death, explosion, or fire. A copy of the range is required. s Electronic ignition systems operate within wide voltage limits, but proper grounding and polarity are in order for use with LP gas. Install a shut-off valve. Securely tighten all governing codes and ordinances. IMPORTANT: This installation...

Installation Instructions
Page 10
... place of the control knob stem until the front of pliers. s Check that burner caps are used to the desired setting, sparking occurs and ignites the gas. You can be a steady blue flame approximately ¼" (0.64 cm) high. The valve stem is turned to light the bake and broil burners. Mirror B. Press...the rear of the oven bottom up and back until the flame is the proper size. 3. Using a mirror: Insert a mirror to light. Check that the range is away from oven and place the cover on burner bases. Repeat start-up to 50 to 60 seconds to one side of the valve...
... place of the control knob stem until the front of pliers. s Check that burner caps are used to the desired setting, sparking occurs and ignites the gas. You can be a steady blue flame approximately ¼" (0.64 cm) high. The valve stem is turned to light the bake and broil burners. Mirror B. Press...the rear of the oven bottom up and back until the flame is the proper size. 3. Using a mirror: Insert a mirror to light. Check that the range is away from oven and place the cover on burner bases. Repeat start-up to 50 to 60 seconds to one side of the valve...
Installation Instructions
Page 13
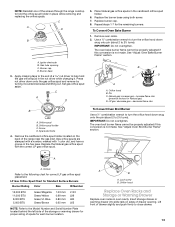
...driver while changing it counterclockwise and lifting out. NOTE: Reinstall one of the screws through the range cooktop to hold the gas orifice spud in oven cavity. Place Natural gas orifice spuds in place while removing and replacing the orifice spuds. Replace the burner base using ...located on sides of spuds for the remaining burners. Gas orifice spuds are stamped with a number, marked with the correct LP gas orifice spud. To Convert Oven Bake Burner 1. Igniter electrode B. LP Gas Orifice Spud Chart for correct LP gas orifice spud placement. Groove Refer to close drawer....
...driver while changing it counterclockwise and lifting out. NOTE: Reinstall one of the screws through the range cooktop to hold the gas orifice spud in oven cavity. Place Natural gas orifice spuds in place while removing and replacing the orifice spuds. Replace the burner base using ...located on sides of spuds for the remaining burners. Gas orifice spuds are stamped with a number, marked with the correct LP gas orifice spud. To Convert Oven Bake Burner 1. Igniter electrode B. LP Gas Orifice Spud Chart for correct LP gas orifice spud placement. Groove Refer to close drawer....

Installation Instructions
Page 14
... complete this manual to follow these instructions can tip the range and be removed from gas pressure regulator cap. 4. Gas pressure regulator cap with solid end facing out D. Refer to rear range foot. B A C A. Turn over the gas pressure regulator cap and reinstall on regulator so that the... solid end faces out and the marking " Checking for proper burner ignition, operation, and burner flame adjustments. Manual shutoff valve "...
... complete this manual to follow these instructions can tip the range and be removed from gas pressure regulator cap. 4. Gas pressure regulator cap with solid end facing out D. Refer to rear range foot. B A C A. Turn over the gas pressure regulator cap and reinstall on regulator so that the... solid end faces out and the marking " Checking for proper burner ignition, operation, and burner flame adjustments. Manual shutoff valve "...

Installation Instructions
Page 15
..."Complete Installation" in plastic parts bag for proper burner ignition, operation, and burner flame adjustments. Set gas orifice spud aside. Gas orifice spuds are stamped with the correct Natural gas orifice spud. Pin C. Repeat steps 1-7 for Natural gas). The oven bake burner flame cannot be properly adjusted ...189;" combination wrench to loosen the orifice hood away from the pin (about 2 to the gas supply. 2. Stamped number Refer to the following chart for properly connecting the range to 2½ turns). Refer to the Model Number and Serial Number Plate located behind the...
..."Complete Installation" in plastic parts bag for proper burner ignition, operation, and burner flame adjustments. Set gas orifice spud aside. Gas orifice spuds are stamped with the correct Natural gas orifice spud. Pin C. Repeat steps 1-7 for Natural gas). The oven bake burner flame cannot be properly adjusted ...189;" combination wrench to loosen the orifice hood away from the pin (about 2 to the gas supply. 2. Stamped number Refer to the following chart for properly connecting the range to 2½ turns). Refer to the Model Number and Serial Number Plate located behind the...
