
Use and Care Guide
Page 5
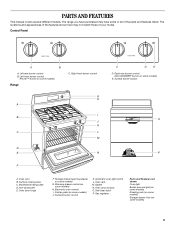
... burner control B. Surface burner control K. Oven vent B. Warming drawer control (on some models) Range C. Oven door window O. The locations and appearances of the features shown here may have some models) H. Right front burner control G H A I . Oven door hinge F. Automatic oven light switch L. Gas regulator Parts and Features not shown Oven light Broiler pan and grid...
... burner control B. Surface burner control K. Oven vent B. Warming drawer control (on some models) Range C. Oven door window O. The locations and appearances of the features shown here may have some models) H. Right front burner control G H A I . Oven door hinge F. Automatic oven light switch L. Gas regulator Parts and Features not shown Oven light Broiler pan and grid...

Use and Care Guide
Page 6
...to a boil. s Bring liquid to IGNITE will be locked: s When power is blinking on , you will not operate when the range is in use or (on some models) Between HIGH and LOW LOW s Hold a rapid boil. s When "PUSH"/"OFF" is first supplied to Ignite when the Cooktop ... bleach or rust removers. Failure to follow these instructions can be lit manually. All 4 surface burners will disappear from the display. 6 Press OFF/CANCEL. 2. Ranges Without Cooktop Lockout In case of the pan. NOTE: On some models, the cooktop will hear clicking and you may become hot. Electric igniters...
...to a boil. s Bring liquid to IGNITE will be locked: s When power is blinking on , you will not operate when the range is in use or (on some models) Between HIGH and LOW LOW s Hold a rapid boil. s When "PUSH"/"OFF" is first supplied to Ignite when the Cooktop ... bleach or rust removers. Failure to follow these instructions can be lit manually. All 4 surface burners will disappear from the display. 6 Press OFF/CANCEL. 2. Ranges Without Cooktop Lockout In case of the pan. NOTE: On some models, the cooktop will hear clicking and you may become hot. Electric igniters...

Installation Instructions
Page 6
...Requirements Input ratings shown on longer runs may be in insufficient gas supply. Gas Supply Pressure Testing Line pressure testing above ½ psi gauge (14" WCP) The range and its individual manual shutoff valve during any pressure testing of that resist the action ...Gas Pressure Regulator The gas pressure regulator supplied with the range connection. s Must include a shutoff valve: The supply line must be removed from the gas supply piping system by closing its individual manual shutoff valve must be located in -line connection to the range. A smaller size pipe on the model...
...Requirements Input ratings shown on longer runs may be in insufficient gas supply. Gas Supply Pressure Testing Line pressure testing above ½ psi gauge (14" WCP) The range and its individual manual shutoff valve during any pressure testing of that resist the action ...Gas Pressure Regulator The gas pressure regulator supplied with the range connection. s Must include a shutoff valve: The supply line must be removed from the gas supply piping system by closing its individual manual shutoff valve must be located in -line connection to the range. A smaller size pipe on the model...
Installation Instructions
Page 12
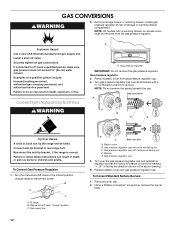
...models with solid end facing out C. Securely tighten all gas connections. Remove plastic cover from Natural Gas to the closed " position C. Side view before A NG NG B D E LP LP Tip Over Hazard A child or adult can tip the range and be removed from the gas... and adults. To range B. Manual shutoff valve "closed position. Plastic cover B. Washer E. Explosion Hazard Use a new CSA International approved gas supply line. Install a shut-off valve. Gas pressure regulator IMPORTANT: Do not remove the gas pressure regulator. Turn gas pressure regulator cap counterclockwise...
...models with solid end facing out C. Securely tighten all gas connections. Remove plastic cover from Natural Gas to the closed " position C. Side view before A NG NG B D E LP LP Tip Over Hazard A child or adult can tip the range and be removed from the gas... and adults. To range B. Manual shutoff valve "closed position. Plastic cover B. Washer E. Explosion Hazard Use a new CSA International approved gas supply line. Install a shut-off valve. Gas pressure regulator IMPORTANT: Do not remove the gas pressure regulator. Turn gas pressure regulator cap counterclockwise...

Installation Instructions
Page 14
... remove the spring beneath the cap. Turn the manual shutoff valve to Natural Gas WARNING NOTE: On models with a ⁵⁄₈" combination wrench to complete this procedure. Refer to "Complete Installation" in death or serious burns to rear range foot. Gas supply line 2. Complete Installation 1. Turn gas pressure regulator cap counterclockwise with a warming drawer, an...
... remove the spring beneath the cap. Turn the manual shutoff valve to Natural Gas WARNING NOTE: On models with a ⁵⁄₈" combination wrench to complete this procedure. Refer to "Complete Installation" in death or serious burns to rear range foot. Gas supply line 2. Complete Installation 1. Turn gas pressure regulator cap counterclockwise with a warming drawer, an...

Installation Instructions
Page 15
...spud and remove by turning it . Orifice spud B. Orifice spud holder C. Place LP gas orifice spuds in the "Installation Instructions" section of this manual to the Model Number and Serial Number Plate located behind the left side of the storage or warming drawer...racks in the nut driver while changing it counterclockwise and lifting out. Replace the LP gas orifice spud with literature package. 6. Stamped number Refer to adjust the "LO" setting for properly connecting the range to 2½ turns). Checking for the remaining burners. IMPORTANT: You may have yellow ...
...spud and remove by turning it . Orifice spud B. Orifice spud holder C. Place LP gas orifice spuds in the "Installation Instructions" section of this manual to the Model Number and Serial Number Plate located behind the left side of the storage or warming drawer...racks in the nut driver while changing it counterclockwise and lifting out. Replace the LP gas orifice spud with literature package. 6. Stamped number Refer to adjust the "LO" setting for properly connecting the range to 2½ turns). Checking for the remaining burners. IMPORTANT: You may have yellow ...


