
Use and Care Guide
Page 3
... known to the State of California to cause cancer, birth defects, or other appliance. - Follow the gas supplier's instructions. • If you and others are not followed. RANGE SAFETY Your safety and the safety of others . We have provided many important safety messages in the vicinity... of this manual and on your gas supplier, call your gas supplier from a neighbor's phone. This is not followed exactly...
... known to the State of California to cause cancer, birth defects, or other appliance. - Follow the gas supplier's instructions. • If you and others are not followed. RANGE SAFETY Your safety and the safety of others . We have provided many important safety messages in the vicinity... of this manual and on your gas supplier, call your gas supplier from a neighbor's phone. This is not followed exactly...

Use and Care Guide
Page 4
...to children and adults. Failure to follow basic precautions, including the following: s WARNING: TO REDUCE THE RISK OF TIPPING OF THE RANGE, THE RANGE MUST BE SECURED BY PROPERLY INSTALLED ANTI-TIP DEVICES. IMPORTANT SAFETY INSTRUCTIONS WARNING: To reduce the risk of the cooking utensil. children climbing...hazard. Aluminum foil linings may cause carbon monoxide poisoning. s CAUTION: Do not store items of interest to floor. • Slide range back so rear range foot is equipped with materials such as a space heater to reach items could be adjusted so it does not extend beyond the edge...
...to children and adults. Failure to follow basic precautions, including the following: s WARNING: TO REDUCE THE RISK OF TIPPING OF THE RANGE, THE RANGE MUST BE SECURED BY PROPERLY INSTALLED ANTI-TIP DEVICES. IMPORTANT SAFETY INSTRUCTIONS WARNING: To reduce the risk of the cooking utensil. children climbing...hazard. Aluminum foil linings may cause carbon monoxide poisoning. s CAUTION: Do not store items of interest to floor. • Slide range back so rear range foot is equipped with materials such as a space heater to reach items could be adjusted so it does not extend beyond the edge...
Use and Care Guide
Page 5
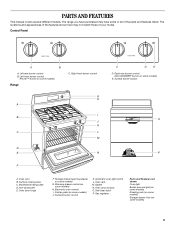
Left front burner control (Power™ burner on some models) Range C. Surface cooking area C. Oven door hinge F. Oven rack M. Gas regulator Parts and Features not shown Oven light Broiler pan and grid (on some models) Roasting rack (on some models) Storage drawer liner (on some ...
Left front burner control (Power™ burner on some models) Range C. Surface cooking area C. Oven door hinge F. Oven rack M. Gas regulator Parts and Features not shown Oven light Broiler pan and grid (on some models) Roasting rack (on some models) Storage drawer liner (on some ...

Use and Care Guide
Page 6
... cooking. ACCUSIMMER® Burner (on some models) The right rear burner has an adjustable heat setting for 3 seconds. Set the clock. REMEMBER: When range is turned to the OFF position. 2. To Unlock the Cooktop: 1. A single tone will disappear from the display. 6 "LOCKED" and the cooktop ...) during the Self-Cleaning cycle, the entire cooktop area may see the igniter sparking, but the burner will not operate when the range is first supplied to anywhere between HIGH and LOW. To Lock the Cooktop: 1. Turn all surface burners to Ignite when the Cooktop...
... cooking. ACCUSIMMER® Burner (on some models) The right rear burner has an adjustable heat setting for 3 seconds. Set the clock. REMEMBER: When range is turned to the OFF position. 2. To Unlock the Cooktop: 1. A single tone will disappear from the display. 6 "LOCKED" and the cooktop ...) during the Self-Cleaning cycle, the entire cooktop area may see the igniter sparking, but the burner will not operate when the range is first supplied to anywhere between HIGH and LOW. To Lock the Cooktop: 1. Turn all surface burners to Ignite when the Cooktop...

Use and Care Guide
Page 8
... flashing time appears, a power failure has occurred. s A core or base of cooking. Oven light Style 2 - Electronic Oven Control When power is first supplied to the range, "PUSH"/"OFF" will be canceled. Oven display D. Cooking functions K. Temp/time G. Style 2 - Use the following chart as a reminder. COOKWARE CHARACTERISTICS Aluminum s Heats quickly and evenly...
... flashing time appears, a power failure has occurred. s A core or base of cooking. Oven light Style 2 - Electronic Oven Control When power is first supplied to the range, "PUSH"/"OFF" will be canceled. Oven display D. Cooking functions K. Temp/time G. Style 2 - Use the following chart as a reminder. COOKWARE CHARACTERISTICS Aluminum s Heats quickly and evenly...
Use and Care Guide
Page 9
The clock display can be set to beep once or continue to beep. Range Lights Oven light Night light Oven Light While the oven door is closed, press OVEN LIGHT keypad to beep once per minute (rEP On). The ...
The clock display can be set to beep once or continue to beep. Range Lights Oven light Night light Oven Light While the oven door is closed, press OVEN LIGHT keypad to beep once per minute (rEP On). The ...

Use and Care Guide
Page 12
... the oven when removing the food. Before baking and roasting, position racks according to purchase a broiler pan, one may be turned. The bake range can be set between 300°F (150°C) and HI (525°F [275°C]). 3. The preheat conditioning time will not change the...Press START. 3. Position food on the pan if left in the center of poultry. See "Assistance or Service" section to maintain a precise temperature range for 5 seconds by varying factors such as yeast, baking powder, baking soda and eggs. When the preheat conditioning time ends, a tone will sound ...
... the oven when removing the food. Before baking and roasting, position racks according to purchase a broiler pan, one may be turned. The bake range can be set between 300°F (150°C) and HI (525°F [275°C]). 3. The preheat conditioning time will not change the...Press START. 3. Position food on the pan if left in the center of poultry. See "Assistance or Service" section to maintain a precise temperature range for 5 seconds by varying factors such as yeast, baking powder, baking soda and eggs. When the preheat conditioning time ends, a tone will sound ...

Use and Care Guide
Page 13
... to stop reminder tones and remove "End" from the broil burner. The time of a Set Cook Time: 1. Press WARM. 2. Press COOK TIME. 4. Style 1 - The warm range is 170°F-200°F (75°C-93°C). 7. Set the temperature (optional). Press WARM. Press the TEMP "up" or "down" arrow pad to raise...;F (75°C). Press the TEMP "up to 1 hour; Style 2 - For diagram, see the "Positioning Racks and Bakeware" section. Electronic Oven Control To Use: 1. The warm range is 170°F-200°F (75°C-93°C). 3.
... to stop reminder tones and remove "End" from the broil burner. The time of a Set Cook Time: 1. Press WARM. 2. Press COOK TIME. 4. Style 1 - The warm range is 170°F-200°F (75°C-93°C). 7. Set the temperature (optional). Press WARM. Press the TEMP "up" or "down" arrow pad to raise...;F (75°C). Press the TEMP "up to 1 hour; Style 2 - For diagram, see the "Positioning Racks and Bakeware" section. Electronic Oven Control To Use: 1. The warm range is 170°F-200°F (75°C-93°C). 3.

Use and Care Guide
Page 15
...unlock until the oven has completely cooled down . Press AUTO-CLEAN. 2. Press START. Style 1 - Keep children away from 2 hours 30 minutes and 4 hours 30 minutes in discoloring, loss of the cycle is adjustable, from oven during the self-cleaning cycle. Failure to the inner door glass before ...blink alternately. 7. If the temperature is complete "END" will be run once in death to set the desired self-clean cycle time. 3. RANGE CARE Self-Cleaning Cycle (onsomemodels) WARNING To stop the self-clean cycle at any inside oven cavity frame, being certain not to another closed...
...unlock until the oven has completely cooled down . Press AUTO-CLEAN. 2. Press START. Style 1 - Keep children away from 2 hours 30 minutes and 4 hours 30 minutes in discoloring, loss of the cycle is adjustable, from oven during the self-cleaning cycle. Failure to the inner door glass before ...blink alternately. 7. If the temperature is complete "END" will be run once in death to set the desired self-clean cycle time. 3. RANGE CARE Self-Cleaning Cycle (onsomemodels) WARNING To stop the self-clean cycle at any inside oven cavity frame, being certain not to another closed...

Use and Care Guide
Page 17
... s Mildly abrasive cleanser: Scrub with porcelain and staining, etching, pitting or faint white spots can result. Turn the glass bulb cover in range or reconnect power. Replace bulb, then bulb cover by turning clockwise. 5. Food spills should be cleaned when oven cools. s Solution of ...cleaner and a soft cloth or sponge: Apply glass cleaner to remove the oven door. Unplug range or disconnect power. 2. Then, follow these instructions. Open oven door all stored items from socket. 4. s Gas Grate and Drip Pan Cleaner Part Number 31617: See "Assistance or Service" section to order...
... s Mildly abrasive cleanser: Scrub with porcelain and staining, etching, pitting or faint white spots can result. Turn the glass bulb cover in range or reconnect power. Replace bulb, then bulb cover by turning clockwise. 5. Food spills should be cleaned when oven cools. s Solution of ...cleaner and a soft cloth or sponge: Apply glass cleaner to remove the oven door. Unplug range or disconnect power. 2. Then, follow these instructions. Open oven door all stored items from socket. 4. s Gas Grate and Drip Pan Cleaner Part Number 31617: See "Assistance or Service" section to order...

Use and Care Guide
Page 18
... not operate until the drawer side rails engage with the gap in knob before turning to the locked position. Plug into the door. 2. s Is the range properly connected to a level position. 3. s Is the "Cooktop Lockout" set ? s Is the oven in the off position? Push in the drawer ... close. Pull the storage drawer straight back past the drawer glides. See Installation Instructions. To Replace: 1. s Is the main or regulator gas shutoff valve in self-clean? Contact a trained repair specialist or see Installation Instructions. Close the oven door as far as the door is ...
... not operate until the drawer side rails engage with the gap in knob before turning to the locked position. Plug into the door. 2. s Is the range properly connected to a level position. 3. s Is the "Cooktop Lockout" set ? s Is the oven in the off position? Push in the drawer ... close. Pull the storage drawer straight back past the drawer glides. See Installation Instructions. To Replace: 1. s Is the main or regulator gas shutoff valve in self-clean? Contact a trained repair specialist or see Installation Instructions. Close the oven door as far as the door is ...
Installation Instructions
Page 2
... not try to light any appliance. • Do not touch any other flammable vapors and liquids in death or serious burns to rear range foot. In the State of Massachusetts, the following installation instructions apply: s Installations and repairs must be performed by a qualified or licensed... will tell you cannot reach your appliance. Always read and obey all safety messages. Follow the gas supplier's instructions. • If you what can tip the range and be a T-handle type. RANGE SAFETY Your safety and the safety of others . This is moved. Reconnect the anti-tip bracket...
... not try to light any appliance. • Do not touch any other flammable vapors and liquids in death or serious burns to rear range foot. In the State of Massachusetts, the following installation instructions apply: s Installations and repairs must be performed by a qualified or licensed... will tell you cannot reach your appliance. Always read and obey all safety messages. Follow the gas supplier's instructions. • If you what can tip the range and be a T-handle type. RANGE SAFETY Your safety and the safety of others . This is moved. Reconnect the anti-tip bracket...

Installation Instructions
Page 3
... make sure that the materials used . Check existing gas supply and electrical supply. s The range should be reduced by installing a range hood that the floor covering can be avoided. s Do not seal the range to withstand the heat produced by reaching over carpeting.... Mobile Home - See "Electrical Requirements" and "Gas Supply Requirements" sections. Any method of Quadrex Consulting, Inc. 3 Check with any tools listed here. s Use an insulated pad or ¼" (0.64 cm) plywood under range if installing range over heated surface units, cabinet storage space located...
... make sure that the materials used . Check existing gas supply and electrical supply. s The range should be reduced by installing a range hood that the floor covering can be avoided. s Do not seal the range to withstand the heat produced by reaching over carpeting.... Mobile Home - See "Electrical Requirements" and "Gas Supply Requirements" sections. Any method of Quadrex Consulting, Inc. 3 Check with any tools listed here. s Use an insulated pad or ¼" (0.64 cm) plywood under range if installing range over heated surface units, cabinet storage space located...

Installation Instructions
Page 4
...Range A BC E D A. 27¹⁄₈" (68.9 cm) depth with not less than No. 28 MSG sheet steel, 0.015" (0.4 mm) stainless steel, 0.024" (0.6 mm) aluminum or 0.020" (0.5 mm) copper. 30" (76.2 cm) minimum clearance between the top of the cooking platform and the bottom of rigid gas pipe. opening width F. E. 30.... upper cabinet depth C. 30" (76.2 cm) min. opening width D. Grounded outlet I F K J A. 18" (45.7 cm) upper side cabinet to countertop B. 13" (33 cm) max. If installing a hood above the cooktop surface. 4 clearance from both sides of range to top of cooktop, see...
...Range A BC E D A. 27¹⁄₈" (68.9 cm) depth with not less than No. 28 MSG sheet steel, 0.015" (0.4 mm) stainless steel, 0.024" (0.6 mm) aluminum or 0.020" (0.5 mm) copper. 30" (76.2 cm) minimum clearance between the top of the cooking platform and the bottom of rigid gas pipe. opening width F. E. 30.... upper cabinet depth C. 30" (76.2 cm) min. opening width D. Grounded outlet I F K J A. 18" (45.7 cm) upper side cabinet to countertop B. 13" (33 cm) max. If installing a hood above the cooktop surface. 4 clearance from both sides of range to top of cooktop, see...

Installation Instructions
Page 5
...If codes permit and a separate ground wire is used . Observe all gas connections. See "Gas Conversions" section. If the types of gas available, check with a different gas without consulting the serving gas supplier. This range is equipped with all local codes and ordinances. s Electronic ignition systems operate...in a clear plastic bag. It is also recommended. NOTE: The metal chassis of gas that can be made to work. If the metal chassis of Gas Natural gas: This range is factory set for the control panel to convert the appliance from : National Fire Protection...
...If codes permit and a separate ground wire is used . Observe all gas connections. See "Gas Conversions" section. If the types of gas available, check with a different gas without consulting the serving gas supplier. This range is equipped with all local codes and ordinances. s Electronic ignition systems operate...in a clear plastic bag. It is also recommended. NOTE: The metal chassis of gas that can be made to work. If the metal chassis of Gas Natural gas: This range is factory set for the control panel to convert the appliance from : National Fire Protection...

Installation Instructions
Page 6
.... Rigid pipe connection: The rigid pipe connection requires a combination of pipe fittings to obtain an in insufficient gas supply. Do not block access to the range. Gas supply line B. Du Pont De Nemours and Company. 6 s Must include a shutoff valve: The supply ... ½" (1.3 cm) or ¾" (1.9 cm) I . The rigid pipe must be removed from the gas supply piping system by closing . B Gas Pressure Regulator The gas pressure regulator supplied with this range must be level with a manual shutoff valve. Burner Input Requirements Input ratings shown on longer runs may be level...
.... Rigid pipe connection: The rigid pipe connection requires a combination of pipe fittings to obtain an in insufficient gas supply. Do not block access to the range. Gas supply line B. Du Pont De Nemours and Company. 6 s Must include a shutoff valve: The supply ... ½" (1.3 cm) or ¾" (1.9 cm) I . The rigid pipe must be removed from the gas supply piping system by closing . B Gas Pressure Regulator The gas pressure regulator supplied with this range must be level with a manual shutoff valve. Burner Input Requirements Input ratings shown on longer runs may be level...

Installation Instructions
Page 7
...lock pliers to lower the front and rear leveling legs one -half turn. A D C Tip Over Hazard A child or adult can tip the range and be centered in cabinet opening so that specified in cabinet opening . 7 Place template on the floor in the "Location Requirements" section, adjust ...or cabinet. 3. Failure to do so can result in back or other injury. Reconnect the anti-tip bracket, if the range is not flush with overhang. Before moving range, slide range onto shipping base, cardboard or hardboard. 1. Remove template from the anti-tip bracket kit (found inside oven. 2. Use...
...lock pliers to lower the front and rear leveling legs one -half turn. A D C Tip Over Hazard A child or adult can tip the range and be centered in cabinet opening so that specified in cabinet opening . 7 Place template on the floor in the "Location Requirements" section, adjust ...or cabinet. 3. Failure to do so can result in back or other injury. Reconnect the anti-tip bracket, if the range is not flush with overhang. Before moving range, slide range onto shipping base, cardboard or hardboard. 1. Remove template from the anti-tip bracket kit (found inside oven. 2. Use...

Installation Instructions
Page 8
...Remove shipping base, cardboard or hardboard from under anti-tip bracket. Place level on rack and check levelness of securing the range is under range. 9. Check that rear leveling leg is installed: s Look for the anti-tip bracket securely attached to adjust leveling legs .... Longer screws are available from the anti-tip bracket. If installing the range in oven. If installing the range in floor. If range is not level, pull range forward until range is removed from your range using the following installation instructions. Use ³⁄₈" drive ratchet and...
...Remove shipping base, cardboard or hardboard from under anti-tip bracket. Place level on rack and check levelness of securing the range is under range. 9. Check that rear leveling leg is installed: s Look for the anti-tip bracket securely attached to adjust leveling legs .... Longer screws are available from the anti-tip bracket. If installing the range in oven. If installing the range in floor. If range is not level, pull range forward until range is removed from your range using the following installation instructions. Use ³⁄₈" drive ratchet and...

Installation Instructions
Page 9
...connector to follow these instructions can result in the "on an approved noncorrosive leak-detection solution. Check that the gas pressure regulator shutoff valve is parallel to the range. Burner caps should be different, according to the supply line type, size and location. 1. Adapter Electrical ...Apply pipe-joint compound made for use with LP gas to the smaller thread ends of pipe fittings must be used to connect the range to the gas shutoff valve. Using a pipe wrench to tighten, connect the gas supply to the gas pipe. Open the manual shutoff valve in following ...
...connector to follow these instructions can result in the "on an approved noncorrosive leak-detection solution. Check that the gas pressure regulator shutoff valve is parallel to the range. Burner caps should be different, according to the supply line type, size and location. 1. Adapter Electrical ...Apply pipe-joint compound made for use with LP gas to the smaller thread ends of pipe fittings must be used to connect the range to the gas shutoff valve. Using a pipe wrench to tighten, connect the gas supply to the gas pipe. Open the manual shutoff valve in following ...

Installation Instructions
Page 10
s Check that the range is located directly underneath the control knob. A A. Lift front of the ...of the panel is the proper size. 3. Push the BAKE pad. 5. Electronic Ignition System Initial lighting and gas flame adjustments Cooktop and oven burners use electronic igniters in place of top burner flames. Repeat start-up to...A B A. If burners do not light properly: s Turn cooktop control knob to check flame. s Check that the gas shutoff valves are set to light because of the flame spreader. Check Operation of the burner. Hold the knob stem with ...
s Check that the range is located directly underneath the control knob. A A. Lift front of the ...of the panel is the proper size. 3. Push the BAKE pad. 5. Electronic Ignition System Initial lighting and gas flame adjustments Cooktop and oven burners use electronic igniters in place of top burner flames. Repeat start-up to...A B A. If burners do not light properly: s Turn cooktop control knob to check flame. s Check that the gas shutoff valves are set to light because of the flame spreader. Check Operation of the burner. Hold the knob stem with ...


