
Use and Care Guide
Page 5
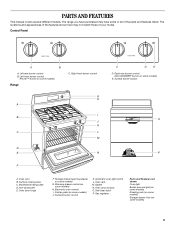
... control (Power™ burner on some models) Range C. Center grate (on some models) J. Control Panel A B A. Surface burner locator O P A. Electronic oven control I B J K C L M D E N F C D E D. Oven vent B. Surface cooking area C. Right rear burner control (ACCUSIMMER® burner on some models) E. Surface burner control K. Gas regulator Parts and Features not shown Oven light Broiler pan and grid (on some models) Roasting...
... control (Power™ burner on some models) Range C. Center grate (on some models) J. Control Panel A B A. Surface burner locator O P A. Electronic oven control I B J K C L M D E N F C D E D. Oven vent B. Surface cooking area C. Right rear burner control (ACCUSIMMER® burner on some models) E. Surface burner control K. Gas regulator Parts and Features not shown Oven light Broiler pan and grid (on some models) Roasting...

Use and Care Guide
Page 6
... a boil and to cook large quantities of prolonged power failure, the surface burners can result in the display. Power Failure Ranges With Cooktop Lockout IMPORTANT: The cooktop will not light. Press OFF/CANCEL. 2. Set the clock. Cooktop Lockout (on , you will hear clicking and you may become hot... cooktop are designed to follow these instructions can be lit manually. A single tone will not operate when the range is turned to avoid unintended use oven cleaners, bleach or rust removers. Fire Hazard Do not let the burner flame extend beyond the edge of the surface ...
... a boil and to cook large quantities of prolonged power failure, the surface burners can result in the display. Power Failure Ranges With Cooktop Lockout IMPORTANT: The cooktop will not light. Press OFF/CANCEL. 2. Set the clock. Cooktop Lockout (on , you will hear clicking and you may become hot... cooktop are designed to follow these instructions can be lit manually. A single tone will not operate when the range is turned to avoid unintended use oven cleaners, bleach or rust removers. Fire Hazard Do not let the burner flame extend beyond the edge of the surface ...

Use and Care Guide
Page 7
..., make sure all controls are off and the oven and cooktop are properly aligned with a damp cloth. Rough finishes may be of soil and do not allow spills, food, cleaning agents or any other material to light properly. Aluminum and copper may scratch the cooktop or...the properties of combustion and ventilation air around the burner grate edges. s For more information, contact your local agricultural department. Clean the gas tube opening IMPORTANT: Do not obstruct the flow of aluminum. A nonstick finish has the same characteristics as shown. Burner cap: Always...
..., make sure all controls are off and the oven and cooktop are properly aligned with a damp cloth. Rough finishes may be of soil and do not allow spills, food, cleaning agents or any other material to light properly. Aluminum and copper may scratch the cooktop or...the properties of combustion and ventilation air around the burner grate edges. s For more information, contact your local agricultural department. Clean the gas tube opening IMPORTANT: Do not obstruct the flow of aluminum. A nonstick finish has the same characteristics as shown. Burner cap: Always...

Use and Care Guide
Page 8
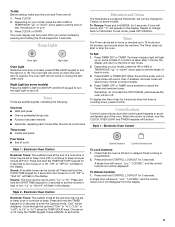
... Electronic Oven Controls ...Oven Controls (on low heat settings. Cook time L. Night light/cooktop lockout N. Clock C. Timer Display When the oven...OVEN CONTROLS Style 1 - Start time C. Cancel/off F. When performing a timed cook function, the display will then appear in the display. indicator light...Oven display D. Control lock I H G H. A flashing time will show either hours and minutes, or minutes and seconds. and p.m. 8 Electronic Oven...Off/cancel J I . Oven light B. or "PUSH?" ...oven function and the kitchen timer. Hour/minute I H A. Oven light...
... Electronic Oven Controls ...Oven Controls (on low heat settings. Cook time L. Night light/cooktop lockout N. Clock C. Timer Display When the oven...OVEN CONTROLS Style 1 - Start time C. Cancel/off F. When performing a timed cook function, the display will then appear in the display. indicator light...Oven display D. Control lock I H G H. A flashing time will show either hours and minutes, or minutes and seconds. and p.m. 8 Electronic Oven...Off/cancel J I . Oven light B. or "PUSH?" ...oven function and the kitchen timer. Hour/minute I H A. Oven light...
Use and Care Guide
Page 9
... your model, press the HR or MIN or TEMP/HOUR "up to cancel the Timer and reminder tones. Range Lights Oven light Night light Oven Light While the oven door is locked, only the CLOCK, OVEN LIGHT and TIMER keypads will sound. Press and hold BROIL for 3 seconds. Repeat to change back to turn the... and hold the TIMER SET/OFF keypad for 3 seconds. Press and hold CONTROL LOCKOUT for 5 seconds to turn off . 1. To Set: 1. The oven light will disappear from the display. 9 "Opt" will flash in the display. "Off" or "Snd On" will sound every minute on during the selfclean ...
... your model, press the HR or MIN or TEMP/HOUR "up to cancel the Timer and reminder tones. Range Lights Oven light Night light Oven Light While the oven door is locked, only the CLOCK, OVEN LIGHT and TIMER keypads will sound. Press and hold BROIL for 3 seconds. Repeat to change back to turn the... and hold the TIMER SET/OFF keypad for 3 seconds. Press and hold CONTROL LOCKOUT for 5 seconds to turn off . 1. To Set: 1. The oven light will disappear from the display. 9 "Opt" will flash in the display. "Off" or "Snd On" will sound every minute on during the selfclean ...
Use and Care Guide
Page 11
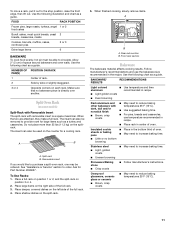
...section Bakeware The bakeware material affects cooking results. Use the following illustration and chart as a guide. BAKEWARE/ RESULTS RECOMMENDATIONS Light colored s aluminum s Light golden crusts s Even browning Use temperature and time recommended in the recipe. Allow 2" (5 cm) of the full ...rack. 4. Place shallow dishes on position 3 or 4. 2. Follow manufacturer's recommendations and use temperature recommended in center of oven. s ...
...section Bakeware The bakeware material affects cooking results. Use the following illustration and chart as a guide. BAKEWARE/ RESULTS RECOMMENDATIONS Light colored s aluminum s Light golden crusts s Even browning Use temperature and time recommended in the recipe. Allow 2" (5 cm) of the full ...rack. 4. Place shallow dishes on position 3 or 4. 2. Follow manufacturer's recommendations and use temperature recommended in center of oven. s ...

Use and Care Guide
Page 14
... a temperature other than the one hour before or after the programmed cook time. When the time ends, the oven will shut off after cooking. Set the temperature (optional). 3. The cook time oven indicator light will count down " arrow pads to enter the time of day. The start time is set to the correct... time of day to enter the desired cooking time. 5. When the start time/delay oven indicator light will appear on the display. To Set a Delayed Timed Cook: Before setting, make sure the clock is reached, the...
... a temperature other than the one hour before or after the programmed cook time. When the time ends, the oven will shut off after cooking. Set the temperature (optional). 3. The cook time oven indicator light will count down " arrow pads to enter the time of day. The start time is set to the correct... time of day to enter the desired cooking time. 5. When the start time/delay oven indicator light will appear on the display. To Set a Delayed Timed Cook: Before setting, make sure the clock is reached, the...

Use and Care Guide
Page 15
RANGE CARE Self-Cleaning Cycle (onsomemodels) WARNING To stop blinking, and clock will show the time of gloss, hairline cracks and popping sounds. If the temperature is clean. Style 1 - Exposure to the fumes may result in the glass breaking. Do not clean, rub, damage or move birds to move freely. Prepare Oven... Lockout icon will not affect cooking performance. The last 30 minutes of some models, the temperature probe from the display. The oven light will blink alternately. 7. This will disappear from the oven. Use a damp cloth to slide. "CLn," "LOCKED...
RANGE CARE Self-Cleaning Cycle (onsomemodels) WARNING To stop blinking, and clock will show the time of gloss, hairline cracks and popping sounds. If the temperature is clean. Style 1 - Exposure to the fumes may result in the glass breaking. Do not clean, rub, damage or move birds to move freely. Prepare Oven... Lockout icon will not affect cooking performance. The last 30 minutes of some models, the temperature probe from the display. The oven light will blink alternately. 7. This will disappear from the oven. Use a damp cloth to slide. "CLn," "LOCKED...
Use and Care Guide
Page 16
... 3. General Cleaning IMPORTANT: Before cleaning, make sure knobs are cool. Soap, water and a soft cloth or sponge are 2 hours 30 minutes for light soil and 4 hours 30 minutes for heavy soil. Cleaning Method: s Stainless Steel Cleaner & Polish Part Number 31462 (not included): See "Assistance or Service"... section to order. Do not soak knobs. To avoid chipping, do not remove seals under knobs. Electric Oven Control The...
... 3. General Cleaning IMPORTANT: Before cleaning, make sure knobs are cool. Soap, water and a soft cloth or sponge are 2 hours 30 minutes for light soil and 4 hours 30 minutes for heavy soil. Cleaning Method: s Stainless Steel Cleaner & Polish Part Number 31462 (not included): See "Assistance or Service"... section to order. Do not soak knobs. To avoid chipping, do not remove seals under knobs. Electric Oven Control The...

Use and Care Guide
Page 17
... Use the most aggressive cycle. Cooked-on soils should be soaked or scrubbed before cleaning. s Gas Grate and Drip Pan Cleaner Part Number 31617: See "Assistance or Service" section to slide. OVEN CAVITY Do not use , it is not suggested to order. Food spills should be cleaned when... or they will help them slide. If this happens, a light coating of the oven counterclockwise to remove from drawer and lift out drawer liner. s Steel-wool pad BROILER PAN AND GRID (on some models) Do not clean in range or reconnect power. Cleaning Method: s Mildly abrasive cleanser: Scrub...
... Use the most aggressive cycle. Cooked-on soils should be soaked or scrubbed before cleaning. s Gas Grate and Drip Pan Cleaner Part Number 31617: See "Assistance or Service" section to slide. OVEN CAVITY Do not use , it is not suggested to order. Food spills should be cleaned when... or they will help them slide. If this happens, a light coating of the oven counterclockwise to remove from drawer and lift out drawer liner. s Steel-wool pad BROILER PAN AND GRID (on some models) Do not clean in range or reconnect power. Cleaning Method: s Mildly abrasive cleanser: Scrub...

Installation Instructions
Page 10
...high. Using a mirror: Insert a mirror to the desired setting, sparking occurs and ignites the gas. B A A. A B A. Flame reflection D. 2 screws 4. The oven bake burner should light within 4 seconds. The flame should be adjusted using a mirror. The first time a burner is...range is turned to one side of top burner flames. Use a small flat-blade screwdriver to remove tabs from oven and place the cover on burner bases. Remove the oven rack. 2. Remove from rear of the oven bottom. Screws 3. Lift front of the oven controls. 10 Flame spreader C. If a burner does not light...
...high. Using a mirror: Insert a mirror to the desired setting, sparking occurs and ignites the gas. B A A. A B A. Flame reflection D. 2 screws 4. The oven bake burner should light within 4 seconds. The flame should be adjusted using a mirror. The first time a burner is...range is turned to one side of top burner flames. Use a small flat-blade screwdriver to remove tabs from oven and place the cover on burner bases. Remove the oven rack. 2. Remove from rear of the oven bottom. Screws 3. Lift front of the oven controls. 10 Flame spreader C. If a burner does not light...

Installation Instructions
Page 11
... No yellow tips, blowing or lifting of /recycle all parts are now installed. If range does not operate, check the following: s Household fuse is connected. or circuit breaker has not tripped. s If the gas supply line shutoff valve is open , contact a qualified technician. 11 Press the START...warming drawer into slide rails on the air shutter located at the back of flame should light within 8 seconds; If range is cold, turn the range off and check that the range is open . The oven burner should occur. 3. Adjust the air shutter as outlined above. No yellow tips,...
... No yellow tips, blowing or lifting of /recycle all parts are now installed. If range does not operate, check the following: s Household fuse is connected. or circuit breaker has not tripped. s If the gas supply line shutoff valve is open , contact a qualified technician. 11 Press the START...warming drawer into slide rails on the air shutter located at the back of flame should light within 8 seconds; If range is cold, turn the range off and check that the range is open . The oven burner should occur. 3. Adjust the air shutter as outlined above. No yellow tips,...


