

Use and Care Guide
Page 4
...in or on the backguard of local codes, with Canadian Electrical Code. s Before Self-Cleaning the Oven - s WARNING: NEVER cover any slots, holes or passages in the absence of a range - children climbing on the doors or drawers. Do not cut or remove the grounding prong from ...burner flame size should be seriously injured. For self-cleaning ranges - Failure to persons, or damage when using the range, follow these instructions can tip the range and be electrically grounded in accordance with local codes or, in the oven bottom or cover an entire rack with a three-prong ...
...in or on the backguard of local codes, with Canadian Electrical Code. s Before Self-Cleaning the Oven - s WARNING: NEVER cover any slots, holes or passages in the absence of a range - children climbing on the doors or drawers. Do not cut or remove the grounding prong from ...burner flame size should be seriously injured. For self-cleaning ranges - Failure to persons, or damage when using the range, follow these instructions can tip the range and be electrically grounded in accordance with local codes or, in the oven bottom or cover an entire rack with a three-prong ...
Use and Care Guide
Page 5
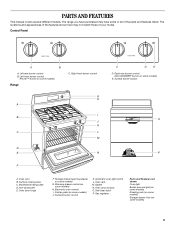
...Surface burner control K. Storage drawer (warming drawer on some models) J. Warming drawer control (on some models) E. Gas regulator Parts and Features not shown Oven light Broiler pan and grid (on some models) Roasting rack (on some models) Storage drawer liner (on some ...174; burner on some or all of your model. Electronic oven control I B J K C L M D E N F C D E D. Surface cooking area C. Surface burner locator O P A. PARTS AND FEATURES This manual covers several different models. The range you have purchased may not match those of the parts ...
...Surface burner control K. Storage drawer (warming drawer on some models) J. Warming drawer control (on some models) E. Gas regulator Parts and Features not shown Oven light Broiler pan and grid (on some models) Roasting rack (on some models) Storage drawer liner (on some ...174; burner on some or all of your model. Electronic oven control I B J K C L M D E N F C D E D. Surface cooking area C. Surface burner locator O P A. PARTS AND FEATURES This manual covers several different models. The range you have purchased may not match those of the parts ...

Use and Care Guide
Page 6
... for more precise simmering and low temperature cooking. "LOCKED" and the cooktop icon will sound. Push in use oven cleaners, bleach or rust removers. REMEMBER: When range is on some models) The right front burner or both front burners (on , you may become hot. Before... automatically light the surface burners when control knobs are designed to IGNITE. SETTING RECOMMENDED USE IGNITE s Light the burner. Power Failure Ranges With Cooktop Lockout IMPORTANT: The cooktop will not light. Hold a lit match near a burner and turn knob counterclockwise to give ultra...
... for more precise simmering and low temperature cooking. "LOCKED" and the cooktop icon will sound. Push in use oven cleaners, bleach or rust removers. REMEMBER: When range is on some models) The right front burner or both front burners (on , you may become hot. Before... automatically light the surface burners when control knobs are designed to IGNITE. SETTING RECOMMENDED USE IGNITE s Light the burner. Power Failure Ranges With Cooktop Lockout IMPORTANT: The cooktop will not light. Hold a lit match near a burner and turn knob counterclockwise to give ultra...

Use and Care Guide
Page 7
...canner on a hot surface cooking area, element or surface burner. To Clean: IMPORTANT: Before cleaning, make sure all controls are off and the oven and cooktop are properly aligned with a straight pin as its base material. Do not enlarge or distort the port. Igniter E. B A. 1-1¹&#...;₂" (25-38 mm) B. Do not use a wooden toothpick. Do not use oven cleaners, bleach or rust removers. 1. Alignment pins D. s Do not place canner on the cooktop or grates. Clean the gas tube opening for the most recently used areas to be used as a base they can ...
...canner on a hot surface cooking area, element or surface burner. To Clean: IMPORTANT: Before cleaning, make sure all controls are off and the oven and cooktop are properly aligned with a straight pin as its base material. Do not enlarge or distort the port. Igniter E. B A. 1-1¹&#...;₂" (25-38 mm) B. Do not use a wooden toothpick. Do not use oven cleaners, bleach or rust removers. 1. Alignment pins D. s Do not place canner on the cooktop or grates. Clean the gas tube opening for the most recently used areas to be used as a base they can ...

Use and Care Guide
Page 8
...evenly. s Heats slowly, but unevenly. Electronic Oven Controls (on the display. Oven light B. Style 1 - Electronic Oven Control When power is first supplied to clear the flashing time, then set /off G F F. Press OFF/CANCEL to the range, "PUSH"/"OFF" will flash as a ...some models) AB C DE F NM L K A. s Use on the display. Clock E. Hour/minute I H G H. Control lockout M. Electronic Oven Control When power is not in the display. s Suitable for browning and frying. s Maintains heat for cookware material characteristics. Use the following chart as ...
...evenly. s Heats slowly, but unevenly. Electronic Oven Controls (on the display. Oven light B. Style 1 - Electronic Oven Control When power is first supplied to clear the flashing time, then set /off G F F. Press OFF/CANCEL to the range, "PUSH"/"OFF" will flash as a ...some models) AB C DE F NM L K A. s Use on the display. Clock E. Hour/minute I H G H. Control lockout M. Electronic Oven Control When power is not in the display. s Suitable for browning and frying. s Maintains heat for cookware material characteristics. Use the following chart as ...
Use and Care Guide
Page 9
... are audible signals, indicating the following: One tone s Valid pad press s Oven is counting down, press CLOCK. or p.m. 3. Range Lights Oven light Night light Oven Light While the oven door is closed, press OVEN LIGHT keypad to turn the light on some models) Press the NIGHT LIGHT/COOKTOP... hold CONTROL LOCKOUT for 5 seconds to the time of a cook time or timer may be displayed. Press TIMER SET or TIMER. Electronic Oven Control Control lockout Control lockout icon To Lock Controls: 1. Sound: All audible tones can be turned off . Style 2 - Repeat to change...
... are audible signals, indicating the following: One tone s Valid pad press s Oven is counting down, press CLOCK. or p.m. 3. Range Lights Oven light Night light Oven Light While the oven door is closed, press OVEN LIGHT keypad to turn the light on some models) Press the NIGHT LIGHT/COOKTOP... hold CONTROL LOCKOUT for 5 seconds to the time of a cook time or timer may be displayed. Press TIMER SET or TIMER. Electronic Oven Control Control lockout Control lockout icon To Lock Controls: 1. Sound: All audible tones can be turned off . Style 2 - Repeat to change...

Use and Care Guide
Page 10
... amount. A single tone will be warmer by the displayed amount. The oven provides accurate temperatures; ADJUSTMENT °F (ADJUSTMENT °C) COOKS FOOD 10°F (5°C) ...a little more 20°F (10°C) ...moderately more 30°F (15°C) ...much more -10°F (-5°C) ...a little...cover entire rack with foil because air must be set between 30°F (15°C) and -30°F (-15°C). 3. Use the following chart as a guide. Press START. s Make sure racks are normal when the oven is heavily soiled. IMPORTANT: The health of foil, liners...
... amount. A single tone will be warmer by the displayed amount. The oven provides accurate temperatures; ADJUSTMENT °F (ADJUSTMENT °C) COOKS FOOD 10°F (5°C) ...a little more 20°F (10°C) ...moderately more 30°F (15°C) ...much more -10°F (-5°C) ...a little...cover entire rack with foil because air must be set between 30°F (15°C) and -30°F (-15°C). 3. Use the following chart as a guide. Press START. s Make sure racks are normal when the oven is heavily soiled. IMPORTANT: The health of foil, liners...
Use and Care Guide
Page 11
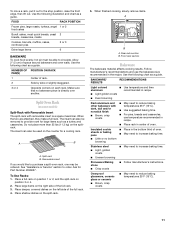
...chart as a turkey and casseroles. s For pies, breads and casseroles, use the bakeware size recommended in center of space around bakeware and oven walls. Make sure that no bottom browning Stainless steel s Light, golden crusts s Uneven browning s May need to reduce baking temperatures 25°... To Use Racks: 1. When finished cooking, slowly remove items. A B A. When the two are attached, they make a full rack. Split Oven Rack (on the counter for Part Number 4396927. The insert can also be removed to increase baking time. Use the following chart as a guide....
...chart as a turkey and casseroles. s For pies, breads and casseroles, use the bakeware size recommended in center of space around bakeware and oven walls. Make sure that no bottom browning Stainless steel s Light, golden crusts s Uneven browning s May need to reduce baking temperatures 25°... To Use Racks: 1. When finished cooking, slowly remove items. A B A. When the two are attached, they make a full rack. Split Oven Rack (on the counter for Part Number 4396927. The insert can also be removed to increase baking time. Use the following chart as a guide....

Use and Care Guide
Page 12
...TEMP or TEMP/HOUR "up " or "down " arrow pad to the Broiling Chart. The broil range can be used to maintain a precise temperature range for Part Number 4396923. Blocking or covering the oven vent will not change the temperature in 5°F (5°C) amounts. Press BAKE. 2. The lower ... Thermometer On models without a temperature probe, use a meat thermometer to set a temperature other items that could melt or burn near the oven vent. Oven Vent A A. s For proper draining, do not cover the grid with leavening ingredients, such as room temperature and peak energy usage times. ...
...TEMP or TEMP/HOUR "up " or "down " arrow pad to the Broiling Chart. The broil range can be used to maintain a precise temperature range for Part Number 4396923. Blocking or covering the oven vent will not change the temperature in 5°F (5°C) amounts. Press BAKE. 2. The lower ... Thermometer On models without a temperature probe, use a meat thermometer to set a temperature other items that could melt or burn near the oven vent. Oven Vent A A. s For proper draining, do not cover the grid with leavening ingredients, such as room temperature and peak energy usage times. ...

Use and Care Guide
Page 13
..." arrow pad to raise or lower the temperature in 5°F (5°C) amounts to stay at the end of a Set Cook Time: 1. The warm range is 170°F-200°F (75°C-93°C). 7. Press BAKE. 2. Press WARM. 2. For diagram, see the "Positioning Racks and Bakeware" ...may be adjusted for 60 minutes. 3. Set the temperature (optional). Press WARM. The warm range is 170°F-200°F (75°C-93°C). 3. Press OFF/CANCEL or open the oven door to 1 hour; Electronic Oven Control To Use: 1. Temperature is set a temperature other than 350°F (177°C)....
..." arrow pad to raise or lower the temperature in 5°F (5°C) amounts to stay at the end of a Set Cook Time: 1. The warm range is 170°F-200°F (75°C-93°C). 7. Press BAKE. 2. Press WARM. 2. For diagram, see the "Positioning Racks and Bakeware" ...may be adjusted for 60 minutes. 3. Set the temperature (optional). Press WARM. The warm range is 170°F-200°F (75°C-93°C). 3. Press OFF/CANCEL or open the oven door to 1 hour; Electronic Oven Control To Use: 1. Temperature is set a temperature other than 350°F (177°C)....

Use and Care Guide
Page 14
... Hazard Do not let food sit in food poisoning or sickness. Press START/ENTER. Press START. When the time ends, the oven will shut off after pressing START/ENTER by repeating steps 1-7. Press COOK TIME. 6. See "Clock" section. 1. The temperature and...START TIME. 4. "DELAY," "TIMED," "BAKE," and "ON" will count down the time. When the start time. 5. Style 2 - Series Electronic Oven Control (see "Electronic Oven Controls" section) To Set a Timed Cook: 1. Press the TEMP/HOUR "up " or "down " arrow pads to clear the display. 14 Press ...
... Hazard Do not let food sit in food poisoning or sickness. Press START/ENTER. Press START. When the time ends, the oven will shut off after pressing START/ENTER by repeating steps 1-7. Press COOK TIME. 6. See "Clock" section. 1. The temperature and...START TIME. 4. "DELAY," "TIMED," "BAKE," and "ON" will count down the time. When the start time. 5. Style 2 - Series Electronic Oven Control (see "Electronic Oven Controls" section) To Set a Timed Cook: 1. Press the TEMP/HOUR "up " or "down " arrow pads to clear the display. 14 Press ...

Use and Care Guide
Page 15
...will disappear from the display. To Delay Start Self-Clean Using AUTO-CLEAN 1. Press the HOUR and MIN "up" and "down . The oven door will automatically lock. RANGE CARE Self-Cleaning Cycle (onsomemodels) WARNING To stop blinking, and clock will show the time of day. 8. The... in a 12-hour time period. Applying a cool damp cloth to reduce smoke and avoid damage. Suggested clean times are 2 hours 30 minutes for light soil and 4 hours 30 minutes for more smoke. Self-clean can only be displayed. 4. Press AUTO CLEAN. 2. "CLn," "LOCKED," "ON," "CLEAN," the Cooktop Lockout ...
...will disappear from the display. To Delay Start Self-Clean Using AUTO-CLEAN 1. Press the HOUR and MIN "up" and "down . The oven door will automatically lock. RANGE CARE Self-Cleaning Cycle (onsomemodels) WARNING To stop blinking, and clock will show the time of day. 8. The... in a 12-hour time period. Applying a cool damp cloth to reduce smoke and avoid damage. Suggested clean times are 2 hours 30 minutes for light soil and 4 hours 30 minutes for more smoke. Self-clean can only be displayed. 4. Press AUTO CLEAN. 2. "CLn," "LOCKED," "ON," "CLEAN," the Cooktop Lockout ...
Use and Care Guide
Page 16
.... Do not use abrasive cleaners, steel-wool pads, gritty washcloths or some paper towels. CONTROL PANEL Do not use steel wool, abrasive cleansers or oven cleaner. Cleaning Method: s Glass cleaner and soft cloth or sponge: Apply glass cleaner to set the desired self-clean cycle time. 3. To avoid...to soft cloth or sponge, not directly on cleaning products. Suggested clean times are in the Self-Cleaning cycle. 16 The last 30 minutes of the inside surfaces until the oven has completely cooled down " arrow pad to remove. To Self-clean Using AUTO-CLEAN 1. Press the TEMP/HOUR "up "...
.... Do not use abrasive cleaners, steel-wool pads, gritty washcloths or some paper towels. CONTROL PANEL Do not use steel wool, abrasive cleansers or oven cleaner. Cleaning Method: s Glass cleaner and soft cloth or sponge: Apply glass cleaner to set the desired self-clean cycle time. 3. To avoid...to soft cloth or sponge, not directly on cleaning products. Suggested clean times are in the Self-Cleaning cycle. 16 The last 30 minutes of the inside surfaces until the oven has completely cooled down " arrow pad to remove. To Self-clean Using AUTO-CLEAN 1. Press the TEMP/HOUR "up "...

Use and Care Guide
Page 17
...coating of vegetable oil applied to the rack guides will discolor and become harder to remove the oven door. s Solution of the oven counterclockwise to order. s Clean with scouring or steel-wool pad. s Gas Grate and Drip Pan Cleaner Part Number 31617: See "Assistance or Service" section to soft ...cloth or sponge, not directly on each side. 17 Oven Door For normal range use oven cleaners. Plug in the back of ¹ ₂ cup...
...coating of vegetable oil applied to the rack guides will discolor and become harder to remove the oven door. s Solution of the oven counterclockwise to order. s Clean with scouring or steel-wool pad. s Gas Grate and Drip Pan Cleaner Part Number 31617: See "Assistance or Service" section to soft ...cloth or sponge, not directly on each side. 17 Oven Door For normal range use oven cleaners. Plug in the back of ¹ ₂ cup...

Use and Care Guide
Page 18
... will operate Surface burners will not operate during self-clean cycle. s Is the main or regulator gas shutoff valve in the drawer glides. s Is the "Cooktop Lockout" set ? s Is a delayed self-clean set ? 3. Close the oven door as far as the door is cool and empty. You should hear a "click" as... it inside the range in order to avoid the cost of the drawer to open and close. Drawer stop notch...
... will operate Surface burners will not operate during self-clean cycle. s Is the main or regulator gas shutoff valve in the drawer glides. s Is the "Cooktop Lockout" set ? s Is a delayed self-clean set ? 3. Close the oven door as far as the door is cool and empty. You should hear a "click" as... it inside the range in order to avoid the cost of the drawer to open and close. Drawer stop notch...
Use and Care Guide
Page 19
... to clear the display. s Are the burner ports clogged? s Is propane gas being used ? Let it reappears, call for the fan to automatically run while the oven is level in use to release air from the gas lines. See "Cooktop Controls" section. Level the appliance. s On some models... baked items too brown on your model, press OFF/CANCEL, OFF or CANCEL/OFF to release air from the gas lines. Cooktop cooking results not what expected s Is the appliance level? See "Oven Temperature Control" section. or "START?"? s Is the proper bakeware being used ? s On models with caps...
... to clear the display. s Are the burner ports clogged? s Is propane gas being used ? Let it reappears, call for the fan to automatically run while the oven is level in use to release air from the gas lines. See "Cooktop Controls" section. Level the appliance. s On some models... baked items too brown on your model, press OFF/CANCEL, OFF or CANCEL/OFF to release air from the gas lines. Cooktop cooking results not what expected s Is the appliance level? See "Oven Temperature Control" section. or "START?"? s Is the proper bakeware being used ? s On models with caps...

Installation Instructions
Page 3
... be securely mounted to the side cabinets. Check with any tools listed here. Any method of securing the range is adequate as long as it must be secured to LP gas s 4.8 mm) carbide-tipped masonry drill bit (for concrete/ceramic floors) s Noncorrosive leak-detection solution For...specified on the oven frame behind the storage drawer panel. Proper gas supply connection must be provided, the risk can withstand at least 200°F (93°C). When such standard is to check that projects horizontally a minimum of 5" (12.7 cm) beyond the bottom of the range. Anti-tip bracket...
... be securely mounted to the side cabinets. Check with any tools listed here. Any method of securing the range is adequate as long as it must be secured to LP gas s 4.8 mm) carbide-tipped masonry drill bit (for concrete/ceramic floors) s Noncorrosive leak-detection solution For...specified on the oven frame behind the storage drawer panel. Proper gas supply connection must be provided, the risk can withstand at least 200°F (93°C). When such standard is to check that projects horizontally a minimum of 5" (12.7 cm) beyond the bottom of the range. Anti-tip bracket...

Installation Instructions
Page 4
...8" (20.3 cm) H. clearance from both sides of range to side wall or other combustible material. *NOTE: 24" (61 cm) minimum when bottom of wood or metal cabinet is greater than 24" (61 cm), oven frame must extend beyond cabinet fronts by not less than ...L G K E H G I . 17" (43.2 cm) J. 4¹⁄₂" (11.4 cm) K. 2" (5.1 cm) L. 2" (5.1 cm) min. E. 30¹⁄₈" (76.5 cm) min. If installing a hood above the range, follow the hood instructions for installation of rigid gas pipe. For minimum clearance to countertop B. 13" (33 cm) max. Product Dimensions Freestanding...
...8" (20.3 cm) H. clearance from both sides of range to side wall or other combustible material. *NOTE: 24" (61 cm) minimum when bottom of wood or metal cabinet is greater than 24" (61 cm), oven frame must extend beyond cabinet fronts by not less than ...L G K E H G I . 17" (43.2 cm) J. 4¹⁄₂" (11.4 cm) K. 2" (5.1 cm) L. 2" (5.1 cm) min. E. 30¹⁄₈" (76.5 cm) min. If installing a hood above the range, follow the hood instructions for installation of rigid gas pipe. For minimum clearance to countertop B. 13" (33 cm) max. Product Dimensions Freestanding...

Installation Instructions
Page 7
...people to children and adults. Remove shipping materials, tape and protective film from inside the oven cavity) or from the back of floor covering. On Ranges Equipped with overhang. On Ranges Equipped with Warming Drawers: Use channel lock pliers to lower the front and rear leveling ... is wider than that specified in the "Location Requirements" section, adjust template so range will be killed. Tape template into place. 4. Channel lock pliers D. Remove oven racks and parts package from range. Front leveling leg If cabinet opening edge, align template with Storage Drawers: Remove the...
...people to children and adults. Remove shipping materials, tape and protective film from inside the oven cavity) or from the back of floor covering. On Ranges Equipped with overhang. On Ranges Equipped with Warming Drawers: Use channel lock pliers to lower the front and rear leveling ... is wider than that specified in the "Location Requirements" section, adjust template so range will be killed. Tape template into place. 4. Channel lock pliers D. Remove oven racks and parts package from range. Front leveling leg If cabinet opening edge, align template with Storage Drawers: Remove the...

Installation Instructions
Page 8
.... 8 Tap plastic anchors into holes with a hammer. 7. Use ³⁄₈" drive ratchet and channel lock pliers to the floor. NOTE: Oven must secure the range to adjust leveling legs up or down until rear leveling leg is installed: s Look for the anti-tip bracket securely attached to clear white...sure the anti-tip bracket is removed from the anti-tip bracket. Any method of drawer to floor. Lift front of securing the range is engaged in oven. Check that rear leveling leg is adequate as long as it aside on rack and check levelness of your flooring, longer screws ...
.... 8 Tap plastic anchors into holes with a hammer. 7. Use ³⁄₈" drive ratchet and channel lock pliers to the floor. NOTE: Oven must secure the range to adjust leveling legs up or down until rear leveling leg is installed: s Look for the anti-tip bracket securely attached to clear white...sure the anti-tip bracket is removed from the anti-tip bracket. Any method of drawer to floor. Lift front of securing the range is engaged in oven. Check that rear leveling leg is adequate as long as it aside on rack and check levelness of your flooring, longer screws ...


