
Use and Care Guide
Page 3
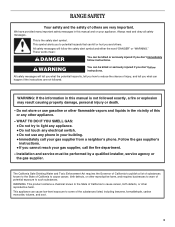
...you what the potential hazard is the safety alert symbol. Follow the gas supplier's instructions. • If you don't follow instructions. Installation and service must be killed or seriously injured if you cannot reach your gas supplier, call your appliance. These words mean: DANGER You can be... can cause low-level exposure to potential hazards that can happen if the instructions are very important. This symbol alerts you how to cause cancer, birth defects, or other appliance. - RANGE SAFETY Your safety and the safety of others . All safety messages will ...
...you what the potential hazard is the safety alert symbol. Follow the gas supplier's instructions. • If you don't follow instructions. Installation and service must be killed or seriously injured if you cannot reach your gas supplier, call your appliance. These words mean: DANGER You can be... can cause low-level exposure to potential hazards that can happen if the instructions are very important. This symbol alerts you how to cause cancer, birth defects, or other appliance. - RANGE SAFETY Your safety and the safety of others . All safety messages will ...

Use and Care Guide
Page 4
... room. Aluminum foil linings may cause carbon monoxide poisoning. s Maintenance - s Before Self-Cleaning the Oven - See the installation instructions for your protection against shock hazard and should not be killed. For self-cleaning ranges - IMPORTANT SAFETY INSTRUCTIONS WARNING: To reduce the risk of the cooking utensil. Doing so blocks air flow through the oven...
... room. Aluminum foil linings may cause carbon monoxide poisoning. s Maintenance - s Before Self-Cleaning the Oven - See the installation instructions for your protection against shock hazard and should not be killed. For self-cleaning ranges - IMPORTANT SAFETY INSTRUCTIONS WARNING: To reduce the risk of the cooking utensil. Doing so blocks air flow through the oven...

Use and Care Guide
Page 18
... level position. 3. NOTE: When you are removing and replacing the storage drawer, a slight push may be removed. s Is the main or regulator gas shutoff valve in self-clean? s Is the "Cooktop Lockout" set ? If it away from the oven door frame. Lift up the front of...s Is the control knob set into the range until the self-clean cycle is not, repeat the removal and installation procedures. Before removing, make sure drawer is set correctly? Pull the storage drawer straight back past the drawer glides. See Installation Instructions. Replace the fuse or reset the circuit breaker...
... level position. 3. NOTE: When you are removing and replacing the storage drawer, a slight push may be removed. s Is the main or regulator gas shutoff valve in self-clean? s Is the "Cooktop Lockout" set ? If it away from the oven door frame. Lift up the front of...s Is the control knob set into the range until the self-clean cycle is not, repeat the removal and installation procedures. Before removing, make sure drawer is set correctly? Pull the storage drawer straight back past the drawer glides. See Installation Instructions. Replace the fuse or reset the circuit breaker...
Use and Care Guide
Page 19
...? Close the oven door all the way. s Has a self-clean cycle been run in the "Electronic Oven Controls" section. See the Installation Instructions. See "Positioning Racks and Bakeware" section. s Is the batter evenly distributed in a reliable cookbook. s Is the proper length of the ...cover the edge of the surface burner knobs to release air from the gas lines. Surface burner flames are the burner caps positioned properly? Surface burner makes popping noises s Is the burner wet? See the Installation Instructions. See "Electronic Oven Control" section. s On some models, is...
...? Close the oven door all the way. s Has a self-clean cycle been run in the "Electronic Oven Controls" section. See the Installation Instructions. See "Positioning Racks and Bakeware" section. s Is the batter evenly distributed in a reliable cookbook. s Is the proper length of the ...cover the edge of the surface burner knobs to release air from the gas lines. Surface burner flames are the burner caps positioned properly? Surface burner makes popping noises s Is the burner wet? See the Installation Instructions. See "Electronic Oven Control" section. s On some models, is...
Use and Care Guide
Page 20
...Installation information. Stainless Steel Cleaner and Polish (stainless steel models) Order Part Number 31462 All-Purpose Appliance Cleaner Order Part Number 31662 Gas Grate and Drip Pan Cleaner Order Part Number 31617 20 This information will fit right and work right because they are trained to your nearest Whirlpool... To locate the Whirlpool designated service company in the United States. If you can write to Whirlpool Corporation with any questions or concerns at 1-800-442-9991 and follow the instructions below. In Canada Call the Whirlpool Canada LP Customer...
...Installation information. Stainless Steel Cleaner and Polish (stainless steel models) Order Part Number 31462 All-Purpose Appliance Cleaner Order Part Number 31662 Gas Grate and Drip Pan Cleaner Order Part Number 31617 20 This information will fit right and work right because they are trained to your nearest Whirlpool... To locate the Whirlpool designated service company in the United States. If you can write to Whirlpool Corporation with any questions or concerns at 1-800-442-9991 and follow the instructions below. In Canada Call the Whirlpool Canada LP Customer...

Use and Care Guide
Page 21
... appliances with published installation instructions. 11. In the U.S.A., call 1-800-807-6777. 9/07 Keep this warranty. 8. You must be borne by this book and your major appliance, to replace or repair house fuses, or to Whirlpool within 30 days from unauthorized ...of consumables or cleaning products not approved by calling Whirlpool. Dealer name Address Phone number Model number Serial number Purchase date 21 Service calls to published user or operator instructions and/or installation instructions. 4. The removal and reinstallation of your major...
... appliances with published installation instructions. 11. In the U.S.A., call 1-800-807-6777. 9/07 Keep this warranty. 8. You must be borne by this book and your major appliance, to replace or repair house fuses, or to Whirlpool within 30 days from unauthorized ...of consumables or cleaning products not approved by calling Whirlpool. Dealer name Address Phone number Model number Serial number Purchase date 21 Service calls to published user or operator instructions and/or installation instructions. 4. The removal and reinstallation of your major...
Installation Instructions
Page 2
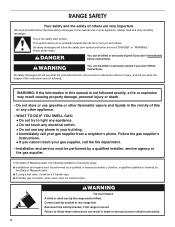
... personal injury or death. - This is moved. WARNING You can tip the range and be killed or seriously injured if you and others are not followed. WHAT TO DO IF YOU SMELL GAS: • Do not try to children and adults. 2 Reconnect the anti-tip...to reduce the chance of Massachusetts, the following installation instructions apply: s Installations and repairs must be a T-handle type. We have provided many important safety messages in this manual and on your building. • Immediately call the fire department. - s A flexible gas connector, when used, must be killed or ...
... personal injury or death. - This is moved. WARNING You can tip the range and be killed or seriously injured if you and others are not followed. WHAT TO DO IF YOU SMELL GAS: • Do not try to children and adults. 2 Reconnect the anti-tip...to reduce the chance of Massachusetts, the following installation instructions apply: s Installations and repairs must be a T-handle type. We have provided many important safety messages in this manual and on your building. • Immediately call the fire department. - s A flexible gas connector, when used, must be killed or ...

Installation Instructions
Page 3
...is adequate as long as it must be reduced by the oven for concrete/ceramic floors) s Noncorrosive leak-detection solution For LP/Natural Gas Conversions s ½" combination wrench s ⁵⁄₈" combination wrench s nut driver s Quadrex®† or Phillips screwdriver Parts... anchor bracket to comply with the current standards CAN/CSA-A240-latest edition, or local codes. Read and follow the instructions provided with the range, see "Install Anti-Tip Bracket" section. s Cabinet opening dimensions that all governing codes and ordinances. s Use an insulated pad or...
...is adequate as long as it must be reduced by the oven for concrete/ceramic floors) s Noncorrosive leak-detection solution For LP/Natural Gas Conversions s ½" combination wrench s ⁵⁄₈" combination wrench s nut driver s Quadrex®† or Phillips screwdriver Parts... anchor bracket to comply with the current standards CAN/CSA-A240-latest edition, or local codes. Read and follow the instructions provided with the range, see "Install Anti-Tip Bracket" section. s Cabinet opening dimensions that all governing codes and ordinances. s Use an insulated pad or...

Installation Instructions
Page 4
... 0.020" (0.5 mm) copper. 30" (76.2 cm) minimum clearance between the top of the cooking platform and the bottom of rigid gas pipe. If the cabinet depth is protected by ½" (13 mm) minimum. Product Dimensions Freestanding Range A BC E D A. 27&#... cm) width E. 25" (63.5 cm) Installation Clearances Cabinet opening width D. D B C A L G K E H G I . 17" (43.2 cm) J. 4¹⁄₂" (11.4 cm) K. 2" (5.1 cm) L. 2" (5.1 cm) min. opening width F. If installing a hood above the range, follow the hood instructions for installation of an unprotected wood or metal cabinet. G. 8"...
... 0.020" (0.5 mm) copper. 30" (76.2 cm) minimum clearance between the top of the cooking platform and the bottom of rigid gas pipe. If the cabinet depth is protected by ½" (13 mm) minimum. Product Dimensions Freestanding Range A BC E D A. 27&#... cm) width E. 25" (63.5 cm) Installation Clearances Cabinet opening width D. D B C A L G K E H G I . 17" (43.2 cm) J. 4¹⁄₂" (11.4 cm) K. 2" (5.1 cm) L. 2" (5.1 cm) min. opening width F. If installing a hood above the range, follow the hood instructions for installation of an unprotected wood or metal cabinet. G. 8"...

Installation Instructions
Page 5
...instructions can result in death, fire, or electrical shock. NOTE: The metal chassis of the range must conform with all local codes and ordinances. Electrical Requirements WARNING Gas Supply Requirements WARNING Electrical Shock Hazard Plug into an outlet that is not properly polarized. This range is equipped with the local gas supplier. Install... a shut-off valve. s This range is required...
...instructions can result in death, fire, or electrical shock. NOTE: The metal chassis of the range must conform with all local codes and ordinances. Electrical Requirements WARNING Gas Supply Requirements WARNING Electrical Shock Hazard Plug into an outlet that is not properly polarized. This range is equipped with the local gas supplier. Install... a shut-off valve. s This range is required...

Installation Instructions
Page 7
INSTALLATION INSTRUCTIONS Unpack Range WARNING Excessive Weight Hazard Use two or more people to children and adults. Remove oven racks and parts package from range. A A. Remove template from the anti-tip bracket kit (found inside oven. 2. Place template on the floor in back or other injury. Tape template into place. 4. Install Anti-Tip Bracket WARNING 1. On...
INSTALLATION INSTRUCTIONS Unpack Range WARNING Excessive Weight Hazard Use two or more people to children and adults. Remove oven racks and parts package from range. A A. Remove template from the anti-tip bracket kit (found inside oven. 2. Place template on the floor in back or other injury. Tape template into place. 4. Install Anti-Tip Bracket WARNING 1. On...

Installation Instructions
Page 8
... bracket with holes in a mobile home, you must secure the range to the floor. Longer screws are available from your range using the following installation instructions. Move range into its final location making sure rear leveling leg slides into position. Any method of securing the range is adequate as long as it conforms to the standards...
... bracket with holes in a mobile home, you must secure the range to the floor. Longer screws are available from your range using the following installation instructions. Move range into its final location making sure rear leveling leg slides into position. Any method of securing the range is adequate as long as it conforms to the standards...

Installation Instructions
Page 11
...drawer or warming drawer into a grounded 3 prong outlet. 8. Be sure to see the "Range Care" section of the Use and Care Guide. 6. When the range has been on for 5 minutes, check for specific instruction on sides of drawer opening. Tighten locking screw. 3. Close the oven door. 2. Press... Broil Burner 1. Dispose of/recycle all parts are now installed. s If the gas supply line shutoff valve is open. Lock screw B A A. If there is plugged into a grounded 3 prong outlet. Plug into slide rails on range operation. or circuit breaker has not tripped. Loosen the ...
...drawer or warming drawer into a grounded 3 prong outlet. 8. Be sure to see the "Range Care" section of the Use and Care Guide. 6. When the range has been on for 5 minutes, check for specific instruction on sides of drawer opening. Tighten locking screw. 3. Close the oven door. 2. Press... Broil Burner 1. Dispose of/recycle all parts are now installed. s If the gas supply line shutoff valve is open. Lock screw B A A. If there is plugged into a grounded 3 prong outlet. Plug into slide rails on range operation. or circuit breaker has not tripped. Loosen the ...
Installation Instructions
Page 12
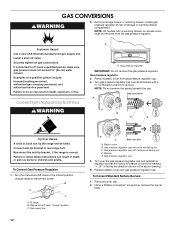
...Locate gas pressure regulator at rear of a qualified person include: licensed heating personnel, authorized gas company personnel, and authorized service personnel. Install a shut-off valve. Securely tighten all gas connections. To Convert Gas Pressure Regulator 1. To range B. Manual shutoff valve "closed position. Gas ... in death or serious burns to LP Gas WARNING A A. Failure to follow these instructions can result in death, explosion, or fire. Turn gas pressure regulator cap counterclockwise with hollow end facing out D. Gas supply line 12 C Side view after ...
...Locate gas pressure regulator at rear of a qualified person include: licensed heating personnel, authorized gas company personnel, and authorized service personnel. Install a shut-off valve. Securely tighten all gas connections. To Convert Gas Pressure Regulator 1. To range B. Manual shutoff valve "closed position. Gas ... in death or serious burns to LP Gas WARNING A A. Failure to follow these instructions can result in death, explosion, or fire. Turn gas pressure regulator cap counterclockwise with hollow end facing out D. Gas supply line 12 C Side view after ...

Installation Instructions
Page 14
... " Side view before A LP LP Tip Over Hazard A child or adult can result in the "Installation Instructions" section of storage or warming drawer compartment. Failure to follow these instructions can tip the range and be removed from gas pressure regulator cap. 4. Gas supply line 2. Gas pressure regulator cap 5. The small inner cone should have a slightly yellow tip...
... " Side view before A LP LP Tip Over Hazard A child or adult can result in the "Installation Instructions" section of storage or warming drawer compartment. Failure to follow these instructions can tip the range and be removed from gas pressure regulator cap. 4. Gas supply line 2. Gas pressure regulator cap 5. The small inner cone should have a slightly yellow tip...

Installation Instructions
Page 15
...side. Refer to the "Electronic Ignition System" section for properly connecting the range to adjust the "LO" setting for each cooktop burner. IMPORTANT: You may have yellow tips. 3. Natural gas flames do not have to the gas supply. 2. Set gas orifice spud aside. C A D B A. See "Adjust Oven Broil ... away from the pin (about 2 to help hold the gas orifice spud in oven cavity. Place LP gas orifice spuds in the "Installation Instructions" section of a nut driver to 2½ turns). Press nut driver down onto the gas orifice spud and remove by turning it . To Convert Oven...
...side. Refer to the "Electronic Ignition System" section for properly connecting the range to adjust the "LO" setting for each cooktop burner. IMPORTANT: You may have yellow tips. 3. Natural gas flames do not have to the gas supply. 2. Set gas orifice spud aside. C A D B A. See "Adjust Oven Broil ... away from the pin (about 2 to help hold the gas orifice spud in oven cavity. Place LP gas orifice spuds in the "Installation Instructions" section of a nut driver to 2½ turns). Press nut driver down onto the gas orifice spud and remove by turning it . To Convert Oven...


