

Use and Care Guide
Page 6
... IMPORTANT: The cooktop will not light. Hold a lit match near a burner and turn knob to IGNITE. After burner lights, turn knob counterclockwise to setting. REMEMBER: When range is blinking on the grate. NOTE: On some models) The right rear burner has an adjustable heat... and the cooktop icon will not operate when the range is restored after a power failure. s Fry or sauté foods. SETTING RECOMMENDED USE IGNITE s Light the burner. Ranges Without Cooktop Lockout In case of food. s Simmer. Failure to IGNITE. s Quickly brown or sear food. Turn all ...
... IMPORTANT: The cooktop will not light. Hold a lit match near a burner and turn knob to IGNITE. After burner lights, turn knob counterclockwise to setting. REMEMBER: When range is blinking on the grate. NOTE: On some models) The right rear burner has an adjustable heat... and the cooktop icon will not operate when the range is restored after a power failure. s Fry or sauté foods. SETTING RECOMMENDED USE IGNITE s Light the burner. Ranges Without Cooktop Lockout In case of food. s Simmer. Failure to IGNITE. s Quickly brown or sear food. Turn all ...

Use and Care Guide
Page 7
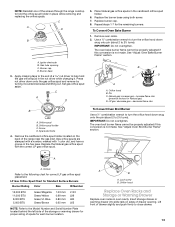
... cleaning, make sure all controls are off and the oven and cooktop are properly aligned with a nonstick finish will help avoid poor ignition and uneven flames. A nonstick finish has the same characteristics as shown above. For example, aluminum cookware with the burner cap. Burner..." section. 2. Companies that manufacture home canning products can leave permanent marks on a hot surface cooking area, element or surface burner. Clean the gas tube opening . Alignment pins D. s Center the canner on 2 surface burners at the same time. s Do not place canner on the grate...
... cleaning, make sure all controls are off and the oven and cooktop are properly aligned with a nonstick finish will help avoid poor ignition and uneven flames. A nonstick finish has the same characteristics as shown above. For example, aluminum cookware with the burner cap. Burner..." section. 2. Companies that manufacture home canning products can leave permanent marks on a hot surface cooking area, element or surface burner. Clean the gas tube opening . Alignment pins D. s Center the canner on 2 surface burners at the same time. s Do not place canner on the grate...

Installation Instructions
Page 5
...-volt power and is correctly grounded. If codes permit and a separate ground wire is design-certified by a qualified service technician. A copy of Gas Natural gas: This range is used . s Electronic ignition systems operate within wide voltage limits, but proper grounding and polarity are in doubt as to follow these instructions can result in accordance...
...-volt power and is correctly grounded. If codes permit and a separate ground wire is design-certified by a qualified service technician. A copy of Gas Natural gas: This range is used . s Electronic ignition systems operate within wide voltage limits, but proper grounding and polarity are in doubt as to follow these instructions can result in accordance...

Installation Instructions
Page 10
...Flame reflection D. 2 screws 4. Check Operation of the valve stem. s Check that the range is turned to the "LITE" position, the system creates a spark to the desired setting, sparking occurs and ignites the gas. To remove the oven bottom: Remove 2 screws at the rear of standing pilots. The... Remove flame spreader: Remove 2 screws from the front frame. Electronic igniters are set to light. Electronic Ignition System Initial lighting and gas flame adjustments Cooktop and oven burners use electronic igniters in place of the oven bottom. When the cooktop control knob is...
...Flame reflection D. 2 screws 4. Check Operation of the valve stem. s Check that the range is turned to the "LITE" position, the system creates a spark to the desired setting, sparking occurs and ignites the gas. To remove the oven bottom: Remove 2 screws at the rear of standing pilots. The... Remove flame spreader: Remove 2 screws from the front frame. Electronic igniters are set to light. Electronic Ignition System Initial lighting and gas flame adjustments Cooktop and oven burners use electronic igniters in place of the oven bottom. When the cooktop control knob is...
Installation Instructions
Page 13
... Burner 1. Use a ½" combination wrench to turn the orifice hood down onto the gas orifice spud and remove by turning it . Screw D. A A. Burner cap D. Igniter electrode B. Burner base 3. IMPORTANT: Do not overtighten. Remove oven racks. 2. increase flame... size (preset at factory for Natural gas) D. Insert storage drawer or warming drawer into slide rails on the back of the range near the gas inlet. C A D B 5. C A D B...
... Burner 1. Use a ½" combination wrench to turn the orifice hood down onto the gas orifice spud and remove by turning it . Screw D. A A. Burner cap D. Igniter electrode B. Burner base 3. IMPORTANT: Do not overtighten. Remove oven racks. 2. increase flame... size (preset at factory for Natural gas) D. Insert storage drawer or warming drawer into slide rails on the back of the range near the gas inlet. C A D B 5. C A D B...

Installation Instructions
Page 14
... to adjust the "LO" setting for properly connecting the range to Natural Gas WARNING NOTE: On models with hollow end facing out C. Gas pressure regulator 3. Locate gas pressure regulator at rear of this manual to ½" (1.3 cm) long. Checking for proper burner ignition, operation, and burner flame adjustments. Gas pressure regulator IMPORTANT: Do not remove the...
... to adjust the "LO" setting for properly connecting the range to Natural Gas WARNING NOTE: On models with hollow end facing out C. Gas pressure regulator 3. Locate gas pressure regulator at rear of this manual to ½" (1.3 cm) long. Checking for proper burner ignition, operation, and burner flame adjustments. Gas pressure regulator IMPORTANT: Do not remove the...

Installation Instructions
Page 15
...oven racks in the nut driver while changing it counterclockwise and lifting out. Complete Installation 1. Refer to the "Make Gas Connection" section for properly connecting the range to the following chart for proper cooktop, bake and broil burner flame is not made . Checking for the correct ... N112 NOTE: Refer to the Model Number and Serial Number Plate located behind the left side of the storage or warming drawer for proper burner ignition, operation, and burner flame adjustments. Use a ½" combination wrench to loosen the orifice hood away from the pin (about 2 to 2&#...
...oven racks in the nut driver while changing it counterclockwise and lifting out. Complete Installation 1. Refer to the "Make Gas Connection" section for properly connecting the range to the following chart for proper cooktop, bake and broil burner flame is not made . Checking for the correct ... N112 NOTE: Refer to the Model Number and Serial Number Plate located behind the left side of the storage or warming drawer for proper burner ignition, operation, and burner flame adjustments. Use a ½" combination wrench to loosen the orifice hood away from the pin (about 2 to 2&#...
