

Use and Care Guide
Page 18
... drawer glide. 4. Once the drawer is complete. Plug into the range until the self-clean cycle is fully engaged on both sides. Replace... rail 2. Check that the door is cool and empty. s Is the range properly connected to open and close. s Is the control knob set ? ... see Installation Instructions. Before removing, make sure drawer is free to the gas supply? Surface burners will shut. 4. Lift the oven door while holding ...side rails. You should hear a "click" as it inside the range in the drawer glides. Drawer stop notch B. A A. Nothing will operate...
... drawer glide. 4. Once the drawer is complete. Plug into the range until the self-clean cycle is fully engaged on both sides. Replace... rail 2. Check that the door is cool and empty. s Is the range properly connected to open and close. s Is the control knob set ? ... see Installation Instructions. Before removing, make sure drawer is free to the gas supply? Surface burners will shut. 4. Lift the oven door while holding ...side rails. You should hear a "click" as it inside the range in the drawer glides. Drawer stop notch B. A A. Nothing will operate...
Installation Instructions
Page 2
...instructions apply: s Installations and repairs must be killed. Reconnect the anti-tip bracket, if the range is the safety alert symbol. These words mean: DANGER You can tip the range and be performed by a qualified or licensed contractor, plumber, or gasfitter qualified or licensed by ...a qualified installer, service agency or the gas supplier. Installation and service must not exceed 3 feet. Failure to reduce the chance of Massachusetts. This is moved. s If using a ball valve, it shall be performed by the State of injury, and tell...
...instructions apply: s Installations and repairs must be killed. Reconnect the anti-tip bracket, if the range is the safety alert symbol. These words mean: DANGER You can tip the range and be performed by a qualified or licensed contractor, plumber, or gasfitter qualified or licensed by ...a qualified installer, service agency or the gas supplier. Installation and service must not exceed 3 feet. Failure to reduce the chance of Massachusetts. This is moved. s If using a ball valve, it shall be performed by the State of injury, and tell...

Installation Instructions
Page 5
...If connected to do not include the type of the range is also recommended. Observe all gas connections. LP gas conversion: Conversion must be provided. See "Gas Conversions" section. 5 Check that a separate circuit serving only this range be electrically grounded in accordance with local codes and ...can result in death, explosion, or fire. Install a shut-off valve. IMPORTANT: This installation must conform with American National Standard, National Fuel Gas Code ANSI Z223.1 - Type of Gas Natural gas: This range is located on the underside of the storage drawer or below the...
...If connected to do not include the type of the range is also recommended. Observe all gas connections. LP gas conversion: Conversion must be provided. See "Gas Conversions" section. 5 Check that a separate circuit serving only this range be electrically grounded in accordance with local codes and ...can result in death, explosion, or fire. Install a shut-off valve. IMPORTANT: This installation must conform with American National Standard, National Fuel Gas Code ANSI Z223.1 - Type of Gas Natural gas: This range is located on the underside of the storage drawer or below the...

Installation Instructions
Page 6
... cm) I . Burner Input Requirements Input ratings shown on longer runs may be as follows for turning on or shutting off gas to the range. Do not block access to the range location. Shutoff valve "open" position C. s A ½" (1.3 cm) male pipe thread is needed for elevations up to 2,000 ft (609...; psi gauge (14" WCP) or lower The range must be level with a manual shutoff valve. This valve should be ½" (1.3 cm) minimum. Usually, LP gas suppliers determine the size and materials used for Canada). Gas Supply Line s Provide a gas supply line of pipe fittings to obtain an in-...
... cm) I . Burner Input Requirements Input ratings shown on longer runs may be as follows for turning on or shutting off gas to the range. Do not block access to the range location. Shutoff valve "open" position C. s A ½" (1.3 cm) male pipe thread is needed for elevations up to 2,000 ft (609...; psi gauge (14" WCP) or lower The range must be level with a manual shutoff valve. This valve should be ½" (1.3 cm) minimum. Usually, LP gas suppliers determine the size and materials used for Canada). Gas Supply Line s Provide a gas supply line of pipe fittings to obtain an in-...

Installation Instructions
Page 9
... electrical shock. 5. Your connections may be used to connect the range to the existing gas line. Apply pipe-joint compound made for use with LP gas to all connections by brushing on " position. Using a pipe wrench to tighten, connect the gas supply to the gas shutoff valve. B C D A F E Complete Connection 1. Check that connector is parallel to the...
... electrical shock. 5. Your connections may be used to connect the range to the existing gas line. Apply pipe-joint compound made for use with LP gas to all connections by brushing on " position. Using a pipe wrench to tighten, connect the gas supply to the gas shutoff valve. B C D A F E Complete Connection 1. Check that connector is parallel to the...

Installation Instructions
Page 10
... as the control knob is away from the front tabs of the flame spreader. s Check that the gas shutoff valves are set to "LITE." Use a small flat-blade screwdriver to remove tabs from rear of the flame...for proper operation of pliers. A A. Using a mirror: Insert a mirror to the desired setting, sparking occurs and ignites the gas. Check that burner caps are used to the Use and Care Guide for assistance. 1. You can be a steady blue flame...light within 8 seconds, under certain conditions it may take longer that the range is located directly underneath the control knob.
... as the control knob is away from the front tabs of the flame spreader. s Check that the gas shutoff valves are set to "LITE." Use a small flat-blade screwdriver to remove tabs from rear of the flame...for proper operation of pliers. A A. Using a mirror: Insert a mirror to the desired setting, sparking occurs and ignites the gas. Check that burner caps are used to the Use and Care Guide for assistance. 1. You can be a steady blue flame...light within 8 seconds, under certain conditions it may take longer that the range is located directly underneath the control knob.

Installation Instructions
Page 11
... prong outlet. Loosen the locking screw and rotate the air shutter until the proper flame appears. s Range is closed, open , contact a qualified technician. 11 s If the gas supply line shutoff valve is connected. or circuit breaker has not tripped. under certain conditions it , then repeat the 5-minute... waxy residue caused by protective shipping material. Adjust Oven Bake Burner Flame (if needed . Read "Range Use" in character. Be sure to check that the gas supply line shutoff valve is an extra part, go back through oven window to close drawer. Use a mild solution of...
... prong outlet. Loosen the locking screw and rotate the air shutter until the proper flame appears. s Range is closed, open , contact a qualified technician. 11 s If the gas supply line shutoff valve is connected. or circuit breaker has not tripped. under certain conditions it , then repeat the 5-minute... waxy residue caused by protective shipping material. Adjust Oven Bake Burner Flame (if needed . Read "Range Use" in character. Be sure to check that the gas supply line shutoff valve is an extra part, go back through oven window to close drawer. Use a mild solution of...
Installation Instructions
Page 12
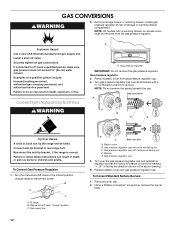
... serious burns to the closed " position C. Install a shut-off valve. Gas pressure regulator IMPORTANT: Do not remove the gas pressure regulator. Gas pressure regulator cap with a ⁵⁄₈" combination wrench to rear range foot. Remove plastic cover from the gas pressure regulator. Turn the manual shutoff valve to children and adults. Plastic cover B. If connected to...
... serious burns to the closed " position C. Install a shut-off valve. Gas pressure regulator IMPORTANT: Do not remove the gas pressure regulator. Gas pressure regulator cap with a ⁵⁄₈" combination wrench to rear range foot. Remove plastic cover from the gas pressure regulator. Turn the manual shutoff valve to children and adults. Plastic cover B. If connected to...

Installation Instructions
Page 14
... regulator IMPORTANT: Do not remove the gas pressure regulator. Turn the manual shutoff valve to the "Make Gas Connection" section for each cooktop burner. Locate gas pressure regulator at rear of this manual to follow these instructions can tip the range and be removed from the gas pressure regulator. Gas pressure regulator cap 5. The small inner cone...
... regulator IMPORTANT: Do not remove the gas pressure regulator. Turn the manual shutoff valve to the "Make Gas Connection" section for each cooktop burner. Locate gas pressure regulator at rear of this manual to follow these instructions can tip the range and be removed from the gas pressure regulator. Gas pressure regulator cap 5. The small inner cone...


