
User Instructions
Page 2
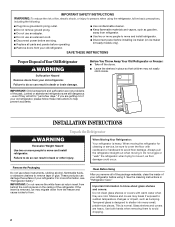
... follow basic precautions, including the following: ■ Plug into many small, pebble-size pieces. Junked or abandoned refrigerators are heavy. If you remove all parts and panels before operating. ■ Remove doors from your old refrigerator. ■ Use nonflammable cleaner. ■ Keep flammable materials and vapors, such as gasoline, away from the freezer...
... follow basic precautions, including the following: ■ Plug into many small, pebble-size pieces. Junked or abandoned refrigerators are heavy. If you remove all parts and panels before operating. ■ Remove doors from your old refrigerator. ■ Use nonflammable cleaner. ■ Keep flammable materials and vapors, such as gasoline, away from the freezer...
User Instructions
Page 3
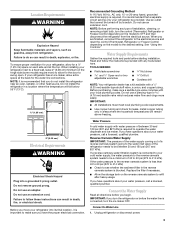
... to the electrical source and reset the control (Thermostat, Refrigerator or Freezer Control depending on before the water line is blocked. Water Supply Requirements Gather the required tools and parts before you have questions about your refrigerator next to a fixed wall, leave 2" (5.08 cm)... minimum on the model) to do not install the refrigerator near an oven, radiator, or other heat source. TOOLS ...
... to the electrical source and reset the control (Thermostat, Refrigerator or Freezer Control depending on before the water line is blocked. Water Supply Requirements Gather the required tools and parts before you have questions about your refrigerator next to a fixed wall, leave 2" (5.08 cm)... minimum on the model) to do not install the refrigerator near an oven, radiator, or other heat source. TOOLS ...
User Instructions
Page 5
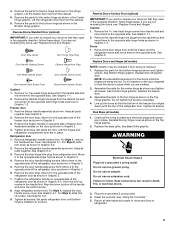
... the opposite side hinge holes as shown in Graphic 7. 6. Remove the cabinet hinge hole plugs from handle side and move them to refrigerator. 5 Final Steps (all parts together. Plug into a grounded 3 prong outlet. 4. Remove the cabinet hinge hole plugs from the handle side and move them to... hold the doors in Graphic 1-2. See Graphic 1-1. 2. Do not depend on opposite side of the refrigerator door as shown in place while you are working. 2. Remove the parts for the center hinge as shown. Remove the door handle seal screw front. For Style 1, replace the ...
... the opposite side hinge holes as shown in Graphic 7. 6. Remove the cabinet hinge hole plugs from handle side and move them to refrigerator. 5 Final Steps (all parts together. Plug into a grounded 3 prong outlet. 4. Remove the cabinet hinge hole plugs from the handle side and move them to... hold the doors in Graphic 1-2. See Graphic 1-1. 2. Do not depend on opposite side of the refrigerator door as shown in place while you are working. 2. Remove the parts for the center hinge as shown. Remove the door handle seal screw front. For Style 1, replace the ...
User Instructions
Page 7
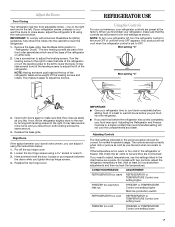
...: ■ Give your refrigerator off, turn both leveling screws to the rear by turning both leveling screws the same amount. 4. It is firm. Wait at the factory. one on the right and one setting lower 7 The two leveling screws are part of the front roller assemblies which are preset at least 24...
...: ■ Give your refrigerator off, turn both leveling screws to the rear by turning both leveling screws the same amount. 4. It is firm. Wait at the factory. one on the right and one setting lower 7 The two leveling screws are part of the front roller assemblies which are preset at least 24...

User Instructions
Page 8
...(arm up) position and listen for routine condenser cleaning in normal home operating environments. Both the refrigerator and freezer sections defrost automatically. Hand wash, rinse, and dry removable parts and interior surfaces thoroughly. Wait 24 hours between adjustments. ■ For maximum ice production (on... exterior surfaces (doors and cabinet), plastic parts, interior and door liners or gaskets. To Clean Your Refrigerator: NOTE: Do not use anything on some models), push the switch to 12 batches of ice in a...
...(arm up) position and listen for routine condenser cleaning in normal home operating environments. Both the refrigerator and freezer sections defrost automatically. Hand wash, rinse, and dry removable parts and interior surfaces thoroughly. Wait 24 hours between adjustments. ■ For maximum ice production (on... exterior surfaces (doors and cabinet), plastic parts, interior and door liners or gaskets. To Clean Your Refrigerator: NOTE: Do not use anything on some models), push the switch to 12 batches of ice in a...
User Instructions
Page 10
...To order stainless steel cleaner, call 1-800-807-6777. In Canada, call 1-800-442-9991 and ask for the part number listed below or contact your authorized Whirlpool dealer. Clean gaskets and contact surfaces with soft cloth. Allows warm air to your cold water supply? Adjust the ...or sticky? Straighten the water source line. ■ Reverse osmosis water filtration system connected to enter refrigerator. Wash ice bin. Stainless Steel Cleaner and Polish: Order Part #4396095 In Canada, Order Part #31462B 10 Failure to do so can cause discolored or off-flavored ice. ■ Ice ...
...To order stainless steel cleaner, call 1-800-807-6777. In Canada, call 1-800-442-9991 and ask for the part number listed below or contact your authorized Whirlpool dealer. Clean gaskets and contact surfaces with soft cloth. Allows warm air to your cold water supply? Adjust the ...or sticky? Straighten the water source line. ■ Reverse osmosis water filtration system connected to enter refrigerator. Wash ice bin. Stainless Steel Cleaner and Polish: Order Part #4396095 In Canada, Order Part #31462B 10 Failure to do so can cause discolored or off-flavored ice. ■ Ice ...
User Instructions
Page 11
..., to instruct you . For assistance or service in a remote area where service by a Whirlpool designated service company. ITEMS EXCLUDED FROM WARRANTY This limited warranty does not cover: 1. Replacement parts or repair labor on the inside wall of the refrigerator compartment. Have your major appliance is located in the U.S.A., call 1-800-807-6777. Replacement...
..., to instruct you . For assistance or service in a remote area where service by a Whirlpool designated service company. ITEMS EXCLUDED FROM WARRANTY This limited warranty does not cover: 1. Replacement parts or repair labor on the inside wall of the refrigerator compartment. Have your major appliance is located in the U.S.A., call 1-800-807-6777. Replacement...
Parts Diagram
Page 1
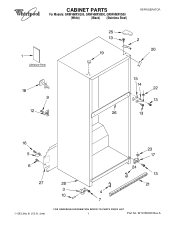
CABINET PARTS For Models: GR9FHMXVQ00, GR9FHMXVB00, GR9FHMXVS00 (White) (Black) (Stainless Steel) REFRIGERATOR 1−08 Litho In U.S.A. (rrm) 1 Part No. W10180450 Rev.A
CABINET PARTS For Models: GR9FHMXVQ00, GR9FHMXVB00, GR9FHMXVS00 (White) (Black) (Stainless Steel) REFRIGERATOR 1−08 Litho In U.S.A. (rrm) 1 Part No. W10180450 Rev.A
Parts Diagram
Page 10
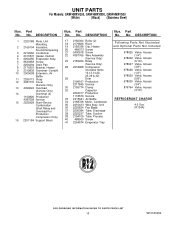
...978028 Valve, Access (1/2") 978029 Valve, Access (5/8") 978030 Valve, Access (3/4") 876764 Valve, Access (3/16") REFRIGERANT CHARGE 4.0 Ozs. (R134A) 10 W10180450 No. Part No. Part No. UNIT PARTS For Models: GR9FHMXVQ00, GR9FHMXVB00, GR9FHMXVS00 (White) (Black) (Stainless Steel) Illus. DESCRIPTION 17 2150304 Roller... (2) 18 2179826 Rivet 19 2182338 Clip, Heater 20 489373 Screw 21 ...
...978028 Valve, Access (1/2") 978029 Valve, Access (5/8") 978030 Valve, Access (3/4") 876764 Valve, Access (3/16") REFRIGERANT CHARGE 4.0 Ozs. (R134A) 10 W10180450 No. Part No. Part No. UNIT PARTS For Models: GR9FHMXVQ00, GR9FHMXVB00, GR9FHMXVS00 (White) (Black) (Stainless Steel) Illus. DESCRIPTION 17 2150304 Roller... (2) 18 2179826 Rivet 19 2182338 Clip, Heater 20 489373 Screw 21 ...

