
Installation Instructions
Page 1
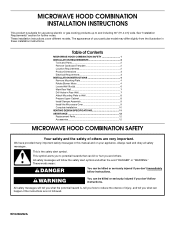
... HOOD COMBINATION SAFETY Your safety and the safety of Contents MICROWAVE HOOD COMBINATION SAFETY 1 INSTALLATION REQUIREMENTS 2 Tools and Parts 2 Remove Cardboard Template 2 Location Requirements 2 Product Dimensions 3 Electrical Requirements 3 INSTALLATION INSTRUCTIONS 4 Remove Mounting Plate 4 Rotate Blower Motor 4 Locate Wall Stud(s 6 Mark Rear Wall 7 Drill Holes in Rear Wall 7 Attach Mounting Plate to...
... HOOD COMBINATION SAFETY Your safety and the safety of Contents MICROWAVE HOOD COMBINATION SAFETY 1 INSTALLATION REQUIREMENTS 2 Tools and Parts 2 Remove Cardboard Template 2 Location Requirements 2 Product Dimensions 3 Electrical Requirements 3 INSTALLATION INSTRUCTIONS 4 Remove Mounting Plate 4 Rotate Blower Motor 4 Locate Wall Stud(s 6 Mark Rear Wall 7 Drill Holes in Rear Wall 7 Attach Mounting Plate to...
Installation Instructions
Page 2
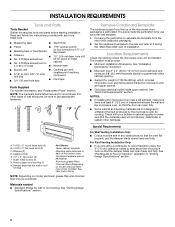
... filter and charcoal filter may not be included. Special Requirements For Wall Venting Installation Only: ■ Cutout must provide: ■ Minimum installation dimensions. Damper assembly (for wood studs. See "Installation Dimensions" illustration. ■ Minimum one 2" x 4" (50.8 x 101.6 mm) wood wall stud and minimum 3/8" (9.5 mm) thickness drywall or plaster/lath within cabinet opening...
... filter and charcoal filter may not be included. Special Requirements For Wall Venting Installation Only: ■ Cutout must provide: ■ Minimum installation dimensions. Damper assembly (for wood studs. See "Installation Dimensions" illustration. ■ Minimum one 2" x 4" (50.8 x 101.6 mm) wood wall stud and minimum 3/8" (9.5 mm) thickness drywall or plaster/lath within cabinet opening...
Installation Instructions
Page 3
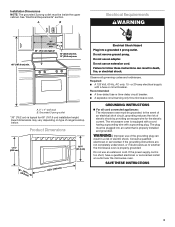
... circuit, grounding reduces the risk of range/cooktop below. WARNING: Improper use an extension cord. Do not use an adapter. Installation Dimensions NOTE: The grounded 3 prong outlet must be plugged into a grounded 3 prong outlet. Failure to whether the microwave oven is typical... for the electric current. Grounded 3 prong outlet *30" (76.2 cm) is properly grounded. Product Dimensions 17¹⁄₄" (43.8 cm) 16¹⁄₄" (41.3 cm) (401.05³c⁄₄m") 29⁷⁄₈" (...
... circuit, grounding reduces the risk of range/cooktop below. WARNING: Improper use an extension cord. Do not use an adapter. Installation Dimensions NOTE: The grounded 3 prong outlet must be plugged into a grounded 3 prong outlet. Failure to whether the microwave oven is typical... for the electric current. Grounded 3 prong outlet *30" (76.2 cm) is properly grounded. Product Dimensions 17¹⁄₄" (43.8 cm) 16¹⁄₄" (41.3 cm) (401.05³c⁄₄m") 29⁷⁄₈" (...
Installation Instructions
Page 7
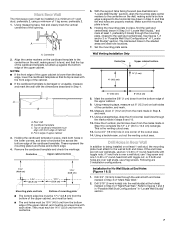
... through the wall at least 1 wall stud, the mounting plate must each other. Cut a 3/4" (19 mm) hole in one 1/4-20 x 3" round-head bolt with the dimensions described in steps 8 and 10. 12. Rear wall B. Front edge of the cutout area. 14. Measure down 4" (10.2 cm) from the bottom edge of "Mark...
... through the wall at least 1 wall stud, the mounting plate must each other. Cut a 3/4" (19 mm) hole in one 1/4-20 x 3" round-head bolt with the dimensions described in steps 8 and 10. 12. Rear wall B. Front edge of the cutout area. 14. Measure down 4" (10.2 cm) from the bottom edge of "Mark...

Installation Instructions
Page 8
.... Installation for Wall Stud at One End Hole (Figure 3) 1. Prepare Upper Cabinet 1. Wall Stud at One End Hole (Figure 3) 1. Make sure the 10" (25.4 cm) dimension from the back of the mounting plate. Disconnect power to points "D" and "E" on the wall. 4. Mounting plate C.
.... Installation for Wall Stud at One End Hole (Figure 3) 1. Prepare Upper Cabinet 1. Wall Stud at One End Hole (Figure 3) 1. Make sure the 10" (25.4 cm) dimension from the back of the mounting plate. Disconnect power to points "D" and "E" on the wall. 4. Mounting plate C.

