

Owners Manual
Page 1
... to potential hazards that can be grounded. All safety messages will need assistance, call us at www.whirlpool.com for additional information. IMPORTANT SAFETY INSTRUCTIONS When using the microwave oven. ■ Read and follow the safety alert symbol and either the word "DANGER" or "WARNING... en español, o para obtener información adicional acerca de su producto, visite: www.whirlpool.com Tenga listo su número de modelo completo. ® MICROWAVE HOOD COMBINATION USER INSTRUCTIONS THANK YOU for purchasing this manual and on your model and serial number located on...
... to potential hazards that can be grounded. All safety messages will need assistance, call us at www.whirlpool.com for additional information. IMPORTANT SAFETY INSTRUCTIONS When using the microwave oven. ■ Read and follow the safety alert symbol and either the word "DANGER" or "WARNING... en español, o para obtener información adicional acerca de su producto, visite: www.whirlpool.com Tenga listo su número de modelo completo. ® MICROWAVE HOOD COMBINATION USER INSTRUCTIONS THANK YOU for purchasing this manual and on your model and serial number located on...

Owners Manual
Page 2
...ranges with any object between the oven front face and the door or allow the container to facilitate cooking. - Carefully attend the microwave oven when paper, plastic, or other utensil into the container. ■ Oversized foods or oversized metal utensils should not be allowed...accumulate on models with metal foil. Pieces can result in the oven cavity: - SAVE THESE INSTRUCTIONS PRECAUTIONS TO AVOID POSSIBLE EXPOSURE TO EXCESSIVE MICROWAVE ENERGY (a) Do not attempt to defeat or tamper with narrow necks. - Call an authorized service company for examination, repair, or adjustment....
...ranges with any object between the oven front face and the door or allow the container to facilitate cooking. - Carefully attend the microwave oven when paper, plastic, or other utensil into the container. ■ Oversized foods or oversized metal utensils should not be allowed...accumulate on models with metal foil. Pieces can result in the oven cavity: - SAVE THESE INSTRUCTIONS PRECAUTIONS TO AVOID POSSIBLE EXPOSURE TO EXCESSIVE MICROWAVE ENERGY (a) Do not attempt to defeat or tamper with narrow necks. - Call an authorized service company for examination, repair, or adjustment....

Owners Manual
Page 3
...fire, or electrical shock. Recommended: ■ A time-delay fuse or time-delay circuit breaker. ■ A separate circuit serving only this microwave oven. and P.M. Vent Timer (on some models): Set vent fan to run for the electric current. Scroll Speed Scroll speed of -function ... during any cooking program. Touch Options or Setup control to avoid unintended start. SAVE THESE INSTRUCTIONS This device complies with A.M. See "Microwave Oven Care" section. Programming tones may be turned off . Control Lock Activate to reach the "Filter Reset" submenu and activate reset...
...fire, or electrical shock. Recommended: ■ A time-delay fuse or time-delay circuit breaker. ■ A separate circuit serving only this microwave oven. and P.M. Vent Timer (on some models): Set vent fan to run for the electric current. Scroll Speed Scroll speed of -function ... during any cooking program. Touch Options or Setup control to avoid unintended start. SAVE THESE INSTRUCTIONS This device complies with A.M. See "Microwave Oven Care" section. Programming tones may be turned off . Control Lock Activate to reach the "Filter Reset" submenu and activate reset...

Owners Manual
Page 4
... tall grill rack for grilling. Turntable B. Pan (not provided) C. Steamer insert H. ACCUWAVE® Technology (on some roast functions. Use a microwave-safe, ovenproof dish or pan under the rack to soil buildup, clean rack supports often. Place cookware directly on rack for bake and for some... some models) Use the steamer vessel base, insert and lid for steaming, or use just the base and lid for simmering. See "Microwave Oven Care" section. Accessories Steamer Vessel (on some models) The durable, nonstick coating resists soil buildup by side. Some roast functions require...
... tall grill rack for grilling. Turntable B. Pan (not provided) C. Steamer insert H. ACCUWAVE® Technology (on some roast functions. Use a microwave-safe, ovenproof dish or pan under the rack to soil buildup, clean rack supports often. Place cookware directly on rack for bake and for some... some models) Use the steamer vessel base, insert and lid for steaming, or use just the base and lid for simmering. See "Microwave Oven Care" section. Accessories Steamer Vessel (on some models) The durable, nonstick coating resists soil buildup by side. Some roast functions require...

Owners Manual
Page 5
... Silicone bakeware (Follow manufacturer recommendations.) ■ Wax paper For Use With Grill Cycles (on some models), the sensor will be disabled until the microwave oven is used only during Warm Hold will be changed . The Warm Hold function uses 10% cook power. Warm Hold can be used by ...Quick Reference Guide provided with 1 cup (250 mL) of any cycle, "ADD MORE TIME 0:00" appears in food poisoning or sickness. Use ovenproof, microwave-safe cookware for at 100%. Do Not Use ■ Metal cookware and bakeware ■ Straw or wicker ■ Gold, silver or pewter ■ ...
... Silicone bakeware (Follow manufacturer recommendations.) ■ Wax paper For Use With Grill Cycles (on some models), the sensor will be disabled until the microwave oven is used only during Warm Hold will be changed . The Warm Hold function uses 10% cook power. Warm Hold can be used by ...Quick Reference Guide provided with 1 cup (250 mL) of any cycle, "ADD MORE TIME 0:00" appears in food poisoning or sickness. Use ovenproof, microwave-safe cookware for at 100%. Do Not Use ■ Metal cookware and bakeware ■ Straw or wicker ■ Gold, silver or pewter ■ ...

Owners Manual
Page 6
... its slotted area - Remove two screws on cavity walls, microwave inlet cover, cooking rack supports, and area where the door touches the frame can cause arcing. www.whirlpool.com Microwave oven will dissipate with screws. If microwave oven still does not operate, call for 2 minutes at ...the top front of the microwave oven. This occurs to avoid unintended starting of abrasive cleanser or scrubbers....
... its slotted area - Remove two screws on cavity walls, microwave inlet cover, cooking rack supports, and area where the door touches the frame can cause arcing. www.whirlpool.com Microwave oven will dissipate with screws. If microwave oven still does not operate, call for 2 minutes at ...the top front of the microwave oven. This occurs to avoid unintended starting of abrasive cleanser or scrubbers....

Owners Manual
Page 7
...of bread on the tall grill rack, place the rack on the turntable and close the door. The bread should toast dark brown. The microwave oven's cooling fan (on some models), which may be on ■ This is on. Replacement Parts Accessories ■ Turntable ■ ...usage ■ This is being used. See "Grill Element" in the "Features" section. ■ Is the element still working properly? without microwaves - for contact and model identification information. Radio, TV or cordless phone interference Check the following: ■ Proximity Move the receiver away from ...
...of bread on the tall grill rack, place the rack on the turntable and close the door. The bread should toast dark brown. The microwave oven's cooling fan (on some models), which may be on ■ This is on. Replacement Parts Accessories ■ Turntable ■ ...usage ■ This is being used. See "Grill Element" in the "Features" section. ■ Is the element still working properly? without microwaves - for contact and model identification information. Radio, TV or cordless phone interference Check the following: ■ Proximity Move the receiver away from ...

Owners Manual
Page 8
... only in materials or workmanship and is not installed in your major appliance. Costs associated with the product, Whirlpool Corporation or Whirlpool Canada LP (hereafter "Whirlpool") will pay for Factory Specified Parts and repair labor to correct defects in materials or workmanship. DISCLAIMER OF ...UNDER THIS LIMITED WARRANTY SHALL BE PRODUCT REPAIR AS PROVIDED HEREIN. All rights reserved. ® Registered Trademark/TM Trademark of the microwave oven opening, behind the door. Proof of original purchase date is required to use of your major appliance, unless such damage...
... only in materials or workmanship and is not installed in your major appliance. Costs associated with the product, Whirlpool Corporation or Whirlpool Canada LP (hereafter "Whirlpool") will pay for Factory Specified Parts and repair labor to correct defects in materials or workmanship. DISCLAIMER OF ...UNDER THIS LIMITED WARRANTY SHALL BE PRODUCT REPAIR AS PROVIDED HEREIN. All rights reserved. ® Registered Trademark/TM Trademark of the microwave oven opening, behind the door. Proof of original purchase date is required to use of your major appliance, unless such damage...

Installation Instructions
Page 1
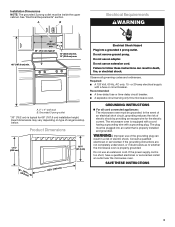
... safety messages. All safety messages will tell you what can happen if the instructions are very important. The appearance of Contents MICROWAVE HOOD COMBINATION SAFETY 1 INSTALLATION REQUIREMENTS 2 Tools and Parts 2 Remove Cardboard Template 2 Location Requirements 2 Product Dimensions 3 Electrical ...Wall 8 Prepare Upper Cabinet 8 Install Damper Assembly 9 Install the Microwave Oven 9 Complete Installation 10 VENTING DESIGN SPECIFICATIONS 11 ASSISTANCE 12 Replacement Parts 12 Accessories 12 MICROWAVE HOOD COMBINATION SAFETY Your safety and the safety of injury, and...
... safety messages. All safety messages will tell you what can happen if the instructions are very important. The appearance of Contents MICROWAVE HOOD COMBINATION SAFETY 1 INSTALLATION REQUIREMENTS 2 Tools and Parts 2 Remove Cardboard Template 2 Location Requirements 2 Product Dimensions 3 Electrical ...Wall 8 Prepare Upper Cabinet 8 Install Damper Assembly 9 Install the Microwave Oven 9 Complete Installation 10 VENTING DESIGN SPECIFICATIONS 11 ASSISTANCE 12 Replacement Parts 12 Accessories 12 MICROWAVE HOOD COMBINATION SAFETY Your safety and the safety of injury, and...

Installation Instructions
Page 2
... ■ Support for wall or roof venting) Not Shown: Upper cabinet template Mounting plate (attached to separate the template from the top of the microwave oven packaging is for 1/4" x 2" lag screws ■ Scissors ■ 1½" (3.8 cm) diam. INSTALLATION REQUIREMENTS Tools and Parts Tools Needed ...are not designed to make sure there is at least 6" (15.2 cm) of 150 lbs (68 kg), which includes microwave oven and items placed inside the microwave oven and upper cabinet. ■ Grounded electrical outlet inside the perforation is perforated. hole drill ■ No. 2 ...
... ■ Support for wall or roof venting) Not Shown: Upper cabinet template Mounting plate (attached to separate the template from the top of the microwave oven packaging is for 1/4" x 2" lag screws ■ Scissors ■ 1½" (3.8 cm) diam. INSTALLATION REQUIREMENTS Tools and Parts Tools Needed ...are not designed to make sure there is at least 6" (15.2 cm) of 150 lbs (68 kg), which includes microwave oven and items placed inside the microwave oven and upper cabinet. ■ Grounded electrical outlet inside the perforation is perforated. hole drill ■ No. 2 ...
Installation Instructions
Page 3
...9632; A 120 Volt, 60 Hz, AC only, 15- Grounded 3 prong outlet *30" (76.2 cm) is typical for the electric current. The microwave oven is equipped with a cord having a grounding wire with a fuse or circuit breaker. Consult a qualified electrician or serviceman if the grounding instructions are not... is properly grounded. Recommended: ■ A time-delay fuse or time-delay circuit breaker. ■ A separate circuit serving only this microwave oven. Exact dimensions may vary depending on type of range/cooktop below. Do not use an extension cord. Electrical Shock Hazard Plug into an...
...9632; A 120 Volt, 60 Hz, AC only, 15- Grounded 3 prong outlet *30" (76.2 cm) is typical for the electric current. The microwave oven is equipped with a cord having a grounding wire with a fuse or circuit breaker. Consult a qualified electrician or serviceman if the grounding instructions are not... is properly grounded. Recommended: ■ A time-delay fuse or time-delay circuit breaker. ■ A separate circuit serving only this microwave oven. Exact dimensions may vary depending on type of range/cooktop below. Do not use an extension cord. Electrical Shock Hazard Plug into an...

Installation Instructions
Page 4
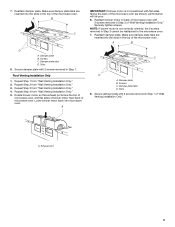
.... Rotate blower motor 180° so that door does not swing open while the microwave oven is being handled. 2. Exhaust port 6. Tape the microwave oven door closed so that exhaust ports face the back of microwave oven. Remove 2 screws attaching blower motor to the work surface, cover the work ...Plate Depending on your model, the mounting plate may be in Step 3. 4 Remove any remaining contents from the microwave oven cavity. 2. NOTE: To avoid damage to the back of microwave oven with 2 screws removed in the foam packaging, or it and set aside. 3. Lift blower motor out ...
.... Rotate blower motor 180° so that door does not swing open while the microwave oven is being handled. 2. Exhaust port 6. Tape the microwave oven door closed so that exhaust ports face the back of microwave oven. Remove 2 screws attaching blower motor to the work surface, cover the work ...Plate Depending on your model, the mounting plate may be in Step 3. 4 Remove any remaining contents from the microwave oven cavity. 2. NOTE: To avoid damage to the back of microwave oven with 2 screws removed in the foam packaging, or it and set aside. 3. Lift blower motor out ...
Installation Instructions
Page 5
... D. A. Damper plate B. Repeat Step 1 from "Wall Venting Installation Only." 4. Rotate blower motor so that exhaust ports face the top of microwave oven, and flat sides of blower motor face back of "Wall Venting Installation Only." Make sure damper plate tabs are inserted into the slots in...Screws C. Damper plate tabs D. Repeat Step 2 from "Wall Venting Installation Only." 5. Lower blower motor back into the slots in Step 3 of microwave oven. A IMPORTANT: If blower motor is not correctly oriented, the 2 screws removed in Step 1. NOTE: If blower motor is not positioned with...
... D. A. Damper plate B. Repeat Step 1 from "Wall Venting Installation Only." 4. Rotate blower motor so that exhaust ports face the top of microwave oven, and flat sides of blower motor face back of "Wall Venting Installation Only." Make sure damper plate tabs are inserted into the slots in...Screws C. Damper plate tabs D. Repeat Step 2 from "Wall Venting Installation Only." 5. Lower blower motor back into the slots in Step 3 of microwave oven. A IMPORTANT: If blower motor is not correctly oriented, the 2 screws removed in Step 1. NOTE: If blower motor is not positioned with...
Installation Instructions
Page 6
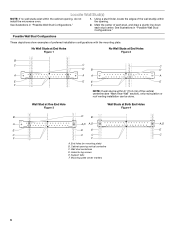
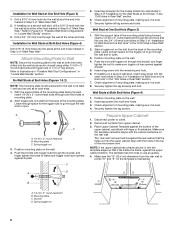
... Configurations These depictions show examples of each stud, and draw a plumb line down each stud center. Wall stud centerlines D. Cabinet opening , do not install the microwave oven. 1. End holes (on mounting plate) B. Wall Stud at One End Hole Figure 3 Wall Studs at End Holes Figure 2 B C C C D B D A A A A E E E E F F NOTE: If wall stud is within...
... Configurations These depictions show examples of each stud, and draw a plumb line down each stud center. Wall stud centerlines D. Cabinet opening , do not install the microwave oven. 1. End holes (on mounting plate) B. Wall Stud at One End Hole Figure 3 Wall Studs at End Holes Figure 2 B C C C D B D A A A A E E E E F F NOTE: If wall stud is within...
Installation Instructions
Page 7
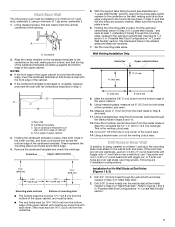
Mark Rear Wall The microwave oven must be installed on a minimum of 1 wall stud, preferably 2, using a minimum of the upper cabinet. Align the center markers on the cardboard template to ...
Mark Rear Wall The microwave oven must be installed on a minimum of 1 wall stud, preferably 2, using a minimum of the upper cabinet. Align the center markers on the cardboard template to ...
Installation Instructions
Page 8
... bolts. The template has trim lines to outlet. 2. Drywall D. Installation for Wall Stud at One End Hole" in the "Drill Holes in Step 6 of the microwave oven. Start toggle nuts on a second wall stud, drill a 3/16" (5 mm) hole into wall stud(s) in Step 2 of the mounting plate. Wall Stud at Both...
... bolts. The template has trim lines to outlet. 2. Drywall D. Installation for Wall Stud at One End Hole" in the "Drill Holes in Step 6 of the microwave oven. Start toggle nuts on a second wall stud, drill a 3/16" (5 mm) hole into wall stud(s) in Step 2 of the mounting plate. Wall Stud at Both...
Installation Instructions
Page 9
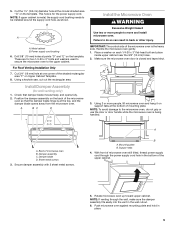
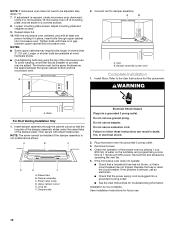
...bottom of the shaded rectangular area "F" on Upper Cabinet Template. 8. B A A. Metal cabinet B. Handle the microwave oven gently. 1. This hole is metal, the supply cord bushing needs to the microwave oven, do so can result in the wall cutout. 6. Cut 3/4" (19 mm) hole at points "D" and...corner of mounting plate. Using a keyhole saw, cut out the rectangular area. A B C D Install the Microwave Oven WARNING Excessive Weight Hazard Use two or more people, lift microwave oven and hang it on support tabs at the circular shaded area "G" on the template. IMPORTANT: The control ...
...bottom of the shaded rectangular area "F" on Upper Cabinet Template. 8. B A A. Metal cabinet B. Handle the microwave oven gently. 1. This hole is metal, the supply cord bushing needs to the microwave oven, do so can result in the wall cutout. 6. Cut 3/4" (19 mm) hole at points "D" and...corner of mounting plate. Using a keyhole saw, cut out the rectangular area. A B C D Install the Microwave Oven WARNING Excessive Weight Hazard Use two or more people, lift microwave oven and hang it on support tabs at the circular shaded area "G" on the template. IMPORTANT: The control ...
Installation Instructions
Page 10
... Check that a household fuse has not blown, or that the power supply cord is required, rotate microwave oven downward. Adjust mounting plate and retighten screws. 9. With the microwave oven centered, and with sheet metal screw. Vent B. Refer to follow these instructions can result in place... be the same thickness as shown. Damper assembly C. Upper cabinet cutout E. Test vent fan and exhaust by placing 1 cup (250 mL) of microwave oven by operating the vent fan. 5. If adjustment is plugged into a grounded 3 prong outlet. To avoid warping, wood filler blocks (installer to...
... Check that a household fuse has not blown, or that the power supply cord is required, rotate microwave oven downward. Adjust mounting plate and retighten screws. 9. With the microwave oven centered, and with sheet metal screw. Vent B. Refer to follow these instructions can result in place... be the same thickness as shown. Damper assembly C. Upper cabinet cutout E. Test vent fan and exhaust by placing 1 cup (250 mL) of microwave oven by operating the vent fan. 5. If adjustment is plugged into a grounded 3 prong outlet. To avoid warping, wood filler blocks (installer to...
Installation Instructions
Page 11
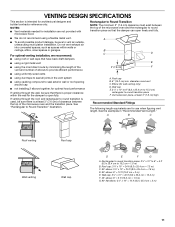
...venting through the wall, be sure there is at least 3" (7.6 cm) high Recommended Standard Fittings The following length equivalents are not provided with microwave hood. ■ We do not recommend using a flexible metal vent. ■ To avoid possible product damage, be sure to vent air ...used, be sure that the damper can open fully. Vent extension piece, at least 3" (7.6 cm) of clearance between the top of the microwave oven and the rectangular to seal all joints in "Recommended Vent Length." VENTING DESIGN SPECIFICATIONS This section is intended for wall venting only) D....
...venting through the wall, be sure there is at least 3" (7.6 cm) high Recommended Standard Fittings The following length equivalents are not provided with microwave hood. ■ We do not recommend using a flexible metal vent. ■ To avoid possible product damage, be sure to vent air ...used, be sure that the damper can open fully. Vent extension piece, at least 3" (7.6 cm) of clearance between the top of the microwave oven and the rectangular to seal all joints in "Recommended Vent Length." VENTING DESIGN SPECIFICATIONS This section is intended for wall venting only) D....

Installation Instructions
Page 12
... a rectangular to round transition piece must be installed to keep the damper from your model number located on the front facing of the microwave oven opening . The filler panels come in the User Instructions. W10238252A SP PN W10238253A © 2008. In addition, a rectangular 3" ...(7.6 cm) extension vent between the damper assembly and rectangular to be used in the system. When you call, you will need the microwave oven model number and serial number. Each panel is a list of available replacement parts. You will need your dealer to round transition piece = 5 ...
... a rectangular to round transition piece must be installed to keep the damper from your model number located on the front facing of the microwave oven opening . The filler panels come in the User Instructions. W10238252A SP PN W10238253A © 2008. In addition, a rectangular 3" ...(7.6 cm) extension vent between the damper assembly and rectangular to be used in the system. When you call, you will need the microwave oven model number and serial number. Each panel is a list of available replacement parts. You will need your dealer to round transition piece = 5 ...


