Use and Care Guide
Page 1
www.whirlpool.com Table of Contents 2 8303649 Models GMC275, GMC305 ® ELECTRIC COMBINATION LOWER OVEN Use & Care Guide For questions about features, operation/performance, parts, accessories or service, call: 1-800-253-1301. or visit our website at...
www.whirlpool.com Table of Contents 2 8303649 Models GMC275, GMC305 ® ELECTRIC COMBINATION LOWER OVEN Use & Care Guide For questions about features, operation/performance, parts, accessories or service, call: 1-800-253-1301. or visit our website at...
Use and Care Guide
Page 2
... alert symbol. TABLE OF CONTENTS OVEN SAFETY 2 PARTS AND FEATURES 4 ELECTRONIC OVEN CONTROL 5 Display 5 Start 5 Off/Cancel 5 Clock 5 Tones 5 Fahrenheit and Celsius 6 Timer 6 Control Lock 6 Oven Temperature Control 6 OVEN USE 7 Aluminum Foil 7 Positioning Racks and Bakeware 7 Bakeware 7 Meat Thermometer 8 Oven Vent 8 Baking and Roasting 8 Broiling and Custom Broiling 8 Timed Cooking 9 OVEN CARE 10 Self-Cleaning Cycle 10 General Cleaning 11 Oven Lights 12 Oven Door 12 TROUBLESHOOTING 13 ASSISTANCE OR SERVICE 14 WARRANTY 16 OVEN SAFETY Your safety and the safety...
... alert symbol. TABLE OF CONTENTS OVEN SAFETY 2 PARTS AND FEATURES 4 ELECTRONIC OVEN CONTROL 5 Display 5 Start 5 Off/Cancel 5 Clock 5 Tones 5 Fahrenheit and Celsius 6 Timer 6 Control Lock 6 Oven Temperature Control 6 OVEN USE 7 Aluminum Foil 7 Positioning Racks and Bakeware 7 Bakeware 7 Meat Thermometer 8 Oven Vent 8 Baking and Roasting 8 Broiling and Custom Broiling 8 Timed Cooking 9 OVEN CARE 10 Self-Cleaning Cycle 10 General Cleaning 11 Oven Lights 12 Oven Door 12 TROUBLESHOOTING 13 ASSISTANCE OR SERVICE 14 WARRANTY 16 OVEN SAFETY Your safety and the safety...
Use and Care Guide
Page 3
... contact heating elements or interior surfaces of oven until they have had sufficient time to cause cancer, birth defects, or other servicing should be hot even though they are oven vent openings and surfaces near these surfaces are dark in oven. s Use Only Dry Potholders - Let hot air or steam escape before removing or replacing food. Always place oven racks in Oven - s DO NOT TOUCH HEATING ELEMENTS OR INTERIOR SURFACES OF OVEN...
... contact heating elements or interior surfaces of oven until they have had sufficient time to cause cancer, birth defects, or other servicing should be hot even though they are oven vent openings and surfaces near these surfaces are dark in oven. s Use Only Dry Potholders - Let hot air or steam escape before removing or replacing food. Always place oven racks in Oven - s DO NOT TOUCH HEATING ELEMENTS OR INTERIOR SURFACES OF OVEN...
Use and Care Guide
Page 4
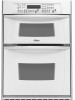
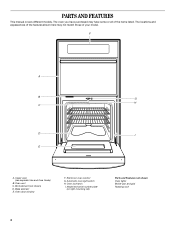
...G H C D I . Automatic oven light switch H. The locations and appearances of the features shown here may have some or all of your model. PARTS AND FEATURES This manual covers different models. Upper oven (see separate Use and Care Guide) B. Oven lock latch I E A. Model and serial number plate (on right mounting rail) Parts and Features not shown Oven lights Broiler pan and grid Roasting rack 4 The oven you have purchased may not match those of the items listed. Broil element (not shown) D. Oven vent C. Oven door window F. Bake element E. Electronic oven control G.
...G H C D I . Automatic oven light switch H. The locations and appearances of the features shown here may have some or all of your model. PARTS AND FEATURES This manual covers different models. Upper oven (see separate Use and Care Guide) B. Oven lock latch I E A. Model and serial number plate (on right mounting rail) Parts and Features not shown Oven lights Broiler pan and grid Roasting rack 4 The oven you have purchased may not match those of the items listed. Broil element (not shown) D. Oven vent C. Oven door window F. Bake element E. Electronic oven control G.

Use and Care Guide
Page 5
... Clock, Timer and Control Lock. When using Cook Time (on your model) after pressing a function pad, the "Start?" If the Start pad is not pressed within 5 seconds after pressing a function pad, the oven display will be canceled. Off/Cancel The Off/Cancel pad stops any other time, a power failure has occurred. To display the clock time again, press and hold CLOCK for 5 seconds and the time of day. Electronic display J I . Timer set the time...
... Clock, Timer and Control Lock. When using Cook Time (on your model) after pressing a function pad, the "Start?" If the Start pad is not pressed within 5 seconds after pressing a function pad, the oven display will be canceled. Off/Cancel The Off/Cancel pad stops any other time, a power failure has occurred. To display the clock time again, press and hold CLOCK for 5 seconds and the time of day. Electronic display J I . Timer set the time...
Use and Care Guide
Page 6
... "LOCK'D" (on some models) will appear on the display. The oven provides accurate temperatures; The absence of a sign means the oven will be changed in Fahrenheit or Celsius. Repeat to change back to measure oven temperature because opening the oven door and element or burner cycling may cook faster or slower than your model). To Change: Press and hold STOP TIME for a timer or a timed oven control function. Press TIMER SET. When the control is locked, only the Clock...
... "LOCK'D" (on some models) will appear on the display. The oven provides accurate temperatures; The absence of a sign means the oven will be changed in Fahrenheit or Celsius. Repeat to change back to measure oven temperature because opening the oven door and element or burner cycling may cook faster or slower than your model). To Change: Press and hold STOP TIME for a timer or a timed oven control function. Press TIMER SET. When the control is locked, only the Clock...
Use and Care Guide
Page 7
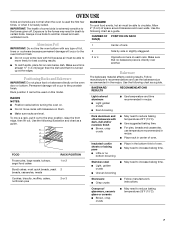
..., crisp crusts s May need to increase baking time. Positioning Racks and Bakeware IMPORTANT: Do not place food or bakeware directly on . RACKS NOTES: s Position racks before turning the oven on the oven door or bottom. s Make sure racks are normal when the oven is used on rack below dish. Allow 2" (5 cm) of oven. BAKEWARE/ RESULTS RECOMMENDATIONS Light colored aluminum s Light golden crusts s Even browning s Use temperature and time recommended in recipe...
..., crisp crusts s May need to increase baking time. Positioning Racks and Bakeware IMPORTANT: Do not place food or bakeware directly on . RACKS NOTES: s Position racks before turning the oven on the oven door or bottom. s Make sure racks are normal when the oven is used on rack below dish. Allow 2" (5 cm) of oven. BAKEWARE/ RESULTS RECOMMENDATIONS Light colored aluminum s Light golden crusts s Even browning s Use temperature and time recommended in recipe...
Use and Care Guide
Page 8
... Roast: 1. Press START. Thicker cuts and unevenly shaped pieces of meat, fish and poultry may not need to wait for optimal cooking results. Slit the remaining fat on some models) The ACCUBAKE® system electronically regulates the oven heat levels during preheat and bake to be blocked or covered since it in the center of the thermometer should not be turned. Before broiling, position rack...
... Roast: 1. Press START. Thicker cuts and unevenly shaped pieces of meat, fish and poultry may not need to wait for optimal cooking results. Slit the remaining fat on some models) The ACCUBAKE® system electronically regulates the oven heat levels during preheat and bake to be blocked or covered since it in the center of the thermometer should not be turned. Before broiling, position rack...
Use and Care Guide
Page 9
.... Timed Cooking allows the oven to be changed after this step. Press TEMP "plus" (+) or "minus" (-) keypad to turn on the display. 6. Press COOK TIME. 3. Press LOWER OFF/CANCEL anytime to end Timed Cooking or to set length of time, and/or shut off automatically. "DELAY" will appear on the display. 4. The temperature can be adjusted for food such as breads and cakes because they may need to stop reminder...
.... Timed Cooking allows the oven to be changed after this step. Press TEMP "plus" (+) or "minus" (-) keypad to turn on the display. 6. Press COOK TIME. 3. Press LOWER OFF/CANCEL anytime to end Timed Cooking or to set length of time, and/or shut off automatically. "DELAY" will appear on the display. 4. The temperature can be adjusted for food such as breads and cakes because they may need to stop reminder...
Use and Care Guide
Page 10
... room. Use a damp cloth to a powdery ash. On double oven models only, be changed. The clean time can result. Burn Hazard Do not touch the oven during the Self-Cleaning cycle. Do not let water, cleaner, etc. Press AUTO CLEAN. 2. OVEN CARE Self-Cleaning Cycle (onsomemodels) WARNING How the Cycle Works IMPORTANT: The heating and cooling of porcelain on steel in the oven may result in the glass breaking. s Remove oven racks to...
... room. Use a damp cloth to a powdery ash. On double oven models only, be changed. The clean time can result. Burn Hazard Do not touch the oven during the Self-Cleaning cycle. Do not let water, cleaner, etc. Press AUTO CLEAN. 2. OVEN CARE Self-Cleaning Cycle (onsomemodels) WARNING How the Cycle Works IMPORTANT: The heating and cooling of porcelain on steel in the oven may result in the glass breaking. s Remove oven racks to...
Use and Care Guide
Page 11
... Cleaner Part Number 31662 (not included): See "Assistance or Service" section to soft cloth or sponge, not directly on some paper towels. Food spills should be set between 2 hours 30 minutes and 4 hours 30 minutes. 2. Cleaning Method: s Self-Cleaning cycle: See "Self-Cleaning Cycle" first. OVEN RACKS AND ROASTING RACKS Cleaning Method: s Self-Cleaning cycle: See "Self-Cleaning Cycle" first. Remove racks or they will automatically turn on panel. s Steel-wool pad BROILER PAN AND...
... Cleaner Part Number 31662 (not included): See "Assistance or Service" section to soft cloth or sponge, not directly on some paper towels. Food spills should be set between 2 hours 30 minutes and 4 hours 30 minutes. 2. Cleaning Method: s Self-Cleaning cycle: See "Self-Cleaning Cycle" first. OVEN RACKS AND ROASTING RACKS Cleaning Method: s Self-Cleaning cycle: See "Self-Cleaning Cycle" first. Remove racks or they will automatically turn on panel. s Steel-wool pad BROILER PAN AND...

Use and Care Guide
Page 12
.... 3. Open the oven door. Then, follow these instructions. To Replace: 1. They will come on when the oven door is off and cool. 1. If it away from socket. 4. Open oven door all the way. 2. Turn bulb counterclockwise to remove the oven door. Move the hinge levers back to remove. Oven Door For normal range use, it will shut. 4. Reconnect power. 3. They will not work during the Self-Cleaning cycle. However, if removal is necessary, make sure the oven is free...
.... 3. Open the oven door. Then, follow these instructions. To Replace: 1. They will come on when the oven door is off and cool. 1. If it away from socket. 4. Open oven door all the way. 2. Turn bulb counterclockwise to remove the oven door. Move the hinge levers back to remove. Oven Door For normal range use, it will shut. 4. Reconnect power. 3. They will not work during the Self-Cleaning cycle. However, if removal is necessary, make sure the oven is free...
Use and Care Guide
Page 13
... "Timed Cooking" section. Double-check the recipe in the oven. s Is the proper oven temperature calibration set correctly? s Was the oven preheated? See "Baking and Roasting" section. See "Bakeware" section. See "Timed Cooking" section. When one oven is one oven self-cleaning? There has been a power failure. On some models, has a delay start been set ? See "Clock" section. Clear the display. Close the oven door all the way. Level the appliance. See the Installation Instructions. See "Oven Temperature Control" section. See "Positioning Racks...
... "Timed Cooking" section. Double-check the recipe in the oven. s Is the proper oven temperature calibration set correctly? s Was the oven preheated? See "Baking and Roasting" section. See "Bakeware" section. See "Timed Cooking" section. When one oven is one oven self-cleaning? There has been a power failure. On some models, has a delay start been set ? See "Clock" section. Clear the display. Close the oven door all the way. Level the appliance. See the Installation Instructions. See "Oven Temperature Control" section. See "Positioning Racks...
Use and Care Guide
Page 14
... your correspondence. s Installation information. Stainless Steel Cleaner & Polish (stainless steel models) Order Part Number 31462 All-Purpose Appliance Cleaner Order Part Number 31662 14 If you need replacement parts If you still need to Whirlpool Corporation with : s Features and specifications on "Buy Accessories Online." Call the Whirlpool Customer eXperience Center toll free: 1-800-253-1301. s Accessory and repair parts sales. To locate the Whirlpool designated service company in your...
... your correspondence. s Installation information. Stainless Steel Cleaner & Polish (stainless steel models) Order Part Number 31462 All-Purpose Appliance Cleaner Order Part Number 31662 14 If you need replacement parts If you still need to Whirlpool Corporation with : s Features and specifications on "Buy Accessories Online." Call the Whirlpool Customer eXperience Center toll free: 1-800-253-1301. s Accessory and repair parts sales. To locate the Whirlpool designated service company in your...
Use and Care Guide
Page 16
... need it. Contact your complete model number and serial number. WHIRLPOOL® COOKTOP, BUILT-IN OVEN AND RANGE WARRANTY ONE-YEAR FULL WARRANTY For one year from the date of purchase, when this information on the model and serial number label/plate, located on your appliance as recommended in the Use and Care Guide. 6. Your appliance is operated and maintained according to instructions attached to replace owner-accessible light bulbs. 2. You must be provided by Whirlpool Corporation. 5. Repairs...
... need it. Contact your complete model number and serial number. WHIRLPOOL® COOKTOP, BUILT-IN OVEN AND RANGE WARRANTY ONE-YEAR FULL WARRANTY For one year from the date of purchase, when this information on the model and serial number label/plate, located on your appliance as recommended in the Use and Care Guide. 6. Your appliance is operated and maintained according to instructions attached to replace owner-accessible light bulbs. 2. You must be provided by Whirlpool Corporation. 5. Repairs...
Parts Diagram
Page 2
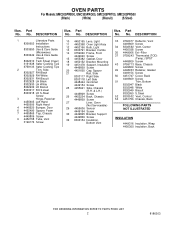
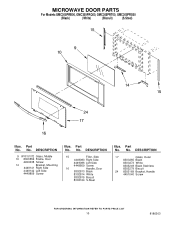
.... DESCRIPTION 1 Literature Parts 8300653 Installation Instructions 8303650 Use & Care Guide (Microwave) 8303649 Use & Care Guide (Oven) 8302010 Tech Sheet (Oven) 3191638 Safer Cooking Tips 9759133 Safer Cooking Tips 2 Trim, Side 8302927 RH Black 8302929 RH White 8302931 RH Biscuit 8302928 LH Black 8302930 LH White 8302932 LH Biscuit 8303217 RH S.steel 8303218 LH S.Steel Screw 3 Hinge, Receiver 4455605 Left Hand 4455606 Right Hand 4 4448520 Bumper, Door 6 4452490 Spacer...
.... DESCRIPTION 1 Literature Parts 8300653 Installation Instructions 8303650 Use & Care Guide (Microwave) 8303649 Use & Care Guide (Oven) 8302010 Tech Sheet (Oven) 3191638 Safer Cooking Tips 9759133 Safer Cooking Tips 2 Trim, Side 8302927 RH Black 8302929 RH White 8302931 RH Biscuit 8302928 LH Black 8302930 LH White 8302932 LH Biscuit 8303217 RH S.steel 8303218 LH S.Steel Screw 3 Hinge, Receiver 4455605 Left Hand 4455606 Right Hand 4 4448520 Bumper, Door 6 4452490 Spacer...
Parts Diagram
Page 4
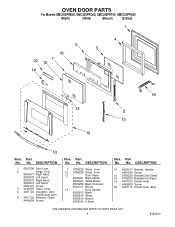
... 14 8303167 Bracket, Handle 4451040 Screw 15 9759229 Bracket(2nd Glass) 16 9759230 Bracket(3rd Glass) 19 4457103 Shield, Heat 4449809 Screw 22 4457114 Shield, Heat (Btm) 4 8186303 OVEN DOOR PARTS For Models:GMC305PRB00, GMC305PRQ00, GMC305PRT00, GMC305PRS00 (Black) (White) (Biscuit) (S.Steel) Illus. DESCRIPTION 1 8303700 Door Liner 2 Hinge, Door 8300577 Right Hand 8300578 Left Hand 8300573 Right Hand 8300574 Left Hand 4449743 Screw 3 4449259 Glass, Inner 4 4451722...
... 14 8303167 Bracket, Handle 4451040 Screw 15 9759229 Bracket(2nd Glass) 16 9759230 Bracket(3rd Glass) 19 4457103 Shield, Heat 4449809 Screw 22 4457114 Shield, Heat (Btm) 4 8186303 OVEN DOOR PARTS For Models:GMC305PRB00, GMC305PRQ00, GMC305PRT00, GMC305PRS00 (Black) (White) (Biscuit) (S.Steel) Illus. DESCRIPTION 1 8303700 Door Liner 2 Hinge, Door 8300577 Right Hand 8300578 Left Hand 8300573 Right Hand 8300574 Left Hand 4449743 Screw 3 4449259 Glass, Inner 4 4451722...
Parts Diagram
Page 10
... Biscuit 8303164 S.Steel Illus. No. Part No. No. Part No. No. DESCRIPTION 17 Glass, Outer 8303265 Black 8303273 White 8303249 Black Stainless 8303279 Biscuit 24 8303169 Bracket, Handle 4451040 Screw 10 8186303 DESCRIPTION 9 W10151072 Glass, Middle 10 8303556 Frame, Door 4450038 Screw 14 Bracket, Mounting 4449141 Right Side 4449142 Left Side 4449809 Screw Illus. MICROWAVE DOOR PARTS For Models:GMC305PRB00, GMC305PRQ00, GMC305PRT00, GMC305PRS00...
... Biscuit 8303164 S.Steel Illus. No. Part No. No. Part No. No. DESCRIPTION 17 Glass, Outer 8303265 Black 8303273 White 8303249 Black Stainless 8303279 Biscuit 24 8303169 Bracket, Handle 4451040 Screw 10 8186303 DESCRIPTION 9 W10151072 Glass, Middle 10 8303556 Frame, Door 4450038 Screw 14 Bracket, Mounting 4449141 Right Side 4449142 Left Side 4449809 Screw Illus. MICROWAVE DOOR PARTS For Models:GMC305PRB00, GMC305PRQ00, GMC305PRT00, GMC305PRS00...
Parts Diagram
Page 12
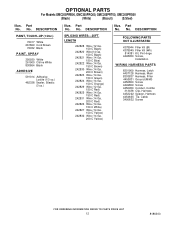
... Kit (Wh) 814381 Kit, Pin Hinge 4448950 Screw, Installation WIRING HARNESS PARTS 8301909 Harness, Latch 4457128 Harness, Main 8303837 Harness, Filter 4450831 Ground (M/W) 4450800 Screw 4449809 Screw 4450950 Conduit, Combo 313438 Clip, Harness 4452222 Spacer, Harness 4454835 Tie, Cable 3400832 Screw 12 8186303 OPTIONAL PARTS For Models:GMC305PRB00, GMC305PRQ00, GMC305PRT00, GMC305PRS00 (Black) (White) (Biscuit) (S.Steel) Illus. No. Part No. LENGTH 242828 Wire (12 Ga...
... Kit (Wh) 814381 Kit, Pin Hinge 4448950 Screw, Installation WIRING HARNESS PARTS 8301909 Harness, Latch 4457128 Harness, Main 8303837 Harness, Filter 4450831 Ground (M/W) 4450800 Screw 4449809 Screw 4450950 Conduit, Combo 313438 Clip, Harness 4452222 Spacer, Harness 4454835 Tie, Cable 3400832 Screw 12 8186303 OPTIONAL PARTS For Models:GMC305PRB00, GMC305PRQ00, GMC305PRT00, GMC305PRS00 (Black) (White) (Biscuit) (S.Steel) Illus. No. Part No. LENGTH 242828 Wire (12 Ga...
Dimensions
Page 1
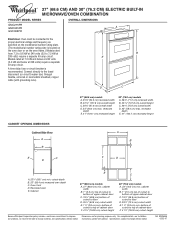
... (with product. recessed depth E. 41" (104.1 cm) recessed height CABINET OPENING DIMENSIONS Cabinet Side View A B A B E C D F D A. 23¹⁄₄" (59.1 cm) min. cabinet width B. 1" (2.5 cm) top of cutout to bottom of upper cabinet door C. 19¹⁄₄" (48.9 cm) bottom of cutout to 7.2 kW at 208 volts) require a separate 30-amp circuit. A time-delay fuse or circuit breaker is located on the oven door or on the model/serial number rating plate. (The model/serial number rating plate is recommended. Recessed oven E.
... (with product. recessed depth E. 41" (104.1 cm) recessed height CABINET OPENING DIMENSIONS Cabinet Side View A B A B E C D F D A. 23¹⁄₄" (59.1 cm) min. cabinet width B. 1" (2.5 cm) top of cutout to bottom of upper cabinet door C. 19¹⁄₄" (48.9 cm) bottom of cutout to 7.2 kW at 208 volts) require a separate 30-amp circuit. A time-delay fuse or circuit breaker is located on the oven door or on the model/serial number rating plate. (The model/serial number rating plate is recommended. Recessed oven E.


