Owners Manual
Page 4
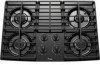
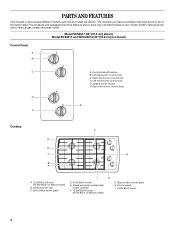
... are shown. Right rear burner control knob D. Left surface burner grate I . 5,000 Btu/h burner 4 Surface burner cap C. Surface burner locator F. Right surface burner grate H. Control panel I H D. 9,100 Btu/h burner E. Model SCS3617 (36" [91.4 cm] shown) Model SCS3017 and W3CG3014 (30" [76.2 cm] not shown) Control Panel A B C A. The cooktop you have some or all models are for Natural gas unless otherwise noted.
... are shown. Right rear burner control knob D. Left surface burner grate I . 5,000 Btu/h burner 4 Surface burner cap C. Surface burner locator F. Right surface burner grate H. Control panel I H D. 9,100 Btu/h burner E. Model SCS3617 (36" [91.4 cm] shown) Model SCS3017 and W3CG3014 (30" [76.2 cm] not shown) Control Panel A B C A. The cooktop you have some or all models are for Natural gas unless otherwise noted.
Owners Manual
Page 5
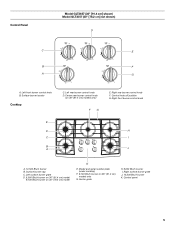
..." [91.4 cm] models only) FG E. Left rear burner control knob D. Left front burner control knob B. Right front burner control knob H I . Control Panel Model GLT3657 (36" [91.4 cm] shown) Model GLT3057 (30" [76.2 cm] not shown) D C E B F A G A. Control knob off position G. Center grate H. 6,000 Btu/h burner I J A. 12,500 Btu/h burner B. Control panel 5 Surface burner locator Cooktop E D C B A C. Surface burner cap C. Model and serial number plate (under...
..." [91.4 cm] models only) FG E. Left rear burner control knob D. Left front burner control knob B. Right front burner control knob H I . Control Panel Model GLT3657 (36" [91.4 cm] shown) Model GLT3057 (30" [76.2 cm] not shown) D C E B F A G A. Control knob off position G. Center grate H. 6,000 Btu/h burner I J A. 12,500 Btu/h burner B. Control panel 5 Surface burner locator Cooktop E D C B A C. Surface burner cap C. Model and serial number plate (under...

Owners Manual
Page 6
... igniter will click. Contact a trained repair specialist to check the wall receptacle to LITE. Hold a lit match near a burner and turn knob to LITE. See the instructions included with your new cooktop. Med Medium Medium Low Between Med & Lo Lo ■ Fry or sauté foods. ■ Maintain a slow...as the vent fan will produce a flame. 2. Only the burner with Natural gas. Fire Hazard Do not let the burner flame extend beyond the edge of prolonged power failure, the surface burners can result in and turn the burner off all controls when not cooking. If you do not hear...
... igniter will click. Contact a trained repair specialist to check the wall receptacle to LITE. Hold a lit match near a burner and turn knob to LITE. See the instructions included with your new cooktop. Med Medium Medium Low Between Med & Lo Lo ■ Fry or sauté foods. ■ Maintain a slow...as the vent fan will produce a flame. 2. Only the burner with Natural gas. Fire Hazard Do not let the burner flame extend beyond the edge of prolonged power failure, the surface burners can result in and turn the burner off all controls when not cooking. If you do not hear...
Owners Manual
Page 8
... time for cookware material characteristics. Aluminum and copper may scratch the cooktop. Use the following chart as its base material. On some models, the middle grate must always face inward toward the control knob panel to cool. ■ Center the canner on the grate...in cookware. Locator pin B. Earthenware ■ Follow manufacturer's instructions. ■ Use on a hot surface cooking area, element or surface burner. Burner cap Home Canning When canning for all types of aluminum or copper on stainless steel provides even heating. 8 Ceramic or Ceramic glass &#...
... time for cookware material characteristics. Aluminum and copper may scratch the cooktop. Use the following chart as its base material. On some models, the middle grate must always face inward toward the control knob panel to cool. ■ Center the canner on the grate...in cookware. Locator pin B. Earthenware ■ Follow manufacturer's instructions. ■ Use on a hot surface cooking area, element or surface burner. Burner cap Home Canning When canning for all types of aluminum or copper on stainless steel provides even heating. 8 Ceramic or Ceramic glass &#...
Owners Manual
Page 9
... Use the most aggressive cycle. ■ Gas Grate and Drip Pan Cleaner Part Number 31617 (not included): See "Assistance or Service" section to order. SURFACE BURNERS Sealed Burner models See "Sealed Surface Burners" section. 9 EXTERIOR PORCELAIN ENAMEL SURFACES (on... panel. ■ All Purpose Appliance Cleaner Part Number 31682 (not included): See "Assistance or Service" section to order. To avoid damage, do not remove seals under knobs. Apply glass cleaner to the cooktop...
... Use the most aggressive cycle. ■ Gas Grate and Drip Pan Cleaner Part Number 31617 (not included): See "Assistance or Service" section to order. SURFACE BURNERS Sealed Burner models See "Sealed Surface Burners" section. 9 EXTERIOR PORCELAIN ENAMEL SURFACES (on... panel. ■ All Purpose Appliance Cleaner Part Number 31682 (not included): See "Assistance or Service" section to order. To avoid damage, do not remove seals under knobs. Apply glass cleaner to the cooktop...
Owners Manual
Page 10
... level? Turn on cooktop ■ Is the cookware the proper size? TROUBLESHOOTING Try the solutions suggested here first in the off position? If the problem continues, call . See "Sealed Surface Burners" section. ■ Is propane gas being used ? Let it dry. See "Cookware" section. ■ Is the control knob set correctly? See "Sealed Surface Burners" section. ■...
... level? Turn on cooktop ■ Is the cookware the proper size? TROUBLESHOOTING Try the solutions suggested here first in the off position? If the problem continues, call . See "Sealed Surface Burners" section. ■ Is propane gas being used ? Let it dry. See "Cookware" section. ■ Is the control knob set correctly? See "Sealed Surface Burners" section. ■...
Installation Instructions
Page 10
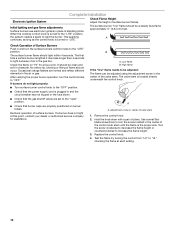
... the burner. When the cooktop control knob is lighted it may take longer then 4 seconds to "LITE." It should occur. After verifying the proper burner operation, turn the screw located in the center of standing pilots. The valve stem is turned to light because of flame should be clean and soft in the gas line...
... the burner. When the cooktop control knob is lighted it may take longer then 4 seconds to "LITE." It should occur. After verifying the proper burner operation, turn the screw located in the center of standing pilots. The valve stem is turned to light because of flame should be clean and soft in the gas line...
Installation Instructions
Page 11
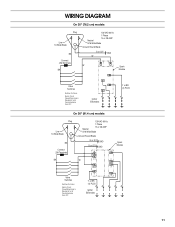
WIRING DIAGRAM On 30" (76.2 cm) models Plug Line 1/4 Wide Blade BK Connect .250 Terminals BK 120 VAC 60 Hz 1 Phase Neutral 15 or 20 AMP 5/16 Wide Blade Ground Round Blade G or G/Y GND W W Spark Module Valve Switches Switches On Valves Electric Circuit Closed When Knob Is Rotated 55˚ to 95˚... Blade Ground Round Blade G or G/Y GND G or G/Y GND N 1 Spark Module BK W L1 2 GND 3 5 4 Valve Switches Y or BR Switches On Valves (4) PLCS Electric Circuit Closed When Knob Is Rotated 55˚ to 95˚ Counterclockwise From OFF Igniter Electrodes 11
WIRING DIAGRAM On 30" (76.2 cm) models Plug Line 1/4 Wide Blade BK Connect .250 Terminals BK 120 VAC 60 Hz 1 Phase Neutral 15 or 20 AMP 5/16 Wide Blade Ground Round Blade G or G/Y GND W W Spark Module Valve Switches Switches On Valves Electric Circuit Closed When Knob Is Rotated 55˚ to 95˚... Blade Ground Round Blade G or G/Y GND G or G/Y GND N 1 Spark Module BK W L1 2 GND 3 5 4 Valve Switches Y or BR Switches On Valves (4) PLCS Electric Circuit Closed When Knob Is Rotated 55˚ to 95˚ Counterclockwise From OFF Igniter Electrodes 11

