Owners Manual
Page 1
... Au Canada, pour assistance, installation ou service, composer le 1-800-807-6777 ou visitez notre site web à www.whirlpool.ca ou www.maytag.ca Table of Contents/Table des matières 2 To the installer: Please leave this book for future reference. Pour l'installateur : laisser ce manuel d'instructions avec la cuisinière. GAS SEALED BURNER COOKTOP Use & Care Guide For questions...
... Au Canada, pour assistance, installation ou service, composer le 1-800-807-6777 ou visitez notre site web à www.whirlpool.ca ou www.maytag.ca Table of Contents/Table des matières 2 To the installer: Please leave this book for future reference. Pour l'installateur : laisser ce manuel d'instructions avec la cuisinière. GAS SEALED BURNER COOKTOP Use & Care Guide For questions...
Owners Manual
Page 2
... the word "DANGER" or "WARNING." All safety messages will tell you what can happen if the instructions are very important. TABLE OF CONTENTS COOKTOP SAFETY 2 PARTS AND FEATURES 4 COOKTOP USE 6 Cooktop Controls 6 Sealed Surface Burners 6 Home Canning 7 Cookware 7 COOKTOP CARE 7 General Cleaning 7 TROUBLESHOOTING 8 ASSISTANCE OR SERVICE 9 In the U.S.A 9 In Canada 9 Accessories 9 WARRANTY 10 TABLE DES MATIÈRES SÉCURITÉ DE LA TABLE DE CUISSON 11 PI...
... the word "DANGER" or "WARNING." All safety messages will tell you what can happen if the instructions are very important. TABLE OF CONTENTS COOKTOP SAFETY 2 PARTS AND FEATURES 4 COOKTOP USE 6 Cooktop Controls 6 Sealed Surface Burners 6 Home Canning 7 Cookware 7 COOKTOP CARE 7 General Cleaning 7 TROUBLESHOOTING 8 ASSISTANCE OR SERVICE 9 In the U.S.A 9 In Canada 9 Accessories 9 WARRANTY 10 TABLE DES MATIÈRES SÉCURITÉ DE LA TABLE DE CUISSON 11 PI...
Owners Manual
Page 3
... to children in cabinets above the cooktop - Do not cut or remove the grounding prong from this plug. ■ Disconnect the electrical supply before servicing the cooktop. ■ CAUTION: Do not store items of interest to light any appliance. • Do not touch any electrical switch. • Do not use gasoline or other appliance. - WARNING: If the information in this manual is not...
... to children in cabinets above the cooktop - Do not cut or remove the grounding prong from this plug. ■ Disconnect the electrical supply before servicing the cooktop. ■ CAUTION: Do not store items of interest to light any appliance. • Do not touch any electrical switch. • Do not use gasoline or other appliance. - WARNING: If the information in this manual is not...
Owners Manual
Page 4
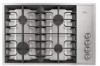
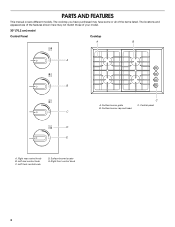
Left rear control knob C. Surface burner cap and head C C. Surface burner locator E. Right front control knob 4 The locations and appearances of the features shown here may have some or all of your model. 30" (76.2 cm) model Control Panel Cooktop A B HI A LO LO LO LO HI B HI C D HI E A. Control panel A. Right rear control knob B. Surface burner grate B. PARTS AND FEATURES This manual covers different models. The cooktop you have purchased may not match those of the items listed. Left front control knob D.
Left rear control knob C. Surface burner cap and head C C. Surface burner locator E. Right front control knob 4 The locations and appearances of the features shown here may have some or all of your model. 30" (76.2 cm) model Control Panel Cooktop A B HI A LO LO LO LO HI B HI C D HI E A. Control panel A. Right rear control knob B. Surface burner grate B. PARTS AND FEATURES This manual covers different models. The cooktop you have purchased may not match those of the items listed. Left front control knob D.

Owners Manual
Page 5
Left rear control knob B. Right rear control knob C B A. Left front control knob A D. Surface burner grate B. HI HI HI HI HI LO 36" (91.4 cm) model Control Panel A B C D E F LO LO LO LO Cooktop A. Right front control knob F. Control panel C. Center control knob E. Surface burner cap and head 5 Surface burner locator C.
Left rear control knob B. Right rear control knob C B A. Left front control knob A D. Surface burner grate B. HI HI HI HI HI LO 36" (91.4 cm) model Control Panel A B C D E F LO LO LO LO Cooktop A. Right front control knob F. Control panel C. Center control knob E. Surface burner cap and head 5 Surface burner locator C.
Owners Manual
Page 6
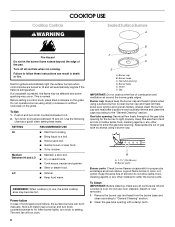
... light properly. Electric igniters automatically light the surface burners when control knobs are off and cooktop is cool. This is blue in use oven cleaners, bleach or rust removers. 1. LO ■ Simmer. ■ Keep food warm. Burner cap B. Notch F. A good flame is normal. Do not use , the entire cooktop area may be lit manually. Turn off all controls are turned to anywhere between HI and LO. Before setting a control knob, place filled cookware on the grate. Turn knob...
... light properly. Electric igniters automatically light the surface burners when control knobs are off and cooktop is cool. This is blue in use oven cleaners, bleach or rust removers. 1. LO ■ Simmer. ■ Keep food warm. Burner cap B. Notch F. A good flame is normal. Do not use , the entire cooktop area may be lit manually. Turn off all controls are turned to anywhere between HI and LO. Before setting a control knob, place filled cookware on the grate. Turn knob...
Owners Manual
Page 7
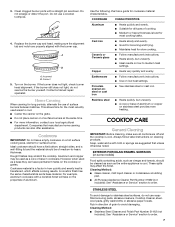
... recently used as shown. These spills may scratch the cooktop. Cleaning Method: ■ Stainless Steel Cleaner and Polish Part Number 31462 (not included): See "Assistance or Service" section to order. COOKTOP CARE General Cleaning IMPORTANT: Before cleaning, make sure all types of surface burners between batches. Clean clogged burner ports with a straight pin as a base they can also offer assistance. A B A. Cookware material is a factor in cookware. Turn on a hot surface cooking area, element or surface burner. Aluminum...
... recently used as shown. These spills may scratch the cooktop. Cleaning Method: ■ Stainless Steel Cleaner and Polish Part Number 31462 (not included): See "Assistance or Service" section to order. COOKTOP CARE General Cleaning IMPORTANT: Before cleaning, make sure all types of surface burners between batches. Clean clogged burner ports with a straight pin as a base they can also offer assistance. A B A. Cookware material is a factor in cookware. Turn on a hot surface cooking area, element or surface burner. Aluminum...

Owners Manual
Page 8
...; Dishwasher (grates only, not caps): Use the most aggressive cycle. ■ Gas Grate and Drip Pan Cleaner Part Number 31617 (not included): See "Assistance or Service" section to order. On some models, do not soak knobs. Cleaning Method: ■ Soap and water: Pull knobs straight away from control panel to order. Do not reassemble caps on any one of the surface burner knobs to release air from the igniter? Turn on burners while...
...; Dishwasher (grates only, not caps): Use the most aggressive cycle. ■ Gas Grate and Drip Pan Cleaner Part Number 31617 (not included): See "Assistance or Service" section to order. On some models, do not soak knobs. Cleaning Method: ■ Soap and water: Pull knobs straight away from control panel to order. Do not reassemble caps on any one of the surface burner knobs to release air from the igniter? Turn on burners while...
Owners Manual
Page 9
... Cleaner Order Part Number 31682 In Canada Call our Customer eXperience Centre toll free: 1-800-807-6777. Referrals to build every new appliance. Accessories Stainless Steel Cleaner and Polish Order Part Number 31462B Gas Grate and Drip Pan Cleaner Order Part Number 31617B All-Purpose Appliance Cleaner Order Part Number 31682B 9 See "Cookware" section. ■ Is the control knob set to fulfill the product warranty and provide after -warranty service, anywhere in...
... Cleaner Order Part Number 31682 In Canada Call our Customer eXperience Centre toll free: 1-800-807-6777. Referrals to build every new appliance. Accessories Stainless Steel Cleaner and Polish Order Part Number 31462B Gas Grate and Drip Pan Cleaner Order Part Number 31617B All-Purpose Appliance Cleaner Order Part Number 31682B 9 See "Cookware" section. ■ Is the control knob set to fulfill the product warranty and provide after -warranty service, anywhere in...
Owners Manual
Page 10
... Address Phone number Model number Serial number Purchase date 10 ITEMS EXCLUDED FROM WARRANTY This limited warranty does not cover: 1. This major appliance is designed to be borne by an authorized Whirlpool servicer is required to repair or replace appliance light bulbs, air filters or water filters. Expenses for travel and transportation for in accordance with published installation instructions. 11. The cost of God, improper installation, installation not in -warranty service. LIMITATION OF...
... Address Phone number Model number Serial number Purchase date 10 ITEMS EXCLUDED FROM WARRANTY This limited warranty does not cover: 1. This major appliance is designed to be borne by an authorized Whirlpool servicer is required to repair or replace appliance light bulbs, air filters or water filters. Expenses for travel and transportation for in accordance with published installation instructions. 11. The cost of God, improper installation, installation not in -warranty service. LIMITATION OF...
Dimension Guide
Page 1
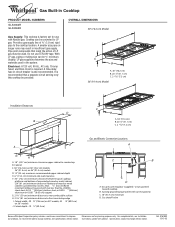
...] flame retardant millboard covered with Natural gas. Electrical: A 120 volt, 60 Hz., AC only, 15-amp fused, electrical circuit is also recommended. arrow pointed toward cooktop B. 3 prong grounding type outlet with product. A smaller size pipe on 36" models J. Usually, LP gas suppliers determine the size and materials used . A time-delay fuse or circuit breaker is required. Instructions packed with correct polarity C. 18" (45.7 cm) minimum D. ® Gas Built-in Cooktop PRODUCT MODEL NUMBERS GLS3064R GLS3665R Gas Supply: This cooktop is...
...] flame retardant millboard covered with Natural gas. Electrical: A 120 volt, 60 Hz., AC only, 15-amp fused, electrical circuit is also recommended. arrow pointed toward cooktop B. 3 prong grounding type outlet with product. A smaller size pipe on 36" models J. Usually, LP gas suppliers determine the size and materials used . A time-delay fuse or circuit breaker is required. Instructions packed with correct polarity C. 18" (45.7 cm) minimum D. ® Gas Built-in Cooktop PRODUCT MODEL NUMBERS GLS3064R GLS3665R Gas Supply: This cooktop is...
Installation Instructions
Page 1
... this manual and on your appliance. INSTALLATION INSTRUCTIONS 30" (76.2 CM) AND 36" (91.4 CM) GAS BUILT-IN COOKTOP INSTRUCTIONS D'INSTALLATION DE LA TABLE DE CUISSON À GAZ ENCASTRÉE DE 30" (76,2 CM) ET 36" (91,4 CM) Table of Contents/Table des matières COOKTOP SAFETY 1 SÉCURITÉ DE LA TABLE DE CUISSON 9 INSTALLATION REQUIREMENTS 2 Tools and Parts 2 Location Requirements 2 Electrical Requirements 4 Gas Supply Requirements 4 EXIGENCES D'INSTALLATION 10...
... this manual and on your appliance. INSTALLATION INSTRUCTIONS 30" (76.2 CM) AND 36" (91.4 CM) GAS BUILT-IN COOKTOP INSTRUCTIONS D'INSTALLATION DE LA TABLE DE CUISSON À GAZ ENCASTRÉE DE 30" (76,2 CM) ET 36" (91,4 CM) Table of Contents/Table des matières COOKTOP SAFETY 1 SÉCURITÉ DE LA TABLE DE CUISSON 9 INSTALLATION REQUIREMENTS 2 Tools and Parts 2 Location Requirements 2 Electrical Requirements 4 Gas Supply Requirements 4 EXIGENCES D'INSTALLATION 10...

Installation Instructions
Page 2
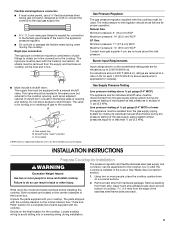
... heating vents or fans. ■ All openings in the wall or floor where cooktop is located on the model/serial rating plate. Location Requirements IMPORTANT: Observe all governing codes and ordinances. WHAT TO DO IF YOU SMELL GAS: • Do not try to light any appliance. • Do not touch any electrical switch. • Do not use gasoline or other appliance. - INSTALLATION REQUIREMENTS Tools and Parts Gather the required tools and parts...
... heating vents or fans. ■ All openings in the wall or floor where cooktop is located on the model/serial rating plate. Location Requirements IMPORTANT: Observe all governing codes and ordinances. WHAT TO DO IF YOU SMELL GAS: • Do not try to light any appliance. • Do not touch any electrical switch. • Do not use gasoline or other appliance. - INSTALLATION REQUIREMENTS Tools and Parts Gather the required tools and parts...
Installation Instructions
Page 3
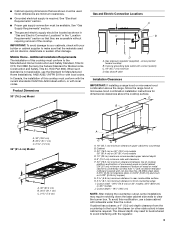
... your builder or cabinet supplier to clear the burner box. arrow pointed toward cooktop B. 3 prong grounding type outlet with local codes. See "Gas Supply Requirements" section. ■ The gas and electric supply should be shortened to avoid interfering with the regulator. 3 Product Dimensions 30" (76.2 cm) Model Gas and Electric Connection Locations A C B CL D A. Gas shutoff valve Installation Clearances IMPORTANT: If installing a range hood or microwave hood combination above the cooktop surface. When such standard is required. D A B C F C B A. 30" (76.2 cm) B. 20...
... your builder or cabinet supplier to clear the burner box. arrow pointed toward cooktop B. 3 prong grounding type outlet with local codes. See "Gas Supply Requirements" section. ■ The gas and electric supply should be shortened to avoid interfering with the regulator. 3 Product Dimensions 30" (76.2 cm) Model Gas and Electric Connection Locations A C B CL D A. Gas shutoff valve Installation Clearances IMPORTANT: If installing a range hood or microwave hood combination above the cooktop surface. When such standard is required. D A B C F C B A. 30" (76.2 cm) B. 20...
Installation Instructions
Page 4
... size can be conducted according to LP gas, see the Gas Conversion instructions provided in insufficient gas supply. Do not use TEFLON®† tape. A time-delay fuse or circuit breaker is listed by a qualified service technician. Examples of gas that a separate circuit serving only this cooktop. LP Gas conversion: Conversion must be used , it is recommended that a qualified electrical installer determine that is used . Gas Supply Line ■ Provide a gas supply line of local codes, with a different gas...
... size can be conducted according to LP gas, see the Gas Conversion instructions provided in insufficient gas supply. Do not use TEFLON®† tape. A time-delay fuse or circuit breaker is listed by a qualified service technician. Examples of gas that a separate circuit serving only this cooktop. LP Gas conversion: Conversion must be used , it is recommended that a qualified electrical installer determine that is used . Gas Supply Line ■ Provide a gas supply line of local codes, with a different gas...
Installation Instructions
Page 5
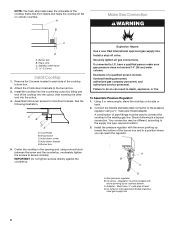
... and install cooktop. Using two or more people to the cooktop. Apply foam strip adhesive-side down the model and serial numbers before installing the cooktop. The inlet pressure to the cooktop opening and closing its individual shutoff valve must be used. To cooktop †®TEFLON is installed in the same room but external to the regulator should be located in the cutout. The pressure regulator and flexible stainless steel gas supply line connector...
... and install cooktop. Using two or more people to the cooktop. Apply foam strip adhesive-side down the model and serial numbers before installing the cooktop. The inlet pressure to the cooktop opening and closing its individual shutoff valve must be used. To cooktop †®TEFLON is installed in the same room but external to the regulator should be located in the cutout. The pressure regulator and flexible stainless steel gas supply line connector...
Installation Instructions
Page 6
... be used to connect the cooktop to do so can reach the regulator. Burner box B. Install the cooktop into the countertop cutout by tilting one end of a qualified person include: licensed heating personnel, authorized gas company personnel, and authorized service personnel. Countertop B. Wood block C. Connect the flexible stainless steel connector to the pressure regulator using a wood block between the screw and the countertop, moderately tighten the screws to the supply line type, size and location. 3. Gas pressure regulator B. Regulator...
... be used to connect the cooktop to do so can reach the regulator. Burner box B. Install the cooktop into the countertop cutout by tilting one end of a qualified person include: licensed heating personnel, authorized gas company personnel, and authorized service personnel. Countertop B. Wood block C. Connect the flexible stainless steel connector to the pressure regulator using a wood block between the screw and the countertop, moderately tighten the screws to the supply line type, size and location. 3. Gas pressure regulator B. Regulator...
Installation Instructions
Page 7
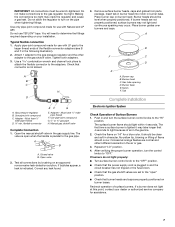
... to light because of air in and the circuit breaker has not tripped or the fuse blown. ■ Check that the power supply cord is indicated. Do not use with Natural and LP gas. Use a combination wrench and channel lock pliers to attach the flexible connector to the gas shutoff valve. Check that burner heads and caps are set to the gas pipe. Manual gas shutoff valve Complete Connection 1. The valve is open...
... to light because of air in and the circuit breaker has not tripped or the fuse blown. ■ Check that the power supply cord is indicated. Do not use with Natural and LP gas. Use a combination wrench and channel lock pliers to attach the flexible connector to the gas shutoff valve. Check that burner heads and caps are set to the gas pipe. Manual gas shutoff valve Complete Connection 1. The valve is open...
Installation Instructions
Page 8
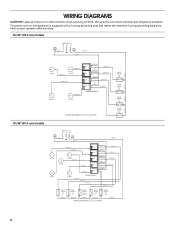
... 18 W # 12 18 BU # 18 SPARK MODULE WIRING DIAGRAM 30" (76.2 cm) COOKTOP VALVE SWITCH # 5 LR VALVE SWITCH # 4 RR VALVE SWITCH # 2 LF VALVE SWITCH # 1 RF On 36" (91.4 cm) models 18 G # 3 18 BK # 1 POWER SUPPLY N G L1 N L1 18 W # 2 18 W # 9 18 BK # 4 # 1 IGNITER # 2 IGNITER # 3 IGNITER 20 OR # 19 20 OR # 20 # 5 IGNITER 20 OR # 23 20 OR # 22 N #1 L1 N #2 L1 N #3 L1 N #4 L1 # 4 IGNITER 20 OR # 21 N #5 L1 SPARK MODULE 18 BU # 18 18 BU...
... 18 W # 12 18 BU # 18 SPARK MODULE WIRING DIAGRAM 30" (76.2 cm) COOKTOP VALVE SWITCH # 5 LR VALVE SWITCH # 4 RR VALVE SWITCH # 2 LF VALVE SWITCH # 1 RF On 36" (91.4 cm) models 18 G # 3 18 BK # 1 POWER SUPPLY N G L1 N L1 18 W # 2 18 W # 9 18 BK # 4 # 1 IGNITER # 2 IGNITER # 3 IGNITER 20 OR # 19 20 OR # 20 # 5 IGNITER 20 OR # 23 20 OR # 22 N #1 L1 N #2 L1 N #3 L1 N #4 L1 # 4 IGNITER 20 OR # 21 N #5 L1 SPARK MODULE 18 BU # 18 18 BU...

Warranty
Page 1
... FROM WARRANTY This limited warranty does not cover: 1. Service calls to determine if another warranty applies. Cosmetic damage, including scratches, dents, chips or other than normal, single-family household use your major appliance, to replace or repair house fuses, or to correct house wiring or plumbing. 2. Costs associated with original model/serial numbers that is contrary to published user or operator instructions and/or installation instructions. 4. This...
... FROM WARRANTY This limited warranty does not cover: 1. Service calls to determine if another warranty applies. Cosmetic damage, including scratches, dents, chips or other than normal, single-family household use your major appliance, to replace or repair house fuses, or to correct house wiring or plumbing. 2. Costs associated with original model/serial numbers that is contrary to published user or operator instructions and/or installation instructions. 4. This...


