
Dimension Guide
Page 1
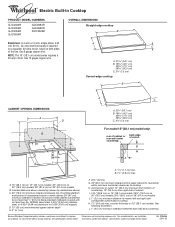
...cm) models. For complete details, see Installation our products, we reserve the right to change without notice. ® Electric Built-in Cooktop PRODUCT MODEL NUMBERS GJC3034R GJC3054R GJC3055R GJC3634R GJC3654R GJC3655R RCC3024R OVERALL DIMENSIONS Straight-edge cooktop B Electrical: A 4-wire or 3-wire, single ...surface above ) C. 30" (76.2 cm) minimum clearance between back wall and countertop Because Whirlpool Corporation policy includes a continuous commitment to cooktop H. Instructions packed with not less than ¹⁄₄" [0.6 cm] flame retardant millboard ...
...cm) models. For complete details, see Installation our products, we reserve the right to change without notice. ® Electric Built-in Cooktop PRODUCT MODEL NUMBERS GJC3034R GJC3054R GJC3055R GJC3634R GJC3654R GJC3655R RCC3024R OVERALL DIMENSIONS Straight-edge cooktop B Electrical: A 4-wire or 3-wire, single ...surface above ) C. 30" (76.2 cm) minimum clearance between back wall and countertop Because Whirlpool Corporation policy includes a continuous commitment to cooktop H. Instructions packed with not less than ¹⁄₄" [0.6 cm] flame retardant millboard ...

Use & Care Guide
Page 3
...do not touch, or let clothing or other glazed utensils are the cooktop and surfaces facing the cooktop. s Make Sure Reflector Pans or Drip Bowls Are in water. Do not use . Improper installation of these pans or bowls during cooking may be left alone or ...Settings - SAVE THESE INSTRUCTIONS 3 IMPORTANT SAFETY INSTRUCTIONS WARNING: To reduce the risk of fire, electrical shock, injury to persons, or damage when using the cooktop. s Never Use Your Cooktop for cooktop service without breaking due to children in burns from steam. s Storage on hot surfaces may result...
...do not touch, or let clothing or other glazed utensils are the cooktop and surfaces facing the cooktop. s Make Sure Reflector Pans or Drip Bowls Are in water. Do not use . Improper installation of these pans or bowls during cooking may be left alone or ...Settings - SAVE THESE INSTRUCTIONS 3 IMPORTANT SAFETY INSTRUCTIONS WARNING: To reduce the risk of fire, electrical shock, injury to persons, or damage when using the cooktop. s Never Use Your Cooktop for cooktop service without breaking due to children in burns from steam. s Storage on hot surfaces may result...

Use & Care Guide
Page 10
...not installed, the life of the coil element will be of aluminum. 10 B A C A. Cookware with white or biscuit ceramic glass, soils and stains may be more cleaning and care. s Do not cook foods directly on the properties of medium-to-heavy thickness. On electric cooktops, canners...for the most even heating. s On coil element models, the installation of surface cooking areas, elements or surface burners between the lid and the cooktop, and the ceramic glass could crack the cooktop. Cookware material is transferred, which affects cooking results. As the glass...
...not installed, the life of the coil element will be of aluminum. 10 B A C A. Cookware with white or biscuit ceramic glass, soils and stains may be more cleaning and care. s Do not cook foods directly on the properties of medium-to-heavy thickness. On electric cooktops, canners...for the most even heating. s On coil element models, the installation of surface cooking areas, elements or surface burners between the lid and the cooktop, and the ceramic glass could crack the cooktop. Cookware material is transferred, which affects cooking results. As the glass...

Use & Care Guide
Page 12
... operate 1. If the problem continues, call for service. See Installation Instructions. Cooktop will operate s Has a household fuse blown, or has a circuit breaker tripped? Clean the cooktop touch control panel thoroughly. If the cooktop lights continue to a setting. After 1 minute, reconnect power ...B. 36" (91.4 cm) models s Let the cooktop cool down, and the blinking lights will stop. Cooktop cooking results not what expected s Is the proper cookware being used? s Is the control knob set correctly? See the Installation Instructions. s On coil element models, is the element...
... operate 1. If the problem continues, call for service. See Installation Instructions. Cooktop will operate s Has a household fuse blown, or has a circuit breaker tripped? Clean the cooktop touch control panel thoroughly. If the cooktop lights continue to a setting. After 1 minute, reconnect power ...B. 36" (91.4 cm) models s Let the cooktop cool down, and the blinking lights will stop. Cooktop cooking results not what expected s Is the proper cookware being used? s Is the control knob set correctly? See the Installation Instructions. s On coil element models, is the element...

Use & Care Guide
Page 13
...build every new WHIRLPOOL® appliance. s Installation information. s Referrals to local dealers, repair parts distributors, and service companies. Accessories U.S.A. Whirlpool designated service technicians are made with the same precision used to Whirlpool Corporation with ...Cooktop Protectant (ceramic glass models) Order Part Number 31463 Cooktop Care Kit (includes cleaner, protectant, and applicator pads) Order Part Number 31605 Cooktop Scraper (ceramic glass models) Order Part Number 3183488 All-Purpose Appliance Cleaner Order Part Number 31662 In Canada Call the Whirlpool...
...build every new WHIRLPOOL® appliance. s Installation information. s Referrals to local dealers, repair parts distributors, and service companies. Accessories U.S.A. Whirlpool designated service technicians are made with the same precision used to Whirlpool Corporation with ...Cooktop Protectant (ceramic glass models) Order Part Number 31463 Cooktop Care Kit (includes cleaner, protectant, and applicator pads) Order Part Number 31605 Cooktop Scraper (ceramic glass models) Order Part Number 3183488 All-Purpose Appliance Cleaner Order Part Number 31662 In Canada Call the Whirlpool...

Use & Care Guide
Page 14
... a remote area where service by an authorized Whirlpool servicer is not available. 10. Damage resulting from accident, alteration, misuse, abuse, fire, flood, acts of God, improper installation, installation not in accordance with electrical or plumbing codes, or use your major appliance... instructions attached to or furnished with the product, Whirlpool Corporation or Whirlpool Canada LP (hereafter "Whirlpool") will need it is installed in an inaccessible location or is not installed in accordance with published installation instructions. 11. Expenses for travel and transportation for...
... a remote area where service by an authorized Whirlpool servicer is not available. 10. Damage resulting from accident, alteration, misuse, abuse, fire, flood, acts of God, improper installation, installation not in accordance with electrical or plumbing codes, or use your major appliance... instructions attached to or furnished with the product, Whirlpool Corporation or Whirlpool Canada LP (hereafter "Whirlpool") will need it is installed in an inaccessible location or is not installed in accordance with published installation instructions. 11. Expenses for travel and transportation for...
Installation Guide
Page 1
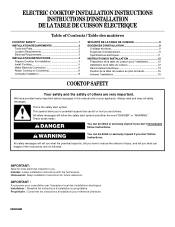
...;férence ultérieure. 8286066B Installer: Leave installation instructions with the homeowner. ELECTRIC COOKTOP INSTALLATION INSTRUCTIONS INSTRUCTIONS D'INSTALLATION DE LA TABLE DE CUISSON ÉLECTRIQUE Table of Contents / Table des matières COOKTOP SAFETY 1 INSTALLATION REQUIREMENTS 2 Tools and Parts 2 Location Requirements 2 Electrical Requirements 3 INSTALLATION INSTRUCTIONS 4 Prepare Cooktop for Installation 4 Install Cooktop 5 Make Electrical Connection 6 Attach Cooktop to Countertop 8 Complete Installation 8 SÉCURITÉ DE LA...
...;férence ultérieure. 8286066B Installer: Leave installation instructions with the homeowner. ELECTRIC COOKTOP INSTALLATION INSTRUCTIONS INSTRUCTIONS D'INSTALLATION DE LA TABLE DE CUISSON ÉLECTRIQUE Table of Contents / Table des matières COOKTOP SAFETY 1 INSTALLATION REQUIREMENTS 2 Tools and Parts 2 Location Requirements 2 Electrical Requirements 3 INSTALLATION INSTRUCTIONS 4 Prepare Cooktop for Installation 4 Install Cooktop 5 Make Electrical Connection 6 Attach Cooktop to Countertop 8 Complete Installation 8 SÉCURITÉ DE LA...
Installation Guide
Page 2
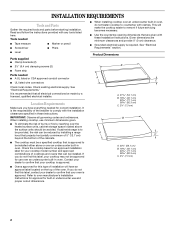
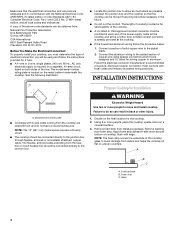
... your oven is approved. Given dimensions are given with the installation clearances specified in oven. Check existing electrical supply. When installing cooktop, use minimum dimensions given. ■ To eliminate the risk of cooktops and ovens that can be reduced by installing a range hood that your cooktop may not be made by reaching over an undercounter built-in...
... your oven is approved. Given dimensions are given with the installation clearances specified in oven. Check existing electrical supply. When installing cooktop, use minimum dimensions given. ■ To eliminate the risk of cooktops and ovens that can be reduced by installing a range hood that your cooktop may not be made by reaching over an undercounter built-in...
Installation Guide
Page 3
...B M L F G E H I . Failure to clear the cooktop base. If codes permit and a separate ground wire is used, it is recommended that a qualified electrical installer determine that the ground path and wire gauge are in accordance with a qualified electrical installer if you are not sure the oven is required. B. 1½"...copper wire. Use 8 gauge copper wire. Cabinet Dimensions IMPORTANT: If installing a range hood or microwave hood combination above the cooktop, follow these instructions can result in death, fire, or electrical shock. Junction box or outlet; 12" (30.5 cm) minimum ...
...B M L F G E H I . Failure to clear the cooktop base. If codes permit and a separate ground wire is used, it is recommended that a qualified electrical installer determine that the ground path and wire gauge are in accordance with a qualified electrical installer if you are not sure the oven is required. B. 1½"...copper wire. Use 8 gauge copper wire. Cabinet Dimensions IMPORTANT: If installing a range hood or microwave hood combination above the cooktop, follow these instructions can result in death, fire, or electrical shock. Junction box or outlet; 12" (30.5 cm) minimum ...
Installation Guide
Page 4
... Protection Association One Batterymarch Park Quincy, MA 02269 CSA International 8501 East Pleasant Valley Road Cleveland, OH 44131-5575 Before You Make the Electrical Connection: To properly install your cooktop, you must determine the type of the above code standards can be obtained from the fuse box or circuit breaker box should be...
... Protection Association One Batterymarch Park Quincy, MA 02269 CSA International 8501 East Pleasant Valley Road Cleveland, OH 44131-5575 Before You Make the Electrical Connection: To properly install your cooktop, you must determine the type of the above code standards can be obtained from the fuse box or circuit breaker box should be...
Installation Guide
Page 5
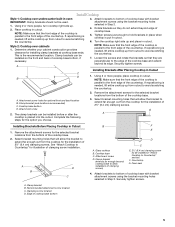
... of the countertop. Securely tighten screws. B NOTE: Make sure that the front edge of the cooktop is parallel to the front edge of 2½" (6.4 cm) clamping screws. A. G A Installing Brackets Before Placing Cooktop in cutout. Cooktop base C. Foam seal 4. Place cooktop in Cutout 1. Attach brackets to Countertop" section) F. NOTE: Make sure that the front edge of...
... of the countertop. Securely tighten screws. B NOTE: Make sure that the front edge of the cooktop is parallel to the front edge of 2½" (6.4 cm) clamping screws. A. G A Installing Brackets Before Placing Cooktop in cutout. Cooktop base C. Foam seal 4. Place cooktop in Cutout 1. Attach brackets to Countertop" section) F. NOTE: Make sure that the front edge of...
Installation Guide
Page 6
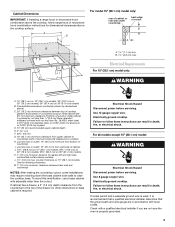
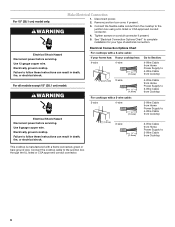
...cooktop to complete installation for your cooktop has: 4-wire 4-wire ¹⁄₂" (1.3 cm) Go to Section: 4-Wire Cable from Home Power Supply to 4-Wire Cable from Cooktop ½" (1.3 cm) 3-wire ¹⁄₂" (1.3 cm) 4-Wire Cable from Home Power Supply to 3-Wire Cable from Cooktop For cooktops...wire. Electrically ground cooktop. For all models except 15" (38.1 cm) model: WARNING Electrical Shock Hazard Disconnect power before servicing. Remove junction box cover, if present. 3. Electrically ground cooktop. Electrical Connection Options Chart For cooktops with...
...cooktop to complete installation for your cooktop has: 4-wire 4-wire ¹⁄₂" (1.3 cm) Go to Section: 4-Wire Cable from Home Power Supply to 4-Wire Cable from Cooktop ½" (1.3 cm) 3-wire ¹⁄₂" (1.3 cm) 4-Wire Cable from Home Power Supply to 3-Wire Cable from Cooktop For cooktops...wire. Electrically ground cooktop. For all models except 15" (38.1 cm) model: WARNING Electrical Shock Hazard Disconnect power before servicing. Remove junction box cover, if present. 3. Electrically ground cooktop. Electrical Connection Options Chart For cooktops with...
Installation Guide
Page 7
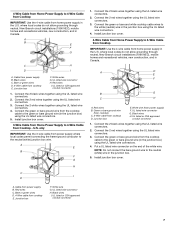
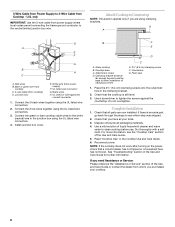
...connectors. 3. Red wires B. UL listed or CSA approved conduit connector 1. Install junction box cover. UL listed wire connector H. Cable from cooktop D. Red wires I . Connect the green or bare and white cooktop cable wires to the neutral (white) wire in the junction box using... from Home Power Supply to 4-Wire Cable from Cooktop - White wires G. Connect the 2 white wires together using the UL listed wire connectors. 3. Install junction box cover. 3-Wire Cable from Home Power Supply to 4-Wire Cable from Cooktop IMPORTANT: Use the 4-wire cable from home power...
...connectors. 3. Red wires B. UL listed or CSA approved conduit connector 1. Install junction box cover. UL listed wire connector H. Cable from cooktop D. Red wires I . Connect the green or bare and white cooktop cable wires to the neutral (white) wire in the junction box using... from Home Power Supply to 4-Wire Cable from Cooktop - White wires G. Connect the 2 white wires together using the UL listed wire connectors. 3. Install junction box cover. 3-Wire Cable from Home Power Supply to 4-Wire Cable from Cooktop IMPORTANT: Use the 4-wire cable from home power...
Installation Guide
Page 8
.... Red wires B. UL listed or CSA approved conduit connector 1. Cooktop base C. NOTE: If the cooktop does not work after turning on the power, check that you purchased your tools. 3. Install junction box cover. Attachment screw D. Place the 2½" (6.4 cm... clamping screw F. Connect the green or bare cooktop cable wires to see the "Cooktop Care" section of /recycle all your cooktop. 8 Use a screwdriver to 3-Wire Cable from Cooktop - Dispose of the Use and Care Guide. 5. Complete Installation 1. Glass cooktop B. Check that a circuit breaker has not...
.... Red wires B. UL listed or CSA approved conduit connector 1. Cooktop base C. NOTE: If the cooktop does not work after turning on the power, check that you purchased your tools. 3. Install junction box cover. Attachment screw D. Place the 2½" (6.4 cm... clamping screw F. Connect the green or bare cooktop cable wires to see the "Cooktop Care" section of /recycle all your cooktop. 8 Use a screwdriver to 3-Wire Cable from Cooktop - Dispose of the Use and Care Guide. 5. Complete Installation 1. Glass cooktop B. Check that a circuit breaker has not...
Warranty Information
Page 1
... better help by checking the "Assistance or Service" section or by Whirlpool. 5. Outside the 50 United States and Canada, this warranty. 8. Service calls to correct the installation of God, improper installation, installation not in a remote area where service by this limited warranty does ...not apply. This warranty is located in accordance with electrical or plumbing codes, or use your major appliance, ...
... better help by checking the "Assistance or Service" section or by Whirlpool. 5. Outside the 50 United States and Canada, this warranty. 8. Service calls to correct the installation of God, improper installation, installation not in a remote area where service by this limited warranty does ...not apply. This warranty is located in accordance with electrical or plumbing codes, or use your major appliance, ...

