Use and Care Guide
Page 3
...with ventilating hood - Absence of these liners may penetrate the broken cooktop and create a risk of electric shock. Do not use . Children climbing on Grease Fires - s Never Use Your Cooktop for cooktop service without breaking due to line surface unit drip bowls, except...Contact a qualified technician immediately. SAVE THESE INSTRUCTIONS 3 IMPORTANT SAFETY INSTRUCTIONS WARNING: To reduce the risk of fire, electrical shock, injury to persons, or damage when using the cooktop. s Clean Ventilating Hoods Frequently - s When flaming foods under the hood, turn the fan on hood or ...
...with ventilating hood - Absence of these liners may penetrate the broken cooktop and create a risk of electric shock. Do not use . Children climbing on Grease Fires - s Never Use Your Cooktop for cooktop service without breaking due to line surface unit drip bowls, except...Contact a qualified technician immediately. SAVE THESE INSTRUCTIONS 3 IMPORTANT SAFETY INSTRUCTIONS WARNING: To reduce the risk of fire, electrical shock, injury to persons, or damage when using the cooktop. s Clean Ventilating Hoods Frequently - s When flaming foods under the hood, turn the fan on hood or ...
Use and Care Guide
Page 10
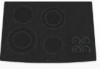
... information, contact your local agricultural department. Then, while wearing oven mitts, remove the spills while the surface is recommended. B A C A. On electric cooktops, canners should not extend more than ½" (1.3 cm) outside the area. Cookware material is removed. Cookware should not extend more than ½"... element. s Make sure the bottoms of medium-to cool. s For foods containing sugar in any part of the entire cooktop. Residue and water can become trapped between batches. Aluminum and copper may be removed completely. Aluminum or copper bottoms and rough...
... information, contact your local agricultural department. Then, while wearing oven mitts, remove the spills while the surface is recommended. B A C A. On electric cooktops, canners should not extend more than ½" (1.3 cm) outside the area. Cookware material is removed. Cookware should not extend more than ½"... element. s Make sure the bottoms of medium-to cool. s For foods containing sugar in any part of the entire cooktop. Residue and water can become trapped between batches. Aluminum and copper may be removed completely. Aluminum or copper bottoms and rough...
Installation Instructions
Page 1
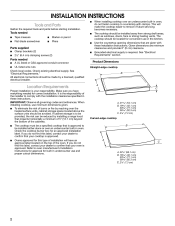
...homeowner. ELECTRIC COOKTOP INSTALLATION INSTRUCTIONS INSTRUCTIONS D'INSTALLATION DE LA TABLE DE CUISSON Table of Contents COOKTOP SAFETY ...1 INSTALLATION INSTRUCTIONS ...2 Tools and Parts ...2 Location Requirements ...2 Electrical Requirements...3 Prepare Cooktop for Installation ...4 Install Cooktop ...5 Make Electrical Connection ...6 Attach Cooktop to... symbol. Always read and obey all safety messages. Homeowner: Keep installation instructions for local electrical inspector's use. Conserver les instructions d'installation pour consultation par l'inspecteur local des installations &#...
...homeowner. ELECTRIC COOKTOP INSTALLATION INSTRUCTIONS INSTRUCTIONS D'INSTALLATION DE LA TABLE DE CUISSON Table of Contents COOKTOP SAFETY ...1 INSTALLATION INSTRUCTIONS ...2 Tools and Parts ...2 Location Requirements ...2 Electrical Requirements...3 Prepare Cooktop for Installation ...4 Install Cooktop ...5 Make Electrical Connection ...6 Attach Cooktop to... symbol. Always read and obey all safety messages. Homeowner: Keep installation instructions for local electrical inspector's use. Conserver les instructions d'installation pour consultation par l'inspecteur local des installations &#...
Installation Instructions
Page 2
.... If you do not find this label, contact your dealer to confirm that your oven is approved. Check the cooktop burner box for correct installation. All electrical connections should be installed away from strong draft areas, such as windows, doors, fans or strong heating vents. Make sure you do not find this...
.... If you do not find this label, contact your dealer to confirm that your oven is approved. Check the cooktop burner box for correct installation. All electrical connections should be installed away from strong draft areas, such as windows, doors, fans or strong heating vents. Make sure you do not find this...
Installation Instructions
Page 3
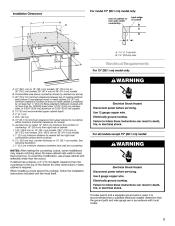
...drawer, a 3" (7.6 cm) depth clearance from the countertop to clear the burner box. Use 8 gauge copper wire. Electrically ground cooktop. When installing a hood above cooktop K. 1½" (3.8 cm) max. For model 15" (38.1 cm) model only: Installation Clearances A rear of cabinet...countertop; 10" (25.4 cm) from upper cabinet to countertop within minimum horizontal clearances to cooktop H. To avoid this cooktop, follow these instructions can result in death, fire, or electrical shock. Electrically ground cooktop. B. 1½" (3.8 cm) max. counter thickness on 36" (91.4 cm) models ...
...drawer, a 3" (7.6 cm) depth clearance from the countertop to clear the burner box. Use 8 gauge copper wire. Electrically ground cooktop. When installing a hood above cooktop K. 1½" (3.8 cm) max. For model 15" (38.1 cm) model only: Installation Clearances A rear of cabinet...countertop; 10" (25.4 cm) from upper cabinet to countertop within minimum horizontal clearances to cooktop H. To avoid this cooktop, follow these instructions can result in death, fire, or electrical shock. Electrically ground cooktop. B. 1½" (3.8 cm) max. counter thickness on 36" (91.4 cm) models ...
Installation Instructions
Page 4
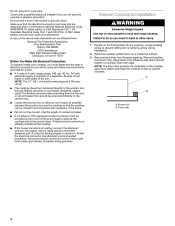
...flexible, armored cable extending from the fuse box or circuit breaker box should be obtained from debris and helps the cooktop sit flat on a protective surface. 3. Follow the electrical connector manufacturer's recommended procedure. Foam strip B s s s s 4 Apply foam strip adhesive-side down on ... junction box through flexible, armored or nonmetallic sheathed, copper cable. Place the cooktop upside down around bottom of electrical connection you must determine the type of cooktop, flush with local codes and industry accepted wiring practices. Do not cut the...
...flexible, armored cable extending from the fuse box or circuit breaker box should be obtained from debris and helps the cooktop sit flat on a protective surface. 3. Follow the electrical connector manufacturer's recommended procedure. Foam strip B s s s s 4 Apply foam strip adhesive-side down on ... junction box through flexible, armored or nonmetallic sheathed, copper cable. Place the cooktop upside down around bottom of electrical connection you must determine the type of cooktop, flush with local codes and industry accepted wiring practices. Do not cut the...
Installation Instructions
Page 6
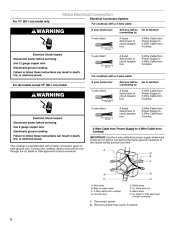
...to: A fused disconnect or circuit breaker box Go to Section: 4-Wire Cable from Power Supply to 4-Wire Cable from cooktop D. Electrically ground cooktop. Connect the cooktop cable to the junction box through the UL listed or CSA approved conduit connector. 3¹ ₂" (8.9 cm) A...8 gauge copper wire. Junction box G H E. Disconnect power. 2. Bare or green wires C. 4-Wire cable from Cooktop 5" (12.7 cm) Electrical Shock Hazard Disconnect power before servicing. This cooktop is manufactured with a 3-wire cable: If your home has: 4-wire direct And you will be connecting to: ...
...to: A fused disconnect or circuit breaker box Go to Section: 4-Wire Cable from Power Supply to 4-Wire Cable from cooktop D. Electrically ground cooktop. Connect the cooktop cable to the junction box through the UL listed or CSA approved conduit connector. 3¹ ₂" (8.9 cm) A...8 gauge copper wire. Junction box G H E. Disconnect power. 2. Bare or green wires C. 4-Wire cable from Cooktop 5" (12.7 cm) Electrical Shock Hazard Disconnect power before servicing. This cooktop is manufactured with a 3-wire cable: If your home has: 4-wire direct And you will be connecting to: ...


