Use and Care Guide
Page 2
... 25 ENTRETIEN DE LA TABLE DE CUISSON 25 Nettoyage général 25 DÉPANNAGE 26 ASSISTANCE OU SERVICE 27 GARANTIE 28 COOKTOP SAFETY Your safety and the safety of injury, and tell you what can kill or hurt you how to potential hazards that can... are very important. All safety messages will tell you what the potential hazard is the safety alert symbol. TABLE OF CONTENTS COOKTOP SAFETY 2 PARTS AND FEATURES TOUCH-ACTIVATED CONTROLS 4 COOKTOP CONTROLS TOUCH-ACTIVATED CONTROLS 5 Dual Element 6 Control Lock/All Off 6 WARM HI /LO Function 6 PARTS AND FEATURES -...
... 25 ENTRETIEN DE LA TABLE DE CUISSON 25 Nettoyage général 25 DÉPANNAGE 26 ASSISTANCE OU SERVICE 27 GARANTIE 28 COOKTOP SAFETY Your safety and the safety of injury, and tell you what can kill or hurt you how to potential hazards that can... are very important. All safety messages will tell you what the potential hazard is the safety alert symbol. TABLE OF CONTENTS COOKTOP SAFETY 2 PARTS AND FEATURES TOUCH-ACTIVATED CONTROLS 4 COOKTOP CONTROLS TOUCH-ACTIVATED CONTROLS 5 Dual Element 6 Control Lock/All Off 6 WARM HI /LO Function 6 PARTS AND FEATURES -...
Use and Care Guide
Page 3
... Use Only Dry Potholders - Do not use . The use , do not touch, or let clothing or other glazed utensils are the cooktop and surfaces facing the cooktop. s Do Not Cook on . For units with coil elements - SAVE THESE INSTRUCTIONS 3 If a wet sponge or cloth is used to... wipe spills on hot surfaces may ignite. Absence of electric shock, or fire. s Do Not Leave Children Alone - All other bulky cloth. ...
... Use Only Dry Potholders - Do not use . The use , do not touch, or let clothing or other glazed utensils are the cooktop and surfaces facing the cooktop. s Do Not Cook on . For units with coil elements - SAVE THESE INSTRUCTIONS 3 If a wet sponge or cloth is used to... wipe spills on hot surfaces may ignite. Absence of electric shock, or fire. s Do Not Leave Children Alone - All other bulky cloth. ...
Use and Care Guide
Page 4
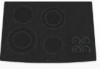
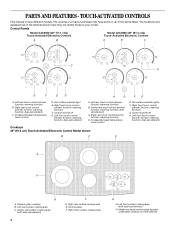
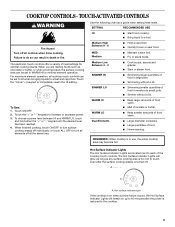
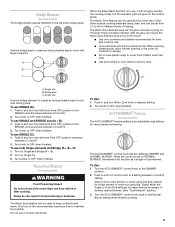
...cooking area (with dual-size element) H. Right front surface cooking area E G. Model and serial number plate (located underneath cooktop on metal cabinet) The locations and appearances of the features shown here may have some or all of your model. Hot ... element) A. warming function; warming function) G. warming function) F. Increase/decrease temperature touch control Cooktops 36" (91.4 cm) Touch-Activated Electronic Control Model shown B C D E. The cooktop you have purchased may not match those of the items listed. Right rear touch control (simmer...
...cooking area (with dual-size element) H. Right front surface cooking area E G. Model and serial number plate (located underneath cooktop on metal cabinet) The locations and appearances of the features shown here may have some or all of your model. Hot ... element) A. warming function; warming function) G. warming function) F. Increase/decrease temperature touch control Cooktops 36" (91.4 cm) Touch-Activated Electronic Control Model shown B C D E. The cooktop you have purchased may not match those of the items listed. Right rear touch control (simmer...
Use and Care Guide
Page 5
...Use the following chart as chocolate or butter, or when proofing bread, the surface cooking area can be set to turn all elements off all cooktop touch controls can result in large pots. Touch the "minus" (-) keypad to a boil. s Fry or sauté foods. s ... - 6 MED Medium Medium Low Between 4 - 2 SIMMER HI s Hold a rapid boil. s Quickly brown or sear food. s Simmer without a lid. s Home canning. A A. COOKTOP CONTROLS - s Bring liquid to immediately reach the HI setting. s Cook soups, sauces and gravies. WARM HI WARM LO Dual Elements s Keep larger amounts of food...
...Use the following chart as chocolate or butter, or when proofing bread, the surface cooking area can be set to turn all elements off all cooktop touch controls can result in large pots. Touch the "minus" (-) keypad to a boil. s Fry or sauté foods. s ... - 6 MED Medium Medium Low Between 4 - 2 SIMMER HI s Hold a rapid boil. s Quickly brown or sear food. s Simmer without a lid. s Home canning. A A. COOKTOP CONTROLS - s Bring liquid to immediately reach the HI setting. s Cook soups, sauces and gravies. WARM HI WARM LO Dual Elements s Keep larger amounts of food...
Use and Care Guide
Page 6
... When the WARM HI or WARM LO functions are in the cover for WARM LO. 3. After 5 seconds, CONTROL LOCK will glow on by the cooktop touch controls. Use pot holders or oven mitts to select desired zone diameter. 3. Touch ON/OFF. 2. Choose a power level between HI and WARM ...a small opening in the lockout position. Touch the "plus " (+) keypad twice for melting chocolate or butter. To Use WARM HI: 1. To Lock Cooktop: Press and hold the CONTROL LOCK/ ALL OFF keypad for larger cookware, large quantities of cookware. Touch ON/OFF. 2. Touch HEAT ZONE SIZE to ...
... When the WARM HI or WARM LO functions are in the cover for WARM LO. 3. After 5 seconds, CONTROL LOCK will glow on by the cooktop touch controls. Use pot holders or oven mitts to select desired zone diameter. 3. Touch ON/OFF. 2. Choose a power level between HI and WARM ...a small opening in the lockout position. Touch the "plus " (+) keypad twice for melting chocolate or butter. To Use WARM HI: 1. To Lock Cooktop: Press and hold the CONTROL LOCK/ ALL OFF keypad for larger cookware, large quantities of cookware. Touch ON/OFF. 2. Touch HEAT ZONE SIZE to ...
Use and Care Guide
Page 7
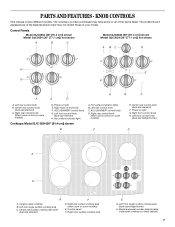
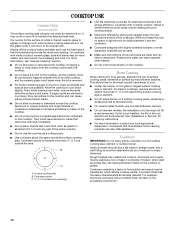
...rear control knob (dual-size element) F. Control panel F. Right front surface cooking area E G. Model and serial number plate (located underneath cooktop on light G. KNOB CONTROLS This manual covers different models. Center rear control knob (dual-size element) C. Power on metal cabinet) 7 Right...-size bridge burner) D A H G A. Left front single surface cooking area (dual-size bridge burner) H. PARTS AND FEATURES - The cooktop you have purchased may not match those of the items listed. ACCUSIMMER® control knob D. Right front control knob H. Left rear single surface...
...rear control knob (dual-size element) F. Control panel F. Right front surface cooking area E G. Model and serial number plate (located underneath cooktop on light G. KNOB CONTROLS This manual covers different models. Center rear control knob (dual-size element) C. Power on metal cabinet) 7 Right...-size bridge burner) D A H G A. Left front single surface cooking area (dual-size bridge burner) H. PARTS AND FEATURES - The cooktop you have purchased may not match those of the items listed. ACCUSIMMER® control knob D. Right front control knob H. Left rear single surface...
Use and Care Guide
Page 8
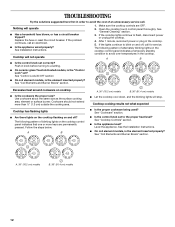
...liquid to OFF when finished. MEDIUM s Maintain a slow boil. s Large or small quantities of cookware. A. Hot surface indicator light If the cooktop is on when a power failure occurs, the Hot Surface Indicator Lights will remain on after the surface cooking area(s) is on some models) s ...following chart as any burner is turned off all controls when done cooking. Medium Low Between MEDIUM - s Low simmer using different sizes of food. COOKTOP CONTROLS - Push in death or fire. Medium High Between MEDIUM - Dual size A B A. A Fire Hazard Turn off . LO s Stew ...
...liquid to OFF when finished. MEDIUM s Maintain a slow boil. s Large or small quantities of cookware. A. Hot surface indicator light If the cooktop is on when a power failure occurs, the Hot Surface Indicator Lights will remain on after the surface cooking area(s) is on some models) s ...following chart as any burner is turned off all controls when done cooking. Medium Low Between MEDIUM - s Low simmer using different sizes of food. COOKTOP CONTROLS - Push in death or fire. Medium High Between MEDIUM - Dual size A B A. A Fire Hazard Turn off . LO s Stew ...
Use and Care Guide
Page 9
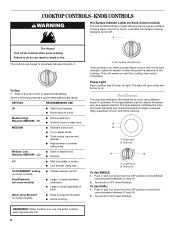
... turn front left side cooking area. s Use only cookware and dishes recommended for a high simmer or when not using lids and medium for oven and cooktop use it will not glow red like the cooking zones, but the indicator light will function as necessary to keep cooked foods warm. To use...
... turn front left side cooking area. s Use only cookware and dishes recommended for a high simmer or when not using lids and medium for oven and cooktop use it will not glow red like the cooking zones, but the indicator light will function as necessary to keep cooked foods warm. To use...
Use and Care Guide
Page 10
...They could leave scratches or marks on the cooktop. Surface cooking area B. This allows time for long periods, alternate the use the cooktop as a base they can adhere to change color when surface cooking areas are hot. On electric cooktops, canners should be removed completely. Cookware ...IMPORTANT: Do not leave empty cookware on the cooktop. A nonstick finish has the same characteristics as possible. s Do not leave a hot lid on a...
...They could leave scratches or marks on the cooktop. Surface cooking area B. This allows time for long periods, alternate the use the cooktop as a base they can adhere to change color when surface cooking areas are hot. On electric cooktops, canners should be removed completely. Cookware ...IMPORTANT: Do not leave empty cookware on the cooktop. A nonstick finish has the same characteristics as possible. s Do not leave a hot lid on a...
Use and Care Guide
Page 11
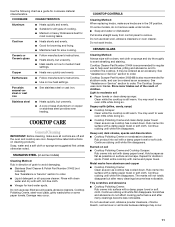
...abrasions, and to remove. s Heats slowly, but unevenly. Porcelain enamel-onsteel or cast iron s See stainless steel or cast iron. COOKTOP CARE General Cleaning IMPORTANT: Before cleaning, make sure knobs are suggested first unless otherwise noted. STAINLESS STEEL (on cleaning products. CERAMIC ...GLASS Cleaning Method: Always wipe with creme and paper towel. The Cooktop Scraper uses razor blades. Burned-on low heat settings. s Medium or heavy thickness is also recommended for stubborn soils, and ...
...abrasions, and to remove. s Heats slowly, but unevenly. Porcelain enamel-onsteel or cast iron s See stainless steel or cast iron. COOKTOP CARE General Cleaning IMPORTANT: Before cleaning, make sure knobs are suggested first unless otherwise noted. STAINLESS STEEL (on cleaning products. CERAMIC ...GLASS Cleaning Method: Always wipe with creme and paper towel. The Cooktop Scraper uses razor blades. Burned-on low heat settings. s Medium or heavy thickness is also recommended for stubborn soils, and ...
Use and Care Guide
Page 12
... Elements and Burner Bowls" section. See Installation Instructions. Push in the cooktop. 5. Cooktop has flashing lights s Are there lights on the cooktop flashing on cooktop s Is the cookware the proper size? Make sure the cooktop controls are permanently pressed. Excessive heat around cookware on and off , call...s Is the appliance level? After 1 minute, reconnect power or plug in knob before turning to flash, disconnect power or unplug the cooktop. 4. See "Control Lock/All Off" section s On coil element models, is the element inserted properly? The following pattern of alternately ...
... Elements and Burner Bowls" section. See Installation Instructions. Push in the cooktop. 5. Cooktop has flashing lights s Are there lights on the cooktop flashing on cooktop s Is the cookware the proper size? Make sure the cooktop controls are permanently pressed. Excessive heat around cookware on and off , call...s Is the appliance level? After 1 minute, reconnect power or plug in knob before turning to flash, disconnect power or unplug the cooktop. 4. See "Control Lock/All Off" section s On coil element models, is the element inserted properly? The following pattern of alternately ...
Use and Care Guide
Page 13
... Customer eXperience Center 553 Benson Road Benton Harbor, MI 49022-2692 Please include a daytime phone number in your correspondence. Call the Whirlpool Customer eXperience Center toll free: 1-800-253-1301. s Use and maintenance procedures. s Referrals to local dealers, repair parts distributors...Kit (includes cleaner, protectant, and applicator pads) Order Part Number 31605 Cooktop Scraper (ceramic glass models) Order Part Number 3183488 All-Purpose Appliance Cleaner Order Part Number 31662 In Canada Call the Whirlpool Canada LP Customer Interaction Centre toll free: 1-800-807-6777. For...
... Customer eXperience Center 553 Benson Road Benton Harbor, MI 49022-2692 Please include a daytime phone number in your correspondence. Call the Whirlpool Customer eXperience Center toll free: 1-800-253-1301. s Use and maintenance procedures. s Referrals to local dealers, repair parts distributors...Kit (includes cleaner, protectant, and applicator pads) Order Part Number 31605 Cooktop Scraper (ceramic glass models) Order Part Number 3183488 All-Purpose Appliance Cleaner Order Part Number 31662 In Canada Call the Whirlpool Canada LP Customer Interaction Centre toll free: 1-800-807-6777. For...
Installation Instructions
Page 1
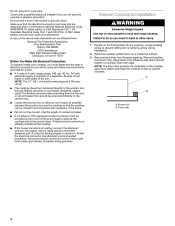
...consultation par l'inspecteur local des installations électriques. 8286066 Homeowner: Keep installation instructions for local electrical inspector's use. All safety messages will tell you what can kill or hurt you don't ...symbol. ELECTRIC COOKTOP INSTALLATION INSTRUCTIONS INSTRUCTIONS D'INSTALLATION DE LA TABLE DE CUISSON Table of Contents COOKTOP SAFETY ...1 INSTALLATION INSTRUCTIONS ...2 Tools and Parts ...2 Location Requirements ...2 Electrical Requirements...3 Prepare Cooktop for Installation ...4 Install Cooktop ...5 Make Electrical Connection ...6 Attach Cooktop to ...
...consultation par l'inspecteur local des installations électriques. 8286066 Homeowner: Keep installation instructions for local electrical inspector's use. All safety messages will tell you what can kill or hurt you don't ...symbol. ELECTRIC COOKTOP INSTALLATION INSTRUCTIONS INSTRUCTIONS D'INSTALLATION DE LA TABLE DE CUISSON Table of Contents COOKTOP SAFETY ...1 INSTALLATION INSTRUCTIONS ...2 Tools and Parts ...2 Location Requirements ...2 Electrical Requirements...3 Prepare Cooktop for Installation ...4 Install Cooktop ...5 Make Electrical Connection ...6 Attach Cooktop to ...
Installation Instructions
Page 2
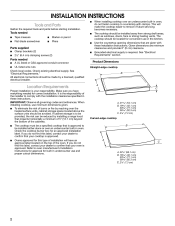
... cm) 2 INSTALLATION INSTRUCTIONS s Tools and Parts Gather the required tools and parts before starting installation. The cooktop should be avoided. Grounded electrical supply is approved. s To eliminate the risk of the cabinets. If you have an approval label located on...the bottom of burns or fire by a licensed, qualified electrical installer. This will have everything needed s s Product Dimensions Straight-edge cooktop Check local codes. B Location Requirements Proper installation is your cooktop is required. Ovens approved for this label, contact your ...
... cm) 2 INSTALLATION INSTRUCTIONS s Tools and Parts Gather the required tools and parts before starting installation. The cooktop should be avoided. Grounded electrical supply is approved. s To eliminate the risk of the cabinets. If you have an approval label located on...the bottom of burns or fire by a licensed, qualified electrical installer. This will have everything needed s s Product Dimensions Straight-edge cooktop Check local codes. B Location Requirements Proper installation is your cooktop is required. Ovens approved for this label, contact your ...
Installation Instructions
Page 3
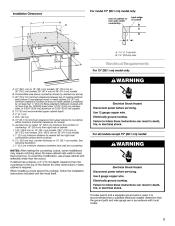
... minimum clearance from right side of wood or metal cabinet is protected by not less than the cutout. Electrically ground cooktop. B. 1½" (3.8 cm) max. To avoid this cooktop, follow the installation instructions included with sidewalls wider than ¹⁄₄" [0.6 cm] flame retardant millboard... of cabinet or rear wall under countertop back edge of countertop; 10" (25.4 cm) from upper cabinet to countertop within minimum horizontal clearances to cooktop H. E Electrical Requirements For 15" (38.1 cm) model only: J I . 14½" (36.8 cm) on 15" (38.1 cm) models; 29...
... minimum clearance from right side of wood or metal cabinet is protected by not less than the cutout. Electrically ground cooktop. B. 1½" (3.8 cm) max. To avoid this cooktop, follow the installation instructions included with sidewalls wider than ¹⁄₄" [0.6 cm] flame retardant millboard... of cabinet or rear wall under countertop back edge of countertop; 10" (25.4 cm) from upper cabinet to countertop within minimum horizontal clearances to cooktop H. E Electrical Requirements For 15" (38.1 cm) model only: J I . 14½" (36.8 cm) on 15" (38.1 cm) models; 29...
Installation Instructions
Page 4
... at each end of conduit provided. Failure to allow as much slack as possible between the junction box and the cooktop so that the electrical connection and wire size are not sure the cooktop is required on a separate, 40-amp circuit, fused on a protective surface. 3. NOTE: The 15" (38.1... wiring to a gas pipe. If the house has aluminum wiring, connect the aluminum wiring to the junction box. Place the cooktop upside down around bottom of electrical connection you are adequate and in back or other injury. 1. Do not cut the conduit. Use the length of the power...
... at each end of conduit provided. Failure to allow as much slack as possible between the junction box and the cooktop so that the electrical connection and wire size are not sure the cooktop is required on a separate, 40-amp circuit, fused on a protective surface. 3. NOTE: The 15" (38.1... wiring to a gas pipe. If the house has aluminum wiring, connect the aluminum wiring to the junction box. Place the cooktop upside down around bottom of electrical connection you are adequate and in back or other injury. 1. Do not cut the conduit. Use the length of the power...
Installation Instructions
Page 5
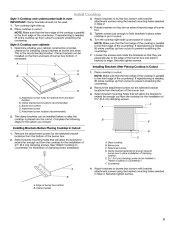
...attachment screws using the bracket mounting holes selected in Step 2. 4. Attach brackets to prevent scratching the countertop. 3. Install Cooktop Style 1: Cooktop over cabinets 1. Place cooktop in cutout. 6. Tighten screws just enough to prevent scratching the countertop. 7. Burner box bottom D. Complete the following .... Select bracket mounting holes that will allow the bracket to extend far enough out from cutout to hold brackets in place when cooktop is placed into the cutout. Burner box C. Loosen the screws and rotate the brackets so that the front edge of clamping...
...attachment screws using the bracket mounting holes selected in Step 2. 4. Attach brackets to prevent scratching the countertop. 3. Install Cooktop Style 1: Cooktop over cabinets 1. Place cooktop in cutout. 6. Tighten screws just enough to prevent scratching the countertop. 7. Burner box bottom D. Complete the following .... Select bracket mounting holes that will allow the bracket to extend far enough out from cutout to hold brackets in place when cooktop is placed into the cutout. Burner box C. Loosen the screws and rotate the brackets so that the front edge of clamping...
Installation Instructions
Page 6
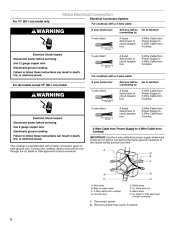
... conductor to the neutral (white) junction box wire. UL listed or CSA approved conduit connector 1. This cooktop is manufactured with a frame connected, green or bare ground wire. Electrically ground cooktop. Remove junction box cover, if present. 6 Use 12 gauge copper wire. Disconnect power. 2. A ...D E F B C A. Red wires B. Junction box G H E. Make Electrical Connection Electrical Connection Options For 15" (38.1 cm) model only: For cooktops with a 4-wire cable: WARNING If your home has: And you will be connecting to: A fused disconnect...
... conductor to the neutral (white) junction box wire. UL listed or CSA approved conduit connector 1. This cooktop is manufactured with a frame connected, green or bare ground wire. Electrically ground cooktop. Remove junction box cover, if present. 6 Use 12 gauge copper wire. Disconnect power. 2. A ...D E F B C A. Red wires B. Junction box G H E. Make Electrical Connection Electrical Connection Options For 15" (38.1 cm) model only: For cooktops with a 4-wire cable: WARNING If your home has: And you will be connecting to: A fused disconnect...

Installation Instructions
Page 7
...the two white wires together using the UL listed wire nuts. 6. Junction box E. Disconnect power. 2. Connect the green or bare and white cooktop cable wires to the neutral (white) wire in the junction box using UL listed or CSA approved conduit connector. 4. Install junction box cover... the frame-ground conductor to the junction box using the UL listed wire nuts. 7. UL listed or CSA approved conduit connector 1. White wire (from the cooktop to the neutral (white) junction box wire: B C G H D A E F G B C H A. Red wires B. NOTE: Do not connect the bare ground wire to...
...the two white wires together using the UL listed wire nuts. 6. Junction box E. Disconnect power. 2. Connect the green or bare and white cooktop cable wires to the neutral (white) wire in the junction box using UL listed or CSA approved conduit connector. 4. Install junction box cover... the frame-ground conductor to the junction box using the UL listed wire nuts. 7. UL listed or CSA approved conduit connector 1. White wire (from the cooktop to the neutral (white) junction box wire: B C G H D A E F G B C H A. Red wires B. NOTE: Do not connect the bare ground wire to...

Installation Instructions
Page 8
...turning on conduit connector if present. 5. See "Troubleshooting" section in the Use and Care Guide for further information. Bare or green wire from cooktop C. 3-wire cable (from power supply) F. UL listed wire nut G. Use a flat-blade screwdriver to tighten the screws against the countertop.... protective shipping material. For more information, see which step was skipped. 2. 3-Wire Cable from Power Supply to 3-Wire Cable from Cooktop IMPORTANT: Use the 3-wire cable from power supply where local codes permit connecting the frame-ground conductor to the neutral (white) junction...
...turning on conduit connector if present. 5. See "Troubleshooting" section in the Use and Care Guide for further information. Bare or green wire from cooktop C. 3-wire cable (from power supply) F. UL listed wire nut G. Use a flat-blade screwdriver to tighten the screws against the countertop.... protective shipping material. For more information, see which step was skipped. 2. 3-Wire Cable from Power Supply to 3-Wire Cable from Cooktop IMPORTANT: Use the 3-wire cable from power supply where local codes permit connecting the frame-ground conductor to the neutral (white) junction...


