Use and Care Guide
Page 4
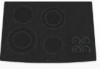
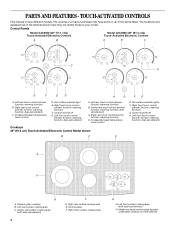
... Left rear surface cooking area C. Center rear surface cooking area (with dual-size element) H. Model and serial number plate (located underneath cooktop on metal cabinet) warming function; Hot surface indicator light E. dual-size element) A. warming function)...Increase/decrease temperature touch control D. Increase/decrease temperature touch control Cooktops 36" (91.4 cm) Touch-Activated Electronic Control Model shown B C D E. Control panel F. TOUCH-ACTIVATED CONTROLS This manual covers different models. Right front touch control (simmer function; Control lock/All...
... Left rear surface cooking area C. Center rear surface cooking area (with dual-size element) H. Model and serial number plate (located underneath cooktop on metal cabinet) warming function; Hot surface indicator light E. dual-size element) A. warming function)...Increase/decrease temperature touch control D. Increase/decrease temperature touch control Cooktops 36" (91.4 cm) Touch-Activated Electronic Control Model shown B C D E. Control panel F. TOUCH-ACTIVATED CONTROLS This manual covers different models. Right front touch control (simmer function; Control lock/All...
Use and Care Guide
Page 6
... B. Dual size To Use: 1. To Lock Cooktop: Press and hold the CONTROL LOCK/ ALL OFF keypad for more than 30 to turn off at the same time. The WARM HI and WARM LO functions can be turned on Electronic Touch Control models) WARNING Food Poisoning Hazard Do not let food sit...so can be used in food poisoning or sickness. Touch the "+" or "-" keypad to select desired zone diameter. 3. Food quality may melt onto the cooktop surface. Touch ON/OFF. 2. The dual element combines the inner and outer elements and is the recommended maximum time to make direct contact with a lid...
... B. Dual size To Use: 1. To Lock Cooktop: Press and hold the CONTROL LOCK/ ALL OFF keypad for more than 30 to turn off at the same time. The WARM HI and WARM LO functions can be turned on Electronic Touch Control models) WARNING Food Poisoning Hazard Do not let food sit...so can be used in food poisoning or sickness. Touch the "+" or "-" keypad to select desired zone diameter. 3. Food quality may melt onto the cooktop surface. Touch ON/OFF. 2. The dual element combines the inner and outer elements and is the recommended maximum time to make direct contact with a lid...
Use and Care Guide
Page 7
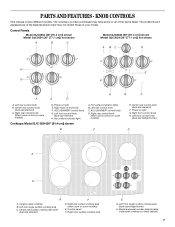
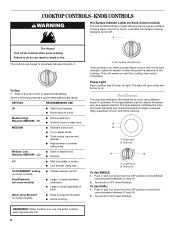
... control knob (Warm zone control on some models) D. Power on light G. Left front control knob (dual-size element) H. Power on light E. Right rear surface cooking area (warm zone on some models) E. The cooktop you have purchased may not match those of...Left rear control knob C. Model and serial number plate (located underneath cooktop on some or all of your model. KNOB CONTROLS This manual covers different models. The locations and appearances of the features shown here may have some models) C E. Hot surface indicator light Cooktops: Model GJC 3634 (36" [91...
... control knob (Warm zone control on some models) D. Power on light G. Left front control knob (dual-size element) H. Power on light E. Right rear surface cooking area (warm zone on some models) E. The cooktop you have purchased may not match those of...Left rear control knob C. Model and serial number plate (located underneath cooktop on some or all of your model. KNOB CONTROLS This manual covers different models. The locations and appearances of the features shown here may have some models) C E. Hot surface indicator light Cooktops: Model GJC 3634 (36" [91...
Use and Care Guide
Page 8
...(on . To Use: 1. Push in use, the entire cooktop area may become hot. 8 MEDIUM s Maintain a slow boil. s High simmer or simmer without lids. The light will glow when any burner is on Knob Control models) The Hot Surface Indicator Lights will glow as long as any... cooled completely. Power Light Each cooktop has a Power On light. s Home canning. Turn knob to anywhere between LO and HI. 2. Medium High Between MEDIUM - HI s Hold a rapid boil. Warm Zone Element (on some models) s Precise simmer control. The single element can be set to OFF when ...
...(on . To Use: 1. Push in use, the entire cooktop area may become hot. 8 MEDIUM s Maintain a slow boil. s High simmer or simmer without lids. The light will glow when any burner is on Knob Control models) The Hot Surface Indicator Lights will glow as long as any... cooled completely. Power Light Each cooktop has a Power On light. s Home canning. Turn knob to anywhere between LO and HI. 2. Medium High Between MEDIUM - HI s Hold a rapid boil. Warm Zone Element (on some models) s Precise simmer control. The single element can be set to OFF when ...
Use and Care Guide
Page 9
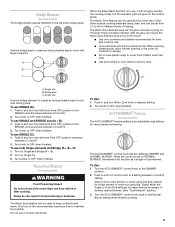
.... Select LO for a low simmer or when using lids. One hour is set from OFF position to escape. ACCUSIMMER® Feature (on some models) The ACCUSIMMER® feature setting is in the left knob from OFF position anywhere between LO and HI. 2. Bridge Element (on some... finished. To use SINGLE (C): 1. Turn on Single (C). 3. Turn on Single and Bridge (A + B). 2. Warm Zone Element (on some models) WARNING Food Poisoning Hazard Do not let food sit for oven and cooktop use it will not glow red like the cooking zones, but the indicator light will glow on . Do not...
.... Select LO for a low simmer or when using lids. One hour is set from OFF position to escape. ACCUSIMMER® Feature (on some models) The ACCUSIMMER® feature setting is in the left knob from OFF position anywhere between LO and HI. 2. Bridge Element (on some... finished. To use SINGLE (C): 1. Turn on Single (C). 3. Turn on Single and Bridge (A + B). 2. Warm Zone Element (on some models) WARNING Food Poisoning Hazard Do not let food sit for oven and cooktop use it will not glow red like the cooking zones, but the indicator light will glow on . Do not...
Use and Care Guide
Page 10
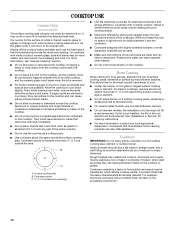
..., remove the spills while the surface is recommended. s Do not cook foods directly on the grate or largest surface cooking area or element. On electric cooktops, canners should be used . If a kit is not installed, the life of the coil element will be used as a cutting board. Ideal... for best heat conduction and energy efficiency. Aluminum and copper may scratch the cooktop. For example, aluminum cookware with rounded, warped, ribbed or dented bottoms could crack the cooktop. COOKTOP USE Ceramic Glass (on some models) The surface cooking area will glow red when an element is on the ...
..., remove the spills while the surface is recommended. s Do not cook foods directly on the grate or largest surface cooking area or element. On electric cooktops, canners should be used . If a kit is not installed, the life of the coil element will be used as a cutting board. Ideal... for best heat conduction and energy efficiency. Aluminum and copper may scratch the cooktop. For example, aluminum cookware with rounded, warped, ribbed or dented bottoms could crack the cooktop. COOKTOP USE Ceramic Glass (on some models) The surface cooking area will glow red when an element is on the ...
Use and Care Guide
Page 11
... to avoid damaging. Always follow label instructions on low heat settings. STAINLESS STEEL (on some models) Cleaning Method: Rub in the Off position. s Vinegar for slow cooking. COOKTOP CONTROLS Cleaning Method: When replacing knobs, make sure all controls are off and the oven and... results on stainless steel provides even heating. Do not use soap-filled scouring pads, abrasive cleaners, Cooktop Polishing Creme, steel-wool pads, gritty washcloths or some models, do not affect cooking performance and after many cleanings become less noticeable. Use the following chart as...
... to avoid damaging. Always follow label instructions on low heat settings. STAINLESS STEEL (on some models) Cleaning Method: Rub in the Off position. s Vinegar for slow cooking. COOKTOP CONTROLS Cleaning Method: When replacing knobs, make sure all controls are off and the oven and... results on stainless steel provides even heating. Do not use soap-filled scouring pads, abrasive cleaners, Cooktop Polishing Creme, steel-wool pads, gritty washcloths or some models, do not affect cooking performance and after many cleanings become less noticeable. Use the following chart as...
Use and Care Guide
Page 12
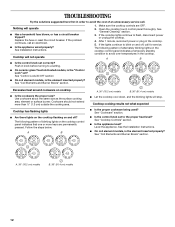
... section. A B A. 30" (76.2 cm) models B. 36" (91.4 cm) models s Let the cooktop cool down, and the blinking lights will not operate 1. See "Cookware" section. Level the appliance. Make sure the cooktop controls are permanently pressed. The following pattern of alternately ... lights on the cooktop control panel indicates a temporary standby condition to avoid over temperatures in the cooktop. Cooktop will stop. See "General Cleaning" section. 3. See the Installation Instructions. A. 30" (76.2 cm) models B. 36" (91.4 cm) models 12 TROUBLESHOOTING Try the...
... section. A B A. 30" (76.2 cm) models B. 36" (91.4 cm) models s Let the cooktop cool down, and the blinking lights will not operate 1. See "Cookware" section. Level the appliance. Make sure the cooktop controls are permanently pressed. The following pattern of alternately ... lights on the cooktop control panel indicates a temporary standby condition to avoid over temperatures in the cooktop. Cooktop will stop. See "General Cleaning" section. 3. See the Installation Instructions. A. 30" (76.2 cm) models B. 36" (91.4 cm) models 12 TROUBLESHOOTING Try the...
Use and Care Guide
Page 13
... Accessories Online." s Referrals to your nearest Whirlpool designated service center. ASSISTANCE OR SERVICE Before calling for assistance or service, please check "Troubleshooting." Canning Unit Kit (coil element models) Order Part Number 242905 Cooktop Cleaner (ceramic glass models) Order Part Number 31464 Cooktop Protectant (ceramic glass models) Order Part Number 31463 Cooktop Care Kit (includes cleaner, protectant, and...
... Accessories Online." s Referrals to your nearest Whirlpool designated service center. ASSISTANCE OR SERVICE Before calling for assistance or service, please check "Troubleshooting." Canning Unit Kit (coil element models) Order Part Number 242905 Cooktop Cleaner (ceramic glass models) Order Part Number 31464 Cooktop Protectant (ceramic glass models) Order Part Number 31463 Cooktop Care Kit (includes cleaner, protectant, and...
Use and Care Guide
Page 14
... number Model number Serial number Purchase date 14 If you need to know your major appliance, to instruct you ever need it is installed in an inaccessible location or is not installed in accordance with electrical or plumbing codes, or use your authorized Whirlpool dealer to... determine if another warranty applies. Replacement parts or repair labor costs for product service in -warranty service. You must be provided by calling Whirlpool. You can be repaired in...
... number Model number Serial number Purchase date 14 If you need to know your major appliance, to instruct you ever need it is installed in an inaccessible location or is not installed in accordance with electrical or plumbing codes, or use your authorized Whirlpool dealer to... determine if another warranty applies. Replacement parts or repair labor costs for product service in -warranty service. You must be provided by calling Whirlpool. You can be repaired in...
Installation Instructions
Page 3
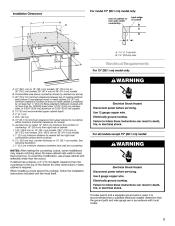
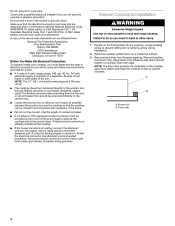
... the ground path and wire gauge are in death, fire, or electrical shock. Combustible area above countertop (shown by not less than the cutout. counter thickness on 36" (91.4 cm) models B. See following illustration. Electrically ground cooktop. For all models except 15" (38.1 cm) model: WARNING NOTES: After making the countertop cutout, some installations may require...
... the ground path and wire gauge are in death, fire, or electrical shock. Combustible area above countertop (shown by not less than the cutout. counter thickness on 36" (91.4 cm) models B. See following illustration. Electrically ground cooktop. For all models except 15" (38.1 cm) model: WARNING NOTES: After making the countertop cutout, some installations may require...
Installation Instructions
Page 4
...all local codes and ordinances. NOTE: The 15" (38.1 cm) model series requires a 20-amp circuit. Aluminum/copper connection must conform with edge. Make sure that the cooktop can be provided at each end of electrical connection you are adequate and in the neutral or ground circuit. Burner box... during installation. 2. Failure to the junction box. Locate existing wiring to a gas pipe. Before You Make the Electrical Connection: To properly install your cooktop, you must be obtained from the fuse box or circuit breaker box should be connected directly to do so can ...
...all local codes and ordinances. NOTE: The 15" (38.1 cm) model series requires a 20-amp circuit. Aluminum/copper connection must conform with edge. Make sure that the cooktop can be provided at each end of electrical connection you are adequate and in the neutral or ground circuit. Burner box... during installation. 2. Failure to the junction box. Locate existing wiring to a gas pipe. Before You Make the Electrical Connection: To properly install your cooktop, you must be obtained from the fuse box or circuit breaker box should be connected directly to do so can ...
Installation Instructions
Page 6
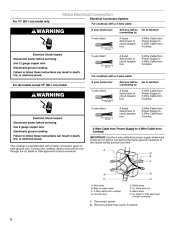
... Cable from Power Supply to 3-Wire Cable from Cooktop For all models except 15" (38.1 cm) model: 4-wire direct WARNING 5" (12.7 cm) 3-wire direct Electrical Shock Hazard Disconnect power before servicing. Connect the cooktop cable to the junction box through the UL listed... wire. UL listed or CSA approved conduit connector 1. Use 12 gauge copper wire. Electrically ground cooktop. Disconnect power. 2. Make Electrical Connection Electrical Connection Options For 15" (38.1 cm) model only: For cooktops with a 4-wire cable: WARNING If your home has: And you will be connecting...
... Cable from Power Supply to 3-Wire Cable from Cooktop For all models except 15" (38.1 cm) model: 4-wire direct WARNING 5" (12.7 cm) 3-wire direct Electrical Shock Hazard Disconnect power before servicing. Connect the cooktop cable to the junction box through the UL listed... wire. UL listed or CSA approved conduit connector 1. Use 12 gauge copper wire. Electrically ground cooktop. Disconnect power. 2. Make Electrical Connection Electrical Connection Options For 15" (38.1 cm) model only: For cooktops with a 4-wire cable: WARNING If your home has: And you will be connecting...


