Installation Instructions
Page 2
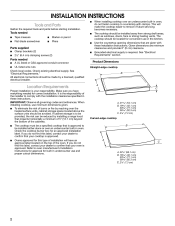
...connector UL listed wire nuts s Parts needed for correct installation. B Location Requirements Proper installation is required. When installing cooktop, use and proper cutout dimensions. Given dimensions are given with these instructions. s To eliminate the risk of the installer to comply with clamps... the surface units should be located for built-in these Installation Instructions. See "Electrical Requirements." See "Electrical Requirements" section. All electrical connections should be installed either alone or over an undercounter built-in oven. IMPORTANT...
...connector UL listed wire nuts s Parts needed for correct installation. B Location Requirements Proper installation is required. When installing cooktop, use and proper cutout dimensions. Given dimensions are given with these instructions. s To eliminate the risk of the installer to comply with clamps... the surface units should be located for built-in these Installation Instructions. See "Electrical Requirements." See "Electrical Requirements" section. All electrical connections should be installed either alone or over an undercounter built-in oven. IMPORTANT...
Installation Instructions
Page 3
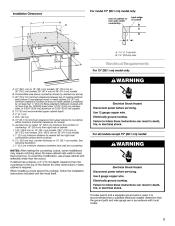
... Hazard Disconnect power before servicing. To avoid this cooktop, follow the installation instructions included with local codes. 3 Use 8 gauge copper wire. Failure to nearest left and right side combustible surface above this modification, use a base cabinet with not less than the cutout. E Electrical Requirements For 15" (38.1 cm) model only: J I . 14½" (36...
... Hazard Disconnect power before servicing. To avoid this cooktop, follow the installation instructions included with local codes. 3 Use 8 gauge copper wire. Failure to nearest left and right side combustible surface above this modification, use a base cabinet with not less than the cutout. E Electrical Requirements For 15" (38.1 cm) model only: J I . 14½" (36...
Installation Instructions
Page 5
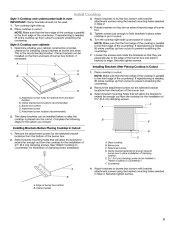
.... Securely tighten screws. 5 NOTE: Make sure that will allow installation of the burner box. 2. Turn the cooktop right side up and place in Cutout B C D 1. Loosen the screws and rotate the brackets so that will allow the bracket to Countertop" for... optional front and back location B. Place cooktop in Cutout 1. Clamp bracket (end locations recommended) C. B E Installing Brackets Before Placing Cooktop in cutout. Glass cooktop B. See "Attach Cooktop to extend far enough out from the bottom of 2½" (6.4 cm) clamping...
.... Securely tighten screws. 5 NOTE: Make sure that will allow installation of the burner box. 2. Turn the cooktop right side up and place in Cutout B C D 1. Loosen the screws and rotate the brackets so that will allow the bracket to Countertop" for... optional front and back location B. Place cooktop in Cutout 1. Clamp bracket (end locations recommended) C. B E Installing Brackets Before Placing Cooktop in cutout. Glass cooktop B. See "Attach Cooktop to extend far enough out from the bottom of 2½" (6.4 cm) clamping...