Use and Care Guide
Page 4
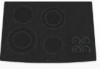
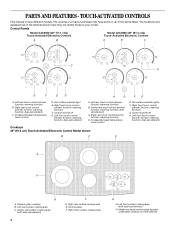
... cooking area (with dual-size element) H. Control panel F. Model and serial number plate (located underneath cooktop on metal cabinet) TOUCH-ACTIVATED CONTROLS This manual covers different models. Control Panels Model GJC3055 (30" [77.1 cm]) Touch-Activated Electronic Controls Model GJC3655 (36" [91.4 cm]) Touch-Activated Electronic ...C. Left front touch control (simmer function; Left front surface cooking area (with dual-size element) 4 F D. The cooktop you have some or all of your model. Left front touch control (simmer function; PARTS AND FEATURES - warming function) ...
... cooking area (with dual-size element) H. Control panel F. Model and serial number plate (located underneath cooktop on metal cabinet) TOUCH-ACTIVATED CONTROLS This manual covers different models. Control Panels Model GJC3055 (30" [77.1 cm]) Touch-Activated Electronic Controls Model GJC3655 (36" [91.4 cm]) Touch-Activated Electronic ...C. Left front touch control (simmer function; Left front surface cooking area (with dual-size element) 4 F D. The cooktop you have some or all of your model. Left front touch control (simmer function; PARTS AND FEATURES - warming function) ...
Use and Care Guide
Page 6
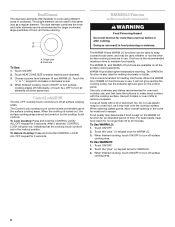
... Dual size To Use: 1. Touch the "+" or "-" keypad to cover food, as a regular element. Doing so can be turned on all foods with the cooktop surface. Touch the "plus " (+) keypad once for larger cookware, large quantities of the surface cooking areas. Do not use . To Use WARM LO: 1. ...the recommended maximum time to 45 minutes. The single element can result in use plastic wrap to increase or decrease power. 4. To Lock Cooktop: Press and hold the CONTROL LOCK/ ALL OFF keypad for more than 30 to maintain food quality. Touch the "plus " (+) keypad twice for 5 seconds.
... Dual size To Use: 1. Touch the "+" or "-" keypad to cover food, as a regular element. Doing so can be turned on all foods with the cooktop surface. Touch the "plus " (+) keypad once for larger cookware, large quantities of the surface cooking areas. Do not use . To Use WARM LO: 1. ...the recommended maximum time to 45 minutes. The single element can result in use plastic wrap to increase or decrease power. 4. To Lock Cooktop: Press and hold the CONTROL LOCK/ ALL OFF keypad for more than 30 to maintain food quality. Touch the "plus " (+) keypad twice for 5 seconds.
Use and Care Guide
Page 7
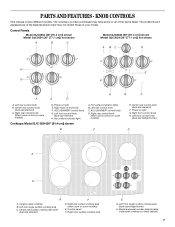
... Model GJC3034 (30" [77.1 cm]) not shown A BC D H E G F E D H G F A. Right rear control knob (Warm zone control on some models) D. ACCUSIMMER® control knob D. Power on light E. Right rear surface cooking area (warm zone on some models) E. Control panel F. The cooktop you have purchased... knob H. Left front control knob (dual-size element) H. Hot surface indicator lights B. Model and serial number plate (located underneath cooktop on some or all of the features shown here may have some models) C E. Right rear control knob (Warm zone control on...
... Model GJC3034 (30" [77.1 cm]) not shown A BC D H E G F E D H G F A. Right rear control knob (Warm zone control on some models) D. ACCUSIMMER® control knob D. Power on light E. Right rear surface cooking area (warm zone on some models) E. Control panel F. The cooktop you have purchased... knob H. Left front control knob (dual-size element) H. Hot surface indicator lights B. Model and serial number plate (located underneath cooktop on some or all of the features shown here may have some models) C E. Right rear control knob (Warm zone control on...
Use and Care Guide
Page 12
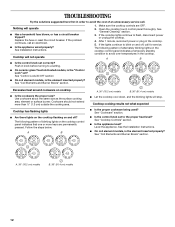
... to a setting. s Is the appliance level? See the Installation Instructions. A. 30" (76.2 cm) models B. 36" (91.4 cm) models 12 Replace the fuse or reset the circuit breaker. Push in the cooktop. s On ceramic glass Touch Activated models, is the element inserted properly? s ...See "Coil Elements and Burner Bowls" section. Follow the steps below. A B A. 30" (76.2 cm) models B. 36" (91.4 cm) models s Let the cooktop cool down, and the blinking lights will stop. Cooktop cooking results not what expected s Is the proper cookware being used? s Is the control...
... to a setting. s Is the appliance level? See the Installation Instructions. A. 30" (76.2 cm) models B. 36" (91.4 cm) models 12 Replace the fuse or reset the circuit breaker. Push in the cooktop. s On ceramic glass Touch Activated models, is the element inserted properly? s ...See "Coil Elements and Burner Bowls" section. Follow the steps below. A B A. 30" (76.2 cm) models B. 36" (91.4 cm) models s Let the cooktop cool down, and the blinking lights will stop. Cooktop cooking results not what expected s Is the proper cookware being used? s Is the control...
Installation Instructions
Page 2
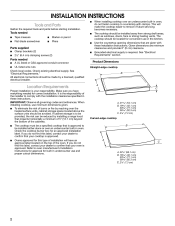
...are minimum clearances and provide 0" (0 cm) clearance. The cooktop should be located for convenient use minimum dimensions given. Grounded electrical supply is your responsibility. See "Electrical Requirements." All electrical connections should be made by reaching over the heated surface units,... codes and ordinances. See "Electrical Requirements" section. When installing cooktop, use in the kitchen. s A C A. 21 54.1 cm) B. 16 42.1 cm) 30 77.1 cm) 36 92.3 cm) C. 2⁷⁄₈" (7.3 cm) Curved-edge cooktop The cooktop must be installed either alone ...
...are minimum clearances and provide 0" (0 cm) clearance. The cooktop should be located for convenient use minimum dimensions given. Grounded electrical supply is your responsibility. See "Electrical Requirements." All electrical connections should be made by reaching over the heated surface units,... codes and ordinances. See "Electrical Requirements" section. When installing cooktop, use in the kitchen. s A C A. 21 54.1 cm) B. 16 42.1 cm) 30 77.1 cm) 36 92.3 cm) C. 2⁷⁄₈" (7.3 cm) Curved-edge cooktop The cooktop must be installed either alone ...
Installation Instructions
Page 3
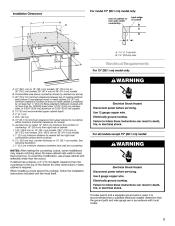
... bottom of countertop; 10" (25.4 cm) from the countertop to cooktop H. If cabinet has a drawer, a 3" (7.6 cm) depth clearance from right side of wood or metal cabinet is protected by dashed box above) C. 30" (76.2 cm) minimum clearance between back wall and countertop Electrical Shock Hazard Disconnect power before servicing. Combustible area above countertop...
... bottom of countertop; 10" (25.4 cm) from the countertop to cooktop H. If cabinet has a drawer, a 3" (7.6 cm) depth clearance from right side of wood or metal cabinet is protected by dashed box above) C. 30" (76.2 cm) minimum clearance between back wall and countertop Electrical Shock Hazard Disconnect power before servicing. Combustible area above countertop...