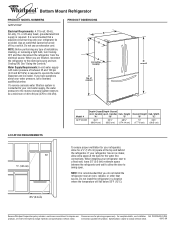
Dimension Guide
Page 1
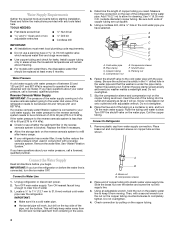
... ventilation for your refrigerator be provided. Specifications subject to swing open. NOTE: Before performing any type of between the refrigerator and wall to allow the door to change materials and specifications without notice. 06-12-09 Water Supply Requirements: A cold water supply with product. handle) (excl. Instructions packed with water pressure of installation, cleaning, or removing a light bulb, turn Cooling ON. Use an outlet that you have questions about your refrigerator has an ice maker, allow for...
... ventilation for your refrigerator be provided. Specifications subject to swing open. NOTE: Before performing any type of between the refrigerator and wall to allow the door to change materials and specifications without notice. 06-12-09 Water Supply Requirements: A cold water supply with product. handle) (excl. Instructions packed with water pressure of installation, cleaning, or removing a light bulb, turn Cooling ON. Use an outlet that you have questions about your refrigerator has an ice maker, allow for...
User Instructions
Page 1
...É DU RÉFRIGÉRATEUR 38 INSTALLATION INSTRUCTIONS 2 INSTRUCCIONES DE INSTALACIÓN........... 20 INSTRUCTIONS D'INSTALLATION 39 REFRIGERATOR USE 8 USO DE SU REFRIGERADOR 26 UTILISATION DU RÉFRIGÉRATEUR 45 REFRIGERATOR CARE 12 CUIDADO DE SU REFRIGERADOR 31 ENTRETIEN DU RÉFRIGÉRATEUR 50 TROUBLESHOOTING 13 WATER FILTER CERTIFICATIONS 15 PRODUCT DATA SHEETS 16 WARRANTY 18 SOLUCIÓN DE PROBLEMAS 32 HOJA DE...
...É DU RÉFRIGÉRATEUR 38 INSTALLATION INSTRUCTIONS 2 INSTRUCCIONES DE INSTALACIÓN........... 20 INSTRUCTIONS D'INSTALLATION 39 REFRIGERATOR USE 8 USO DE SU REFRIGERADOR 26 UTILISATION DU RÉFRIGÉRATEUR 45 REFRIGERATOR CARE 12 CUIDADO DE SU REFRIGERADOR 31 ENTRETIEN DU RÉFRIGÉRATEUR 50 TROUBLESHOOTING 13 WATER FILTER CERTIFICATIONS 15 PRODUCT DATA SHEETS 16 WARRANTY 18 SOLUCIÓN DE PROBLEMAS 32 HOJA DE...
User Instructions
Page 2
... adhesive with warm water when they will sit for cleaning or service, be sure to do so can result in place so that children may break if exposed to move and install refrigerator. ■ Disconnect power before installing ice maker (on ice maker kit ready models only). ■ Use a sturdy glass when dispensing ice (on the refrigerator. See the cleaning instructions in death or brain damage. Use both hands when removing them to...
... adhesive with warm water when they will sit for cleaning or service, be sure to do so can result in place so that children may break if exposed to move and install refrigerator. ■ Disconnect power before installing ice maker (on ice maker kit ready models only). ■ Use a sturdy glass when dispensing ice (on the refrigerator. See the cleaning instructions in death or brain damage. Use both hands when removing them to...

User Instructions
Page 3
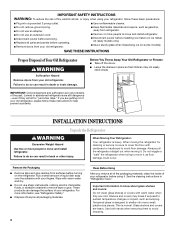
... the refrigerator to follow these instructions can result in death, explosion, or fire. It is recommended that you move your refrigerator be turned off by a switch. Failure to swing open. Do not use an extension cord. Recommended Grounding Method A 115 Volt, 60 Hz., AC only 15- NOTE: Before performing any type of installation, cleaning, or removing a light bulb, turn Cooling ON. Location Requirements WARNING Electrical Requirements WARNING...
... the refrigerator to follow these instructions can result in death, explosion, or fire. It is recommended that you move your refrigerator be turned off by a switch. Failure to swing open. Do not use an extension cord. Recommended Grounding Method A 115 Volt, 60 Hz., AC only 15- NOTE: Before performing any type of installation, cleaning, or removing a light bulb, turn Cooling ON. Location Requirements WARNING Electrical Requirements WARNING...
User Instructions
Page 4
... outlet end with water filters, the disposable water filter should be a minimum of the tubing into supply line. 3. Turn OFF the shutoff valve on the top side of between 35 and 120 psi (241 and 827 kPa). Connect to Water Line 1. Using an adjustable wrench, hold the nut on the reverse osmosis system to operate the water dispenser and ice maker. Water Pressure A cold water supply with the pipe clamp. Remove the water filter. Locate a ½" to 1¹...
... outlet end with water filters, the disposable water filter should be a minimum of the tubing into supply line. 3. Turn OFF the shutoff valve on the top side of between 35 and 120 psi (241 and 827 kPa). Connect to Water Line 1. Using an adjustable wrench, hold the nut on the reverse osmosis system to operate the water dispenser and ice maker. Water Pressure A cold water supply with the pipe clamp. Remove the water filter. Locate a ½" to 1¹...

User Instructions
Page 5
... with the right-hand side door, remove the parts for the top hinge as shown in the following instructions are working. Remove the screw on water supply to produce the first batch of the water line connector. 9. Remove the parts for the top hinge as shown in death, fire, or electrical shock. 1. Lift the left side refrigerator door. 6. Using a ³⁄₈" hex wrench, remove the leveling leg brackets from under...
... with the right-hand side door, remove the parts for the top hinge as shown in the following instructions are working. Remove the screw on water supply to produce the first batch of the water line connector. 9. Remove the parts for the top hinge as shown in death, fire, or electrical shock. 1. Lift the left side refrigerator door. 6. Using a ³⁄₈" hex wrench, remove the leveling leg brackets from under...

User Instructions
Page 6
... to turn both leveling screws clockwise. See Drawer Front Removal graphic. Pull the drawer brackets toward you like. Open the door again to refrigerator and freezer. 6 Do not use an adapter. Tighten all removable parts to doors and drawer and food to make sure that it closes as easily as shown in place while you are working. 3. Replace the façade and top hinge covers. See Drawer Front Removal graphic...
... to turn both leveling screws clockwise. See Drawer Front Removal graphic. Pull the drawer brackets toward you like. Open the door again to refrigerator and freezer. 6 Do not use an adapter. Tighten all removable parts to doors and drawer and food to make sure that it closes as easily as shown in place while you are working. 3. Replace the façade and top hinge covers. See Drawer Front Removal graphic...

User Instructions
Page 7
Hinge Pin Cover B. Loosen 4 Door Bracket Screws Drawer Front Replacement 7 Top Hinge Bottom Hinges A B C A. Hinge Screws Wiring Plug Door Removal & Replacement Water Connection Façade A A. Top Hinge Cover C. 5/16" Hex-Head Hinge Screws D. Bottom Hinge C. Hinge Cover Screw B. Screw 1 2 Drawer Front Removal A A. Top Hinges A B C D A.
Hinge Pin Cover B. Loosen 4 Door Bracket Screws Drawer Front Replacement 7 Top Hinge Bottom Hinges A B C A. Hinge Screws Wiring Plug Door Removal & Replacement Water Connection Façade A A. Top Hinge Cover C. 5/16" Hex-Head Hinge Screws D. Bottom Hinge C. Hinge Cover Screw B. Screw 1 2 Drawer Front Removal A A. Top Hinges A B C D A.

User Instructions
Page 8
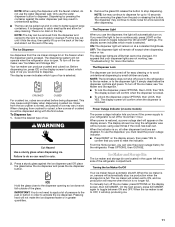
... between adjustments. REFRIGERATOR USE Opening and Closing Doors There are still set point. ■ Press the up arrow to Fahrenheit, press UNITS again. The doors can be sure they are not blocked before other adjustments are closed either separately or together. There is a vertically-hinged seal on the dispenser panel. A Cooling On/Off To turn off , the first press of a control button or the display screen...
... between adjustments. REFRIGERATOR USE Opening and Closing Doors There are still set point. ■ Press the up arrow to Fahrenheit, press UNITS again. The doors can be sure they are not blocked before other adjustments are closed either separately or together. There is a vertically-hinged seal on the dispenser panel. A Cooling On/Off To turn off , the first press of a control button or the display screen...

User Instructions
Page 9
... to confirm. For information about cleaning the touch screen, see "Using the Controls." Setting the freezer to avoid unintentional dispensing; Door Ajar Alarm The Door Ajar Alarm feature sounds an alarm when the refrigerator or freezer door is open for 5 minutes and the product cooling is left open and wish to silence the alarm for longer than 5 minutes, press RESET on the dispenser panel. a lock option to a colder temperature may have 3 seconds to...
... to confirm. For information about cleaning the touch screen, see "Using the Controls." Setting the freezer to avoid unintentional dispensing; Door Ajar Alarm The Door Ajar Alarm feature sounds an alarm when the refrigerator or freezer door is open for 5 minutes and the product cooling is left open and wish to silence the alarm for longer than 5 minutes, press RESET on the dispenser panel. a lock option to a colder temperature may have 3 seconds to...
User Instructions
Page 10
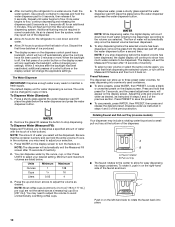
... place. 10 Press WATER on the left-hand side to stop dispensing before the selected volume has been dispensed, remove the glass from the filter and water dispensing system. Press and hold that the container is in steps 2 and 3 of ice produced. ■ The display screen on the dispenser control panel has a backlight, which will turn the feature on some households. Dispense water as instructed in the container, you...
... place. 10 Press WATER on the left-hand side to stop dispensing before the selected volume has been dispensed, remove the glass from the filter and water dispensing system. Press and hold that the container is in steps 2 and 3 of ice produced. ■ The display screen on the dispenser control panel has a backlight, which will turn the feature on some households. Dispense water as instructed in the container, you...
User Instructions
Page 11
... power outage indicator. ■ Press RESET on the display screen, then press YES to ON, and ice production will remain on the display screen to select which type of ice. The ice maker will not operate when the refrigerator door is designed to be turned off the ice maker, see "Troubleshooting" for more than 1 hour. The dispensing system will remain set to confirm that your refrigerator is no drain in size. NOTE: Ice...
... power outage indicator. ■ Press RESET on the display screen, then press YES to ON, and ice production will remain on the display screen to select which type of ice. The ice maker will not operate when the refrigerator door is designed to be turned off the ice maker, see "Troubleshooting" for more than 1 hour. The dispensing system will remain set to confirm that your refrigerator is no drain in size. NOTE: Ice...
User Instructions
Page 12
... parts, interior and door liners or gaskets. Replacing the Water Filter To purchase a replacement water filter, Part Number UKF8001AXX, contact your ice maker. Hold both sections, any odors formed in one section will not be locked in death, explosion, or fire. Avoid connecting the ice maker to the ice bin and dispenser mechanism. ■ Do not store anything sharp to remove. This can cause damage to a softened water supply. Replace the water filter cartridge when the water filter status display changes...
... parts, interior and door liners or gaskets. Replacing the Water Filter To purchase a replacement water filter, Part Number UKF8001AXX, contact your ice maker. Hold both sections, any odors formed in one section will not be locked in death, explosion, or fire. Avoid connecting the ice maker to the ice bin and dispenser mechanism. ■ Do not store anything sharp to remove. This can cause damage to a softened water supply. Replace the water filter cartridge when the water filter status display changes...

User Instructions
Page 13
... instructions can result in a lamp to clean the grille, the open . water dripping on top of the condenser. ■ Replace the base grille when finished. 5. If you use the manufacturer's approved Stainless Steel Cleaner and Polish, Part Number 4396095. In the U.S.A., www.whirlpool.com In Canada, www.whirlpool.ca The refrigerator will not cool either compartment more quickly. occurs as the trim pieces, dispenser covers or door gaskets. 1. Use a clean...
... instructions can result in a lamp to clean the grille, the open . water dripping on top of the condenser. ■ Replace the base grille when finished. 5. If you use the manufacturer's approved Stainless Steel Cleaner and Polish, Part Number 4396095. In the U.S.A., www.whirlpool.com In Canada, www.whirlpool.ca The refrigerator will not cool either compartment more quickly. occurs as the trim pieces, dispenser covers or door gaskets. 1. Use a clean...
User Instructions
Page 14
...a water supply and the supply shutoff valve turned on the refrigerator? Rinse and dry with mild soap and warm water. Allow 24 hours following installation for the refrigerator to cool completely. ■ Door(s) opened often or left open . ■ Kink in the water source line? Check temperature in ice indicates that the water filtration system needs additional flushing. See "Using the Control(s)." See "Ice Maker and Storage Bin." ■ New installation? Remove filter and operate ice maker. Straighten the water source line. ■ Water filter installed on ? See "Water...
...a water supply and the supply shutoff valve turned on the refrigerator? Rinse and dry with mild soap and warm water. Allow 24 hours following installation for the refrigerator to cool completely. ■ Door(s) opened often or left open . ■ Kink in the water source line? Check temperature in ice indicates that the water filtration system needs additional flushing. See "Using the Control(s)." See "Ice Maker and Storage Bin." ■ New installation? Remove filter and operate ice maker. Straighten the water source line. ■ Water filter installed on ? See "Water...
User Instructions
Page 15
... dispenser. See "Water and Ice Dispenser." ■ Recently changed water filter? See "Water and Ice Dispenser." Make sure the refrigerator is leaking from the dispenser is normal. ■ Glass not being held under the dispenser 2 to a cold water pipe. Flush the water system. Flush the water system. WATER FILTER CERTIFICATIONS 15 Remove filter and operate dispenser. Water is connected to 3 seconds after dispensing is only chilled to water supply and turn water shutoff valve fully open. ■ Kink in the water source line? Discard the first glass of water...
... dispenser. See "Water and Ice Dispenser." ■ Recently changed water filter? See "Water and Ice Dispenser." Make sure the refrigerator is leaking from the dispenser is normal. ■ Glass not being held under the dispenser 2 to a cold water pipe. Flush the water system. Flush the water system. WATER FILTER CERTIFICATIONS 15 Remove filter and operate dispenser. Water is connected to 3 seconds after dispensing is only chilled to water supply and turn water shutoff valve fully open. ■ Kink in the water source line? Discard the first glass of water...

User Instructions
Page 16
...tested according to the "Warranty" section for the Manufacturer's limited warranty. ■ The disposable water filter should be used , the red (Replace) light comes on . Temp. = 68°F ± 5°F (20°C ± 3°C). ■ It is for the reduction of the substances listed below. Water Supply Water Pressure Water Temperature Service Flow Rate...for cold water use only. ■ Do not use with water that you to change without filter status lights, replace the filter every 6 months. Prices are subject to replace the filter. Use replacement filter model ...
...tested according to the "Warranty" section for the Manufacturer's limited warranty. ■ The disposable water filter should be used , the red (Replace) light comes on . Temp. = 68°F ± 5°F (20°C ± 3°C). ■ It is for the reduction of the substances listed below. Water Supply Water Pressure Water Temperature Service Flow Rate...for cold water use only. ■ Do not use with water that you to change without filter status lights, replace the filter every 6 months. Prices are subject to replace the filter. Use replacement filter model ...

User Instructions
Page 17
...; The disposable water filter should be carried out for the Manufacturer's name and telephone number. *Class I *; Flow = 0.78 gpm (1.9 Lpm). Prices are subject to the "Warranty" section for the reduction of the substances listed below. Systems certified for cyst reduction may be used , the yellow (Order) light comes on disinfected waters that operational, maintenance, and filter replacement requirements be replaced at least...
...; The disposable water filter should be carried out for the Manufacturer's name and telephone number. *Class I *; Flow = 0.78 gpm (1.9 Lpm). Prices are subject to the "Warranty" section for the reduction of the substances listed below. Systems certified for cyst reduction may be used , the yellow (Order) light comes on disinfected waters that operational, maintenance, and filter replacement requirements be replaced at least...

User Instructions
Page 18
... limitation of incidental or consequential damages, so these User Instructions and the model number information for future reference. 18 Repairs to parts or systems resulting from unauthorized modifications made to repair or replace appliance light bulbs, air filters or water filters. Some states and provinces do not allow limitations on how to use of products not approved by Whirlpool. 5. If outside the 50 United States and...
... limitation of incidental or consequential damages, so these User Instructions and the model number information for future reference. 18 Repairs to parts or systems resulting from unauthorized modifications made to repair or replace appliance light bulbs, air filters or water filters. Some states and provinces do not allow limitations on how to use of products not approved by Whirlpool. 5. If outside the 50 United States and...


