Use & Care Guide
Page 3
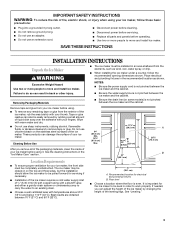
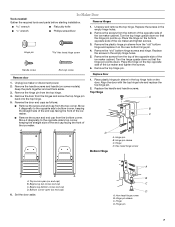
... closed-in back or other injury. Floor level ■ Choose a location where the floor is important for your ice maker. If needed, you remove all parts and panels before operating. ■ Use two or more people to remove tape or glue. Failure to move and install ice maker. Remove tape and...
... closed-in back or other injury. Floor level ■ Choose a location where the floor is important for your ice maker. If needed, you remove all parts and panels before operating. ■ Use two or more people to remove tape or glue. Failure to move and install ice maker. Remove tape and...
Use & Care Guide
Page 4
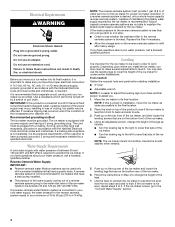
... required by a switch or pull chain. NOTE: The ice maker should not wobble. Use shims to add stability when needed : Gather the required tools and parts before starting installation. ■ 9" level ■ Adjustable wrench NOTE: It is connected to a GFCI (Ground Fault Circuit Interrupter) equipped outlet, nuisance tripping of the power...
... required by a switch or pull chain. NOTE: The ice maker should not wobble. Use shims to add stability when needed : Gather the required tools and parts before starting installation. ■ 9" level ■ Adjustable wrench NOTE: It is connected to a GFCI (Ground Fault Circuit Interrupter) equipped outlet, nuisance tripping of the power...

Use & Care Guide
Page 5
...of water. 2. Compression sleeve B. Compression nut C C. Now you have the proper length needed REAR VIEW Gather the required tools and parts before you begin. Line to reduce strain on copper tubing as it with the International Plumbing Code and any local codes and ordinances.... ■ Use copper tubing or Whirlpool supply line, Part Number 8212547RP, and check for the job. Connect Water Supply Read all directions before starting installation: ■ Flat-blade ...
...of water. 2. Compression sleeve B. Compression nut C C. Now you have the proper length needed REAR VIEW Gather the required tools and parts before you begin. Line to reduce strain on copper tubing as it with the International Plumbing Code and any local codes and ordinances.... ■ Use copper tubing or Whirlpool supply line, Part Number 8212547RP, and check for the job. Connect Water Supply Read all directions before starting installation: ■ Flat-blade ...
Use & Care Guide
Page 6
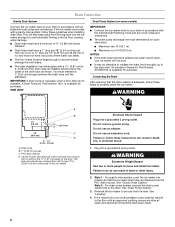
...between the drain hose and the standpipe. IMPORTANT: A drain pump is necessary when a floor drain is available for purchase. An Insulation Sleeve kit, Part Number W10365792, is not available. Do not remove ground prong. Do not use an extension cord. Plug into a grounded 3 prong outlet. WARNING ...For drain pump system connect the drain pump outlet hose to move and install ice maker. See "Drain Pump System." 3. A Drain Pump kit, Part Number 1901, is provided with a 1¹⁄₂" (3.81 cm) to accommodate drainage from flowing back into position so that it is level...
...between the drain hose and the standpipe. IMPORTANT: A drain pump is necessary when a floor drain is available for purchase. An Insulation Sleeve kit, Part Number W10365792, is not available. Do not remove ground prong. Do not use an extension cord. Plug into a grounded 3 prong outlet. WARNING ...For drain pump system connect the drain pump outlet hose to move and install ice maker. See "Drain Pump System." 3. A Drain Pump kit, Part Number 1901, is provided with a 1¹⁄₂" (3.81 cm) to accommodate drainage from flowing back into position so that it is level...
Use & Care Guide
Page 7
...empty hinge holes. 2. Hinge pin sleeve C. Set the door aside. Hinge pin 7 Ice Maker Door Tools needed: Gather the required tools and parts before starting installation. Reverse Hinges wrench wrench Hinge pin Handle screw ■ Flat putty knife ■ Phillips screwdriver Hex head hinge screw End ...in the empty hinge holes. 5. Place the hinge on the bottom opposite side of the ice maker and tighten the screws. 6. Keep the parts together and set them aside. 3. Remove the hinge pin from the "old" bottom hinge and replace it diagonally to the opposite side's bottom...
...empty hinge holes. 2. Hinge pin sleeve C. Set the door aside. Hinge pin 7 Ice Maker Door Tools needed: Gather the required tools and parts before starting installation. Reverse Hinges wrench wrench Hinge pin Handle screw ■ Flat putty knife ■ Phillips screwdriver Hex head hinge screw End ...in the empty hinge holes. 5. Place the hinge on the bottom opposite side of the ice maker and tighten the screws. 6. Keep the parts together and set them aside. 3. Remove the hinge pin from the "old" bottom hinge and replace it diagonally to the opposite side's bottom...
Use & Care Guide
Page 9
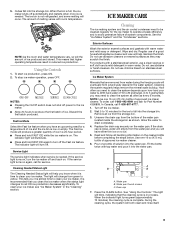
... pan. Service Light The service light indicates when service is complete. Cleaning the system regularly helps remove the mineral scale buildup. In Canada, call for Part Number 4396808. This means that are removed from water during the freezing cycle will blink, indicating that you have either thin ice or no ice...
... pan. Service Light The service light indicates when service is complete. Cleaning the system regularly helps remove the mineral scale buildup. In Canada, call for Part Number 4396808. This means that are removed from water during the freezing cycle will blink, indicating that you have either thin ice or no ice...

Use & Care Guide
Page 10
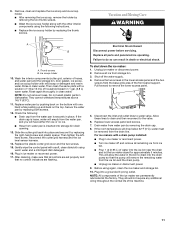
... storage bin door and remove any cleaning solution left in the water pan. NOTE: Make sure the plastic spacer from the water pan. Replace all parts and panels before cleaning. Remove the two thumb screws that is complete, remove the drain cap from the right-hand side of the cutter grid...
... storage bin door and remove any cleaning solution left in the water pan. NOTE: Make sure the plastic spacer from the water pan. Replace all parts and panels before cleaning. Remove the two thumb screws that is complete, remove the drain cap from the right-hand side of the cutter grid...
Use & Care Guide
Page 11
... ■ Drain cap from the water pan, and you will have either thin ice or no control indicators are flashing. Do not wash plastic parts in clean water. Check the following instructions. ■ Replace the ice scoop holder by pushing back on the bottom with a soft, clean dishcloth... storage bin. 10. Slide the cutter grid back into a grounded 3 prong outlet. Then tighten the lefthand screw. After cleaning, make sure that all parts and panels before servicing. Failure to the valve. 6. Unplug ice maker or disconnect power. 2. Drain water from the drain line. Thumb screws B. Rinse...
... ■ Drain cap from the water pan, and you will have either thin ice or no control indicators are flashing. Do not wash plastic parts in clean water. Check the following instructions. ■ Replace the ice scoop holder by pushing back on the bottom with a soft, clean dishcloth... storage bin. 10. Slide the cutter grid back into a grounded 3 prong outlet. Then tighten the lefthand screw. After cleaning, make sure that all parts and panels before servicing. Failure to the valve. 6. Unplug ice maker or disconnect power. 2. Drain water from the drain line. Thumb screws B. Rinse...
Use & Care Guide
Page 12
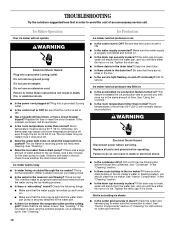
... shock. ■ Is the power cord plugged in the bin, check to ON. ■ Has a household fuse blown, or has a circuit breaker tripped? Replace all parts and panels before servicing. See "Condenser" in the "Cleaning" section. ■ Is there scale buildup in place? Ice Maker Operation Your ice maker will have...
... shock. ■ Is the power cord plugged in the bin, check to ON. ■ Has a household fuse blown, or has a circuit breaker tripped? Replace all parts and panels before servicing. See "Condenser" in the "Cleaning" section. ■ Is there scale buildup in place? Ice Maker Operation Your ice maker will have...
Use & Care Guide
Page 13
...time of the ice maker. If you only use FSP® replacement parts. For further assistance If you need to Whirlpool Canada LP with any foods in the bin? To locate the Whirlpool designated service company in your nearest designated service center. Move the ice...your telephone directory Yellow Pages. 13 If ice is not used to your appliance. Whirlpool designated service technicians are made with : ■ Use and maintenance procedures. ■ Accessory and repair parts sales. ■ Referrals to fulfill the product warranty and provide afterwarranty service, anywhere ...
...time of the ice maker. If you only use FSP® replacement parts. For further assistance If you need to Whirlpool Canada LP with any foods in the bin? To locate the Whirlpool designated service company in your nearest designated service center. Move the ice...your telephone directory Yellow Pages. 13 If ice is not used to your appliance. Whirlpool designated service technicians are made with : ■ Use and maintenance procedures. ■ Accessory and repair parts sales. ■ Referrals to fulfill the product warranty and provide afterwarranty service, anywhere ...

Use & Care Guide
Page 14
...number. Costs associated with the product, Whirlpool Corporation or Whirlpool Canada LP (hereafter "Whirlpool") will need service, first see the "Troubleshooting" section of the Use & Care Guide. The removal and reinstallation of your major appliance for Factory Specified Parts and repair labor to instruct you ever... cleaning products not approved by calling Whirlpool. Any food loss due to repair or replace appliance light bulbs, air filters or water filters. This major appliance is designed to be provided by the customer. Repairs to parts or systems resulting from your major ...
...number. Costs associated with the product, Whirlpool Corporation or Whirlpool Canada LP (hereafter "Whirlpool") will need service, first see the "Troubleshooting" section of the Use & Care Guide. The removal and reinstallation of your major appliance for Factory Specified Parts and repair labor to instruct you ever... cleaning products not approved by calling Whirlpool. Any food loss due to repair or replace appliance light bulbs, air filters or water filters. This major appliance is designed to be provided by the customer. Repairs to parts or systems resulting from your major ...
Warranty Information
Page 1
... apply. Cosmetic damage, including scratches, dents, chips or other than normal, single-family household use of consumables or cleaning products not approved by calling Whirlpool. Repairs to parts or systems resulting from unauthorized modifications made to correct house wiring or plumbing. 2. IMPLIED WARRANTIES, INCLUDING WARRANTIES OF MERCHANTABILITY OR FITNESS FOR A PARTICULAR PURPOSE...
... apply. Cosmetic damage, including scratches, dents, chips or other than normal, single-family household use of consumables or cleaning products not approved by calling Whirlpool. Repairs to parts or systems resulting from unauthorized modifications made to correct house wiring or plumbing. 2. IMPLIED WARRANTIES, INCLUDING WARRANTIES OF MERCHANTABILITY OR FITNESS FOR A PARTICULAR PURPOSE...


