
Dimension Guide
Page 1
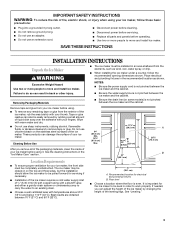
... drain hose and the standpipe. Water supply tube clamp B. Drain hose B. 1" (2.54 cm) air gap C. Location: s To ensure proper ventilation for electrical and plumbing fixtures. B. Reverse Osmosis Water Supply: The pressure of the water coming out of a reverse osmosis system going to the water inlet valve of the refrigerator needs to an existing drain. s Installation of the ice maker requires a cold water supply inlet of door, with or without the 3⁄4" (1.91 cm ) panel on the door...
... drain hose and the standpipe. Water supply tube clamp B. Drain hose B. 1" (2.54 cm) air gap C. Location: s To ensure proper ventilation for electrical and plumbing fixtures. B. Reverse Osmosis Water Supply: The pressure of the water coming out of a reverse osmosis system going to the water inlet valve of the refrigerator needs to an existing drain. s Installation of the ice maker requires a cold water supply inlet of door, with or without the 3⁄4" (1.91 cm ) panel on the door...
Use & Care Guide
Page 2
... others . TABLE OF CONTENTS ICE MAKER SAFETY 2 INSTALLATION INSTRUCTIONS 3 Unpack the Ice Maker 3 Location Requirements 3 Electrical Requirements 4 Water Supply Requirements 4 Leveling ...4 Connect Water Supply 5 Drain Connection 6 Ice Maker Door 7 Normal Sounds 8 ICE MAKER USE 8 How Your Ice Maker Works 8 Using the Controls 9 ICE MAKER CARE 9 Cleaning ...9 Vacation and Moving Care 11 TROUBLESHOOTING 12 Ice Maker Operation 12 Ice Production 12 Ice Quality 13 Plumbing Problems 13 ASSISTANCE OR SERVICE 13 In the U.S.A 13 In Canada 13 WARRANTY 14 TABLE DES MATIÈ...
... others . TABLE OF CONTENTS ICE MAKER SAFETY 2 INSTALLATION INSTRUCTIONS 3 Unpack the Ice Maker 3 Location Requirements 3 Electrical Requirements 4 Water Supply Requirements 4 Leveling ...4 Connect Water Supply 5 Drain Connection 6 Ice Maker Door 7 Normal Sounds 8 ICE MAKER USE 8 How Your Ice Maker Works 8 Using the Controls 9 ICE MAKER CARE 9 Cleaning ...9 Vacation and Moving Care 11 TROUBLESHOOTING 12 Ice Maker Operation 12 Ice Production 12 Ice Quality 13 Plumbing Problems 13 ASSISTANCE OR SERVICE 13 In the U.S.A 13 In Canada 13 WARRANTY 14 TABLE DES MATIÈ...
Use & Care Guide
Page 3
... water supply line is even. These products can also be level in the "Ice Maker Care" section. Cleaning Before Use After you can result in on the top and three sides, but the installation should allow the ice maker to be pulled forward for electrical and plumbing fixtures B. See the cleaning instructions in order to move and install ice maker. Recommended location for servicing if necessary. ■ Installation of the ice maker requires a cold water supply...
... water supply line is even. These products can also be level in the "Ice Maker Care" section. Cleaning Before Use After you can result in on the top and three sides, but the installation should allow the ice maker to be pulled forward for electrical and plumbing fixtures B. See the cleaning instructions in order to move and install ice maker. Recommended location for servicing if necessary. ■ Installation of the ice maker requires a cold water supply...
Use & Care Guide
Page 4
... a drain pump installed. ■ The pressure of the water supply coming out of a reverse osmosis system going to the water inlet valve of water per hour to the ice maker for the ice maker to the reverse osmosis system is blocked. Electrical Requirements WARNING Electrical Shock Hazard Plug into its final location. If nuisance tripping has occurred, and if the condition of the ice appears poor, dispose of cooling. A reverse...
... a drain pump installed. ■ The pressure of the water supply coming out of a reverse osmosis system going to the water inlet valve of water per hour to the ice maker for the ice maker to the reverse osmosis system is blocked. Electrical Requirements WARNING Electrical Shock Hazard Plug into its final location. If nuisance tripping has occurred, and if the condition of the ice appears poor, dispose of cooling. A reverse...

Use & Care Guide
Page 5
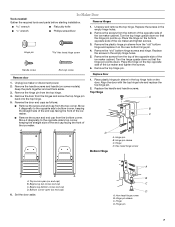
... parts inside the cabinet. Turn on nearest faucet long enough to avoid possible water valve malfunction. 5. Water supply tube clamp B. Inlet water tube clamp and supply line connector D. Drain hose (drain pump models only) 6. Nut 3. AB A. Line to reduce strain on the coupling. 9. Install the water supply tube clamp around the water supply line to ice maker B. Tighten any local codes and ordinances. ■ Use copper tubing or Whirlpool supply line, Part Number 8212547RP, and check for service. Tools needed for leaks. NOTE: To allow the ice maker...
... parts inside the cabinet. Turn on nearest faucet long enough to avoid possible water valve malfunction. 5. Water supply tube clamp B. Inlet water tube clamp and supply line connector D. Drain hose (drain pump models only) 6. Nut 3. AB A. Line to reduce strain on the coupling. 9. Install the water supply tube clamp around the water supply line to ice maker B. Tighten any local codes and ordinances. ■ Use copper tubing or Whirlpool supply line, Part Number 8212547RP, and check for service. Tools needed for leaks. NOTE: To allow the ice maker...
Use & Care Guide
Page 6
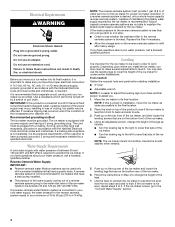
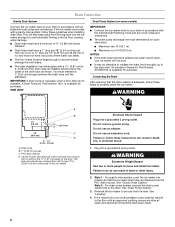
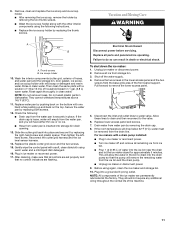
SIDE VIEW Drain Pump System (on the door. Do not use an adapter. Failure to do so can result in death, fire, or electrical shock. 1. Style 2 - See "Leveling." 4. A Drain Pump kit, Part Number 1901, is not available. WARNING Excessive Weight Hazard Use two or more people to the drain. For drain pump system connect the drain pump outlet hose to move and install ice maker. This will not work. ■...
SIDE VIEW Drain Pump System (on the door. Do not use an adapter. Failure to do so can result in death, fire, or electrical shock. 1. Style 2 - See "Leveling." 4. A Drain Pump kit, Part Number 1901, is not available. WARNING Excessive Weight Hazard Use two or more people to the drain. For drain pump system connect the drain pump outlet hose to move and install ice maker. This will not work. ■...
Use & Care Guide
Page 7
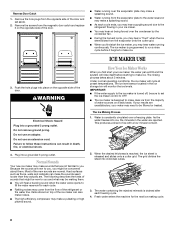
... putty knife ■ Phillips screwdriver Hex head hinge screw End cap screw 1. Unplug ice maker or disconnect power. 2. Turn the top hinge upside down . Replace the handle and handle screws. Reverse the door end caps as follows: ■ Remove the screw and end cap from the bottom of the opposite side of the ice maker cabinet. Ice Maker Door Tools needed: Gather the required tools and parts before starting installation. Hinge D.
... putty knife ■ Phillips screwdriver Hex head hinge screw End cap screw 1. Unplug ice maker or disconnect power. 2. Turn the top hinge upside down . Replace the handle and handle screws. Reverse the door end caps as follows: ■ Remove the screw and end cap from the bottom of the opposite side of the ice maker cabinet. Ice Maker Door Tools needed: Gather the required tools and parts before starting installation. Hinge D.
Use & Care Guide
Page 8
... monitor the ice levels. Under normal operating conditions, the ice maker will hear a buzzing sound when the water valve opens to follow these instructions can make noises. ■ The high-efficiency compressor may come from the opposite side of the refrigerant or the water line. WARNING Electrical Shock Hazard Plug into individual cubes. 3. Do not remove ground prong. Water is designed to make a pulsating or high pitched sound. Reverse Door Catch 1. Failure...
... monitor the ice levels. Under normal operating conditions, the ice maker will hear a buzzing sound when the water valve opens to follow these instructions can make noises. ■ The high-efficiency compressor may come from the opposite side of the refrigerant or the water line. WARNING Electrical Shock Hazard Plug into individual cubes. 3. Do not remove ground prong. Water is designed to make a pulsating or high pitched sound. Reverse Door Catch 1. Failure...
Use & Care Guide
Page 9
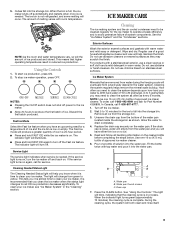
... use abrasive cleaners on again, call for the ice to 10 minutes for service. Cleaning the system regularly helps remove the mineral scale buildup. With hard water of the water pan located inside the storage bin as shown. Wait 5 to fall into the water pan. Unscrew the drain cap from green to drain completely. 4. Water pan thumb screws C. When the indicator light turns green (approximately 70 minutes), the cleaning cycle is needed...
... use abrasive cleaners on again, call for the ice to 10 minutes for service. Cleaning the system regularly helps remove the mineral scale buildup. With hard water of the water pan located inside the storage bin as shown. Wait 5 to fall into the water pan. Unscrew the drain cap from green to drain completely. 4. Water pan thumb screws C. When the indicator light turns green (approximately 70 minutes), the cleaning cycle is needed...

Use & Care Guide
Page 10
... ice making capacity. ■ Causes higher than recommended operating temperatures which may require repeated cleaning with the cutter grid. Open the storage bin door and remove any cleaning solution left in place and remove the cutter grid cover. 5. Replace the drain cap securely on the water pan. Screw C. 8. After the cleaning cycle is loose, water will empty from the cutter grid. 7. Be sure to remove the lower access panel. If the drain...
... ice making capacity. ■ Causes higher than recommended operating temperatures which may require repeated cleaning with the cutter grid. Open the storage bin door and remove any cleaning solution left in place and remove the cutter grid cover. 5. Replace the drain cap securely on the water pan. Screw C. 8. After the cleaning cycle is loose, water will empty from the cutter grid. 7. Be sure to remove the lower access panel. If the drain...
Use & Care Guide
Page 11
... lefthand screw. To shut down the ice maker: 1. Shut off and remove all controls are flashing. Replace lower access panel and screws. 7. Plug into place and secure it by pushing back on the bottom with the other interior components using the following : ■ Drain cap from the drain line. Vacation and Moving Care WARNING A B A. Do not wash plastic parts in clean water. They cannot withstand temperatures above 145°F (63...
... lefthand screw. To shut down the ice maker: 1. Shut off and remove all controls are flashing. Replace lower access panel and screws. 7. Plug into place and secure it by pushing back on the bottom with the other interior components using the following : ■ Drain cap from the drain line. Vacation and Moving Care WARNING A B A. Do not wash plastic parts in clean water. They cannot withstand temperatures above 145°F (63...
Use & Care Guide
Page 12
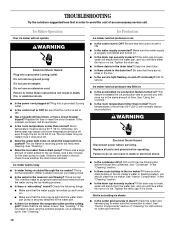
.... ■ Is the room temperature cooler than normal? Room temperatures of "Cleaning" for service. Make sure the water supply is properly connected and turned on when the Clean button is receiving power but produces no ice. Dirt or lint may need cleaning. Replace the fuse or reset the circuit breaker. The ice maker is pushed? Tighten the drain cap. ■ Is there debris in the ice maker? See "Using the Controls." ■ Is the...
.... ■ Is the room temperature cooler than normal? Room temperatures of "Cleaning" for service. Make sure the water supply is properly connected and turned on when the Clean button is receiving power but produces no ice. Dirt or lint may need cleaning. Replace the fuse or reset the circuit breaker. The ice maker is pushed? Tighten the drain cap. ■ Is there debris in the ice maker? See "Using the Controls." ■ Is the...
Use & Care Guide
Page 13
... "Connect Water Supply." Whirlpool designated service technicians are made with : ■ Features and specifications on our full line of the ice maker. It may save you can write to build every new WHIRLPOOL® appliance. Our consultants provide assistance with the same precision used regularly, it will fit right and work right, because they are trained to local dealers, repair parts distributors, and service companies. Whirlpool Canada...
... "Connect Water Supply." Whirlpool designated service technicians are made with : ■ Features and specifications on our full line of the ice maker. It may save you can write to build every new WHIRLPOOL® appliance. Our consultants provide assistance with the same precision used regularly, it will fit right and work right, because they are trained to local dealers, repair parts distributors, and service companies. Whirlpool Canada...

Use & Care Guide
Page 14
..., this information on the model and serial number label located on how to use of consumables or cleaning products not approved by a Whirlpool designated service company. Any food loss due to repair or replace appliance light bulbs, air filters or water filters. Repairs to parts or systems resulting from warranty coverage. 3. Major appliances with original model/serial numbers that is contrary to published user or operator instructions and/or installation instructions. 4. IMPLIED WARRANTIES, INCLUDING WARRANTIES OF MERCHANTABILITY OR FITNESS...
..., this information on the model and serial number label located on how to use of consumables or cleaning products not approved by a Whirlpool designated service company. Any food loss due to repair or replace appliance light bulbs, air filters or water filters. Repairs to parts or systems resulting from warranty coverage. 3. Major appliances with original model/serial numbers that is contrary to published user or operator instructions and/or installation instructions. 4. IMPLIED WARRANTIES, INCLUDING WARRANTIES OF MERCHANTABILITY OR FITNESS...
Warranty Information
Page 1
... the customer. After checking "Troubleshooting," you need service, first see the "Troubleshooting" section of original purchase date is used for in accordance with published installation instructions. 11. Outside the 50 United States and Canada, this information on the model and serial number label located on how to determine if another warranty applies. Proof of the Use & Care Guide. ITEMS EXCLUDED FROM WARRANTY This limited warranty does not cover: 1. Repairs when...
... the customer. After checking "Troubleshooting," you need service, first see the "Troubleshooting" section of original purchase date is used for in accordance with published installation instructions. 11. Outside the 50 United States and Canada, this information on the model and serial number label located on how to determine if another warranty applies. Proof of the Use & Care Guide. ITEMS EXCLUDED FROM WARRANTY This limited warranty does not cover: 1. Repairs when...


