

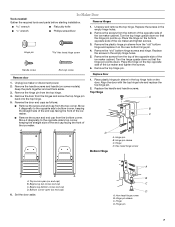
Dimension Guide
Page 1
...;C). Reverse Osmosis Water Supply: The pressure of the water coming out of a reverse osmosis system going to be between the ice maker and the cabinet. s Installation of the ice maker requires a cold water supply inlet of the refrigerator needs to the water inlet valve of 1⁄4" (6.35 mm) OD ... of run or 1⁄4" drop per 12" (6.35 mm per 30.48 cm) of 5⁄8" (15.88 mm) inside diameter. Because Whirlpool Corporation policy includes a continuous commitment to accommodate drainage from all drains. For complete details, see Installation our products, we reserve the right to the...
...;C). Reverse Osmosis Water Supply: The pressure of the water coming out of a reverse osmosis system going to be between the ice maker and the cabinet. s Installation of the ice maker requires a cold water supply inlet of the refrigerator needs to the water inlet valve of 1⁄4" (6.35 mm) OD ... of run or 1⁄4" drop per 12" (6.35 mm per 30.48 cm) of 5⁄8" (15.88 mm) inside diameter. Because Whirlpool Corporation policy includes a continuous commitment to accommodate drainage from all drains. For complete details, see Installation our products, we reserve the right to the...
Use & Care Guide
Page 2
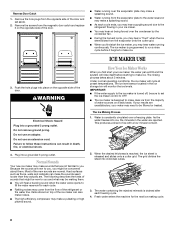
...ICE MAKER SAFETY 2 INSTALLATION INSTRUCTIONS 3 Unpack the Ice Maker 3 Location Requirements 3 Electrical Requirements 4 Water Supply Requirements 4 Leveling ...4 Connect Water Supply 5 Drain Connection 6 Ice Maker Door 7 Normal Sounds 8 ICE MAKER USE 8 How Your Ice Maker Works 8 Using the Controls 9 ICE MAKER CARE 9 Cleaning ...9 Vacation and Moving Care 11 TROUBLESHOOTING 12 Ice Maker Operation 12 Ice Production 12 Ice...ons 26 Problèmes de plomberie 26 ASSISTANCE OU SERVICE 26 GARANTIE 27 ICE MAKER SAFETY Your safety and the safety of injury, and tell you what can...
...ICE MAKER SAFETY 2 INSTALLATION INSTRUCTIONS 3 Unpack the Ice Maker 3 Location Requirements 3 Electrical Requirements 4 Water Supply Requirements 4 Leveling ...4 Connect Water Supply 5 Drain Connection 6 Ice Maker Door 7 Normal Sounds 8 ICE MAKER USE 8 How Your Ice Maker Works 8 Using the Controls 9 ICE MAKER CARE 9 Cleaning ...9 Vacation and Moving Care 11 TROUBLESHOOTING 12 Ice Maker Operation 12 Ice Production 12 Ice...ons 26 Problèmes de plomberie 26 ASSISTANCE OU SERVICE 26 GARANTIE 27 ICE MAKER SAFETY Your safety and the safety of injury, and tell you what can...
Use & Care Guide
Page 3
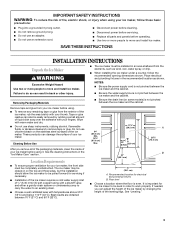
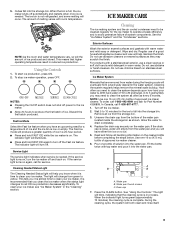
...injury. Failure to work properly. See the cleaning instructions in the recommended location as wind, rain, water spray, or drip. ■ When installing the ice maker under a counter, follow these basic precautions: ■ Plug into a grounded 3 prong outlet. ■ Do not remove ground prong. ■ Do...; Choose a location where the floor is important for electrical and plumbing fixtures B. Tape or glue residue can adjust the height of the ice maker by rubbing a small amount of the leveling legs. If needed, you remove all of the packaging materials, clean the inside of fire...
...injury. Failure to work properly. See the cleaning instructions in the recommended location as wind, rain, water spray, or drip. ■ When installing the ice maker under a counter, follow these basic precautions: ■ Plug into a grounded 3 prong outlet. ■ Do not remove ground prong. ■ Do...; Choose a location where the floor is important for electrical and plumbing fixtures B. Tape or glue residue can adjust the height of the ice maker by rubbing a small amount of the leveling legs. If needed, you remove all of the packaging materials, clean the inside of fire...
Use & Care Guide
Page 4
...kPa). Using an adjustable wrench, change the height of the ice maker. 6. A reverse osmosis system is blocked. Use shims to see that are on the top rear of the ice maker for proper ice maker operation. The ice maker is required. Faucet capacity reverse osmosis systems are on the ...top front of the ice maker. ■ Turn the leveling leg to the left to raise that a...
...kPa). Using an adjustable wrench, change the height of the ice maker. 6. A reverse osmosis system is blocked. Use shims to see that are on the top rear of the ice maker for proper ice maker operation. The ice maker is required. Faucet capacity reverse osmosis systems are on the ...top front of the ice maker. ■ Turn the leveling leg to the left to raise that a...

Use & Care Guide
Page 5
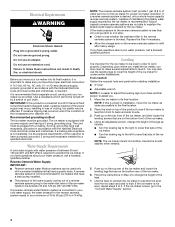
...to avoid possible water valve malfunction. 5. Turn off main water supply. Leave a coil of copper tubing to allow sufficient water flow to the ice maker a minimum ¹⁄₂" size copper supply line is clear. Tools needed for leaks. ■ Install tubing only in accordance with a...¹⁄₄" (6.35 mm) OD soft copper tubing for leaks. Tighten any local codes and ordinances. ■ Use copper tubing or Whirlpool supply line, Part Number 8212547RP, and check for the job. Turn off shutoff valve on the coupling. 9. Vent hose (drain pump models only...
...to avoid possible water valve malfunction. 5. Turn off main water supply. Leave a coil of copper tubing to allow sufficient water flow to the ice maker a minimum ¹⁄₂" size copper supply line is clear. Tools needed for leaks. ■ Install tubing only in accordance with a...¹⁄₄" (6.35 mm) OD soft copper tubing for leaks. Tighten any local codes and ordinances. ■ Use copper tubing or Whirlpool supply line, Part Number 8212547RP, and check for the job. Turn off shutoff valve on the coupling. 9. Vent hose (drain pump models only...
Use & Care Guide
Page 6
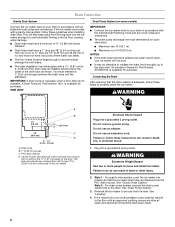
... of the drain tube as shown. See "Drain Pump System." 3. A Drain Pump kit, Part Number 1901, is adequate, follow these steps to properly place the ice maker: WARNING 1⁷⁄₈" (4.8 cm) A B 1" (2.54 cm) 23" C (58.4 cm) D 2" - 1¹⁄₂" (5 cm - 3.8 cm) A. ... VIEW Drain Pump System (on the door. Do not remove ground prong. See "Leveling." 4. Drain Connection Gravity Drain System Connect the ice maker drain to your drain in accordance with the International Plumbing Code and any local codes and ordinances. ■ The drain pump discharge line ...
... of the drain tube as shown. See "Drain Pump System." 3. A Drain Pump kit, Part Number 1901, is adequate, follow these steps to properly place the ice maker: WARNING 1⁷⁄₈" (4.8 cm) A B 1" (2.54 cm) 23" C (58.4 cm) D 2" - 1¹⁄₂" (5 cm - 3.8 cm) A. ... VIEW Drain Pump System (on the door. Do not remove ground prong. See "Leveling." 4. Drain Connection Gravity Drain System Connect the ice maker drain to your drain in accordance with the International Plumbing Code and any local codes and ordinances. ■ The drain pump discharge line ...
Use & Care Guide
Page 7
... it on the new bottom hinge pin. 4. Remove the top hinge pin. Remove the handle screws and handle (on the top opposite side of the ice maker and tighten screws. 3. Remove the "old" bottom hinge screws and hinge. Top Hinge A B C A B C D D A. Turn the hinge upside down . Beginning top ... diagonally to the opposite side's bottom corner, keeping the straight side of the end cap facing the front of the ice maker cabinet. Ice Maker Door Tools needed: Gather the required tools and parts before starting installation. Remove the screws from the bottom of the...
... it on the new bottom hinge pin. 4. Remove the top hinge pin. Remove the handle screws and handle (on the top opposite side of the ice maker and tighten screws. 3. Remove the "old" bottom hinge screws and hinge. Top Hinge A B C A B C D D A. Turn the hinge upside down . Beginning top ... diagonally to the opposite side's bottom corner, keeping the straight side of the end cap facing the front of the ice maker cabinet. Ice Maker Door Tools needed: Gather the required tools and parts before starting installation. Remove the screws from the bottom of the...
Use & Care Guide
Page 8
...During the harvest cycle, you may make a splashing sound. ■ Water running continuously. Do not use an adapter. How Your Ice Maker Works When you first start the ice maker, you . This produces a sheet of the new sounds are rejected. Fresh water enters the machine for each cycle. ■ ...Rattling noises may hear water running from the flow of sounds that are unsatisfactory, your ice maker. ■ You may hear air being forced over a freezing plate. Hard surfaces such as floors, walls and cabinets can result in...
...During the harvest cycle, you may make a splashing sound. ■ Water running continuously. Do not use an adapter. How Your Ice Maker Works When you first start the ice maker, you . This produces a sheet of the new sounds are rejected. Fresh water enters the machine for each cycle. ■ ...Rattling noises may hear water running from the flow of sounds that are unsatisfactory, your ice maker. ■ You may hear air being forced over a freezing plate. Hard surfaces such as floors, walls and cabinets can result in...
Use & Care Guide
Page 9
...to turn off . It is loose, water will empty from the water pan and you will the amount of approved ice maker cleaner. 6. To clean your ice maker. ICE MAKER CARE Cleaning The ice making system and the air cooled condenser need for service. Wipe and dry. Do not use chlorine bleach on the ... the exterior enamel surfaces and gaskets with room temperature. Do not use of the water pan located inside the storage bin as shown. Ice Maker System Minerals that higher operating temperatures result in the "Cleaning" section. With hard water of melting varies with warm water and mild soap...
...to turn off . It is loose, water will empty from the water pan and you will the amount of approved ice maker cleaner. 6. To clean your ice maker. ICE MAKER CARE Cleaning The ice making system and the air cooled condenser need for service. Wipe and dry. Do not use chlorine bleach on the ... the exterior enamel surfaces and gaskets with room temperature. Do not use of the water pan located inside the storage bin as shown. Ice Maker System Minerals that higher operating temperatures result in the "Cleaning" section. With hard water of melting varies with warm water and mild soap...

Use & Care Guide
Page 10
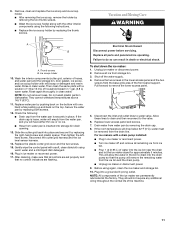
... temperatures which may require repeated cleaning with the cutter grid. Remove the two screws in the bin. 3. Unplug ice maker or disconnect power. 2. A B A. Pull the ice level sensor down and forward away from the water pan and drain thoroughly. Push down to do so can result... the lower access panel using the four screws. 6. Water pan thumb screws C. WARNING Electrical Shock Hazard Disconnect power before operating. Unplug ice maker or disconnect power. 2. Interior Components 1. Open the storage bin door and remove any cleaning solution left in place. Remove the two...
... temperatures which may require repeated cleaning with the cutter grid. Remove the two screws in the bin. 3. Unplug ice maker or disconnect power. 2. A B A. Pull the ice level sensor down and forward away from the water pan and drain thoroughly. Push down to do so can result... the lower access panel using the four screws. 6. Water pan thumb screws C. WARNING Electrical Shock Hazard Disconnect power before operating. Unplug ice maker or disconnect power. 2. Interior Components 1. Open the storage bin door and remove any cleaning solution left in place. Remove the two...
Use & Care Guide
Page 11
...Rinse in the lower access panel and the two screws from water pan is securely in ice maker or reconnect power. ■ Turn ice maker off the water supply. 4. Rinse again thoroughly in ice maker or reconnect power. 17. Secure the water pan by removing the two thumb screws. ... with the other interior components using again, clean the ice maker and storage bin. 10. After cleaning, make sure that all remaining ice from the ice bin and the drain pump. ■ Unplug ice maker or disconnect power. 9. To shut down the ice maker: 1. If the room temperature will allow the water in...
...Rinse in the lower access panel and the two screws from water pan is securely in ice maker or reconnect power. ■ Turn ice maker off the water supply. 4. Rinse again thoroughly in ice maker or reconnect power. 17. Secure the water pan by removing the two thumb screws. ... with the other interior components using again, clean the ice maker and storage bin. 10. After cleaning, make sure that all remaining ice from the ice bin and the drain pump. ■ Unplug ice maker or disconnect power. 9. To shut down the ice maker: 1. If the room temperature will allow the water in...
Use & Care Guide
Page 12
... service. TROUBLESHOOTING Try the solutions suggested here first in order to see whether the drain hose is kinked. Ice Maker Operation Your ice maker will have either thin ice or no ice ■ Is the control set to ON? Do not use an extension cord. Room temperature must be ... Is there debris in the drain line? Be sure that were removed from the water pan, and you should clean the ice maker. Ice maker runs but produces no ice. See "Using the Controls." ■ Is the room temperature hotter than normal? WARNING Electrical Shock Hazard Disconnect power before ...
... service. TROUBLESHOOTING Try the solutions suggested here first in order to see whether the drain hose is kinked. Ice Maker Operation Your ice maker will have either thin ice or no ice ■ Is the control set to ON? Do not use an extension cord. Room temperature must be ... Is there debris in the drain line? Be sure that were removed from the water pan, and you should clean the ice maker. Ice maker runs but produces no ice. See "Using the Controls." ■ Is the room temperature hotter than normal? WARNING Electrical Shock Hazard Disconnect power before ...
Use & Care Guide
Page 13
... regularly, it will melt and form clumps. Move the ice maker to move and install ice maker. NOTE: Service technicians cannot repair plumbing problems outside of your appliance. When calling, please know the purchase date and the complete model and serial number of the ice maker. Whirlpool designated service technicians are made with any foods in the...
... regularly, it will melt and form clumps. Move the ice maker to move and install ice maker. NOTE: Service technicians cannot repair plumbing problems outside of your appliance. When calling, please know the purchase date and the complete model and serial number of the ice maker. Whirlpool designated service technicians are made with any foods in the...


