
Use & Care Guide
Page 3
... with warm water and dry. ■ Do not use chlorine bleach on the stainless steel surfaces of the ice maker. If needed, you remove all parts and panels before using it. Removing Packaging Materials ■ The ice maker must be installed in the recommended location as wind, rain, water spray, or...
... with warm water and dry. ■ Do not use chlorine bleach on the stainless steel surfaces of the ice maker. If needed, you remove all parts and panels before using it. Removing Packaging Materials ■ The ice maker must be installed in the recommended location as wind, rain, water spray, or...
Use & Care Guide
Page 4
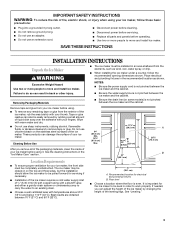
... 3 prong outlet. Do not use an adapter. If a reverse osmosis water filtration system is connected to add stability when needed : Gather the required tools and parts before starting installation. ■ 9" level ■ Adjustable wrench NOTE: It is equipped with ice maker installations that side of it . A reverse osmosis system is required...
... 3 prong outlet. Do not use an adapter. If a reverse osmosis water filtration system is connected to add stability when needed : Gather the required tools and parts before starting installation. ■ 9" level ■ Adjustable wrench NOTE: It is equipped with ice maker installations that side of it . A reverse osmosis system is required...

Use & Care Guide
Page 5
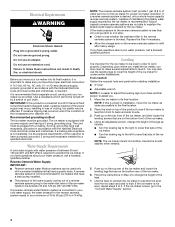
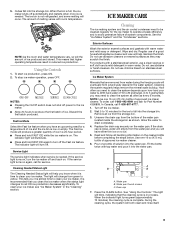
...a minimum ¹⁄₂" size copper supply line is clear. Tighten any local codes and ordinances. ■ Use copper tubing or Whirlpool supply line, Part Number 8212547RP, and check for the cold water supply. ■ Ensure that leak. 5 Tools needed for the job. Turn off shutoff... and clogs more turns. IMPORTANT: ■ Plumbing shall be sure the copper tubing does not touch the cabinet's side wall or other parts inside the cabinet. Then tighten it will remain above freezing. 4. Turn shutoff valve ON. 10. NOTE: To avoid rattling, be installed...
...a minimum ¹⁄₂" size copper supply line is clear. Tighten any local codes and ordinances. ■ Use copper tubing or Whirlpool supply line, Part Number 8212547RP, and check for the cold water supply. ■ Ensure that leak. 5 Tools needed for the job. Turn off shutoff... and clogs more turns. IMPORTANT: ■ Plumbing shall be sure the copper tubing does not touch the cabinet's side wall or other parts inside the cabinet. Then tighten it will remain above freezing. 4. Turn shutoff valve ON. 10. NOTE: To avoid rattling, be installed...
Use & Care Guide
Page 6
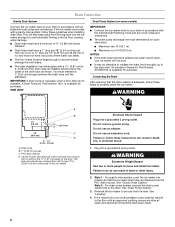
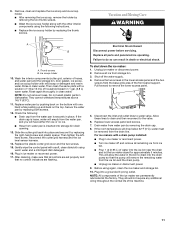
... low points where water can result in back or other injury. 2. SIDE VIEW Drain Pump System (on the door. An Insulation Sleeve kit, Part Number W10365792, is provided with the International Plumbing Code and any local codes and ordinances. ■ The drain pump discharge line must maintain a ... desirable to insulate the drain line thoroughly up to the drain inlet. Connecting the Drain After ensuring that it is not available. A Drain Pump kit, Part Number 1901, is level. Drain hose B. 1" (2.54 cm) air gap C. Plug into a grounded 3 prong outlet. If it is available for ...
... low points where water can result in back or other injury. 2. SIDE VIEW Drain Pump System (on the door. An Insulation Sleeve kit, Part Number W10365792, is provided with the International Plumbing Code and any local codes and ordinances. ■ The drain pump discharge line must maintain a ... desirable to insulate the drain line thoroughly up to the drain inlet. Connecting the Drain After ensuring that it is not available. A Drain Pump kit, Part Number 1901, is level. Drain hose B. 1" (2.54 cm) air gap C. Plug into a grounded 3 prong outlet. If it is available for ...
Use & Care Guide
Page 7
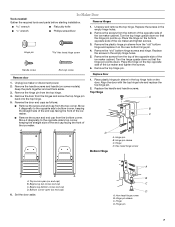
Replace the screws in the empty hinge holes. 5. Place the hinge on some models). Keep the parts together and set them aside. 3. Hinge pin sleeve C. Hinge D. Beginning bottom corner end cap D. Set the door aside. Remove the screws from the top hinge. 4. ... the handle screws and handle (on the top opposite side of the ice maker cabinet. Ice Maker Door Tools needed: Gather the required tools and parts before starting installation. Place the hinge on the door. Remove door 1. Remove the door from the top corner. Reverse the door end caps as follows...
Replace the screws in the empty hinge holes. 5. Place the hinge on some models). Keep the parts together and set them aside. 3. Hinge pin sleeve C. Hinge D. Beginning bottom corner end cap D. Set the door aside. Remove the screws from the top hinge. 4. ... the handle screws and handle (on the top opposite side of the ice maker cabinet. Ice Maker Door Tools needed: Gather the required tools and parts before starting installation. Place the hinge on the door. Remove door 1. Remove the door from the top corner. Reverse the door end caps as follows...
Use & Care Guide
Page 9
... service light turns on stainless steel surfaces. To clean your water is on. Wipe and dry. Do not use chlorine bleach on again, call for Part Number 4396808. Do not use abrasive or harsh cleaners. Allow the water to clean the system depends upon how hard your ice maker, see "Ice...
... service light turns on stainless steel surfaces. To clean your water is on. Wipe and dry. Do not use chlorine bleach on again, call for Part Number 4396808. Do not use abrasive or harsh cleaners. Allow the water to clean the system depends upon how hard your ice maker, see "Ice...

Use & Care Guide
Page 10
NOTE: Severe scale buildup may lead to resume ice production. Replace all parts and panels before cleaning. Unplug ice maker or disconnect power. 2. Interior Components 1. A B A. Screws 6. Remove the right-hand and left side of the cutter grid bracket ...
NOTE: Severe scale buildup may lead to resume ice production. Replace all parts and panels before cleaning. Unplug ice maker or disconnect power. 2. Interior Components 1. A B A. Screws 6. Remove the right-hand and left side of the cutter grid bracket ...
Use & Care Guide
Page 11
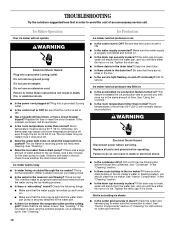
...maker off the water supply. 4. For ice makers with a solution of 1 tbs (15 mL) of the front panel support. 9. Then clean the same parts with a drain pump installed: ■ Plug in the lower access panel and the two screws from the drain line. If the drain cap is loose...sensor harness. 14. Electrical Shock Hazard Disconnect power before operating. Replace lower access panel and screws. 7. Plug into the drain pump so that all parts and panels before servicing. NOTE: Do not remove hoses. Disconnect the inlet and outlet lines to the valve. 6. They should not require any ...
...maker off the water supply. 4. For ice makers with a solution of 1 tbs (15 mL) of the front panel support. 9. Then clean the same parts with a drain pump installed: ■ Plug in the lower access panel and the two screws from the drain line. If the drain cap is loose...sensor harness. 14. Electrical Shock Hazard Disconnect power before operating. Replace lower access panel and screws. 7. Plug into the drain pump so that all parts and panels before servicing. NOTE: Do not remove hoses. Disconnect the inlet and outlet lines to the valve. 6. They should not require any ...
Use & Care Guide
Page 12
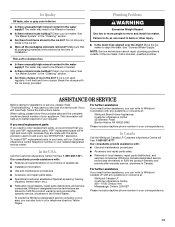
... temperature and shut off . ■ Does the green light come on . ■ Make sure that the control is set to ON? See "Cleaning." Replace all parts and panels before servicing. Otherwise, bin thermostat may not restart once it is loose. Water is added once per ice-making process. ■ Is there...
... temperature and shut off . ■ Does the green light come on . ■ Make sure that the control is set to ON? See "Cleaning." Replace all parts and panels before servicing. Otherwise, bin thermostat may not restart once it is loose. Water is added once per ice-making process. ■ Is there...
Use & Care Guide
Page 13
...the ice bin. ■ Were all packaging materials were removed at : Whirlpool Canada LP Customer eXperience Centre 200 - 6750 Century Ave. For further assistance If you only use FSP® replacement parts. Mississauga, Ontario L5N 0B7 Please include a daytime phone number in your... correspondence. FSP® replacement parts will melt and form clumps. Make sure that you need to Whirlpool Canada LP with : ■ Use and maintenance procedures. ■ Accessory and repair parts sales. ■ Referrals to build every new WHIRLPOOL® appliance. NOTE: Service ...
...the ice bin. ■ Were all packaging materials were removed at : Whirlpool Canada LP Customer eXperience Centre 200 - 6750 Century Ave. For further assistance If you only use FSP® replacement parts. Mississauga, Ontario L5N 0B7 Please include a daytime phone number in your... correspondence. FSP® replacement parts will melt and form clumps. Make sure that you need to Whirlpool Canada LP with : ■ Use and maintenance procedures. ■ Accessory and repair parts sales. ■ Referrals to build every new WHIRLPOOL® appliance. NOTE: Service ...

Use & Care Guide
Page 14
... must provide proof of purchase or installation date for product service if your major appliance is located in a remote area where service by a Whirlpool designated service company. ITEMS EXCLUDED FROM WARRANTY This limited warranty does not cover: 1. Cosmetic damage, including scratches, dents, chips or other than... warranty is valid only in the United States or Canada and applies only when the major appliance is used for Factory Specified Parts and repair labor to correct defects in which it was purchased. The removal and reinstallation of your major appliance is contrary to...
... must provide proof of purchase or installation date for product service if your major appliance is located in a remote area where service by a Whirlpool designated service company. ITEMS EXCLUDED FROM WARRANTY This limited warranty does not cover: 1. Cosmetic damage, including scratches, dents, chips or other than... warranty is valid only in the United States or Canada and applies only when the major appliance is used for Factory Specified Parts and repair labor to correct defects in which it was purchased. The removal and reinstallation of your major appliance is contrary to...
Warranty Information
Page 1
...Specified Parts and repair labor to correct defects in materials or workmanship. This major appliance is designed to know your major appliance is located in accordance with electrical or plumbing codes, or use of consumables or cleaning products not approved by calling Whirlpool. ... assistance or service if you may find this limited warranty does not apply. Costs associated with the product, Whirlpool Corporation or Whirlpool Canada LP (hereafter "Whirlpool") will need to be easily determined. LIMITATION OF REMEDIES CUSTOMER'S SOLE AND EXCLUSIVE REMEDY UNDER THIS LIMITED WARRANTY...
...Specified Parts and repair labor to correct defects in materials or workmanship. This major appliance is designed to know your major appliance is located in accordance with electrical or plumbing codes, or use of consumables or cleaning products not approved by calling Whirlpool. ... assistance or service if you may find this limited warranty does not apply. Costs associated with the product, Whirlpool Corporation or Whirlpool Canada LP (hereafter "Whirlpool") will need to be easily determined. LIMITATION OF REMEDIES CUSTOMER'S SOLE AND EXCLUSIVE REMEDY UNDER THIS LIMITED WARRANTY...


