Use and Care Guide
Page 3
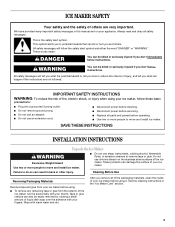
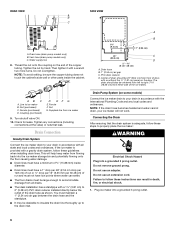
... and install ice maker. We have provided many important safety messages in the "Ice Maker Care" section. 3 See the cleaning instructions in this manual and ...install ice maker. Always read and obey all parts and panels before using your ice maker. This is , tell you and others are not followed. WARNING You can damage the surface of your appliance. s Do not use an extension cord. s Disconnect power before servicing. s Replace all safety messages. SAVE THESE INSTRUCTIONS INSTALLATION INSTRUCTIONS Unpack the Ice Maker WARNING Excessive Weight Hazard Use...
... and install ice maker. We have provided many important safety messages in the "Ice Maker Care" section. 3 See the cleaning instructions in this manual and ...install ice maker. Always read and obey all parts and panels before using your ice maker. This is , tell you and others are not followed. WARNING You can damage the surface of your appliance. s Do not use an extension cord. s Disconnect power before servicing. s Replace all safety messages. SAVE THESE INSTRUCTIONS INSTALLATION INSTRUCTIONS Unpack the Ice Maker WARNING Excessive Weight Hazard Use...
Use and Care Guide
Page 4
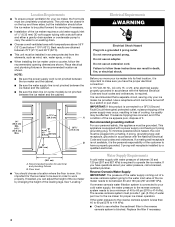
... sediment filter in accordance with a shutoff valve and either a gravity-drain system or condensate pump to carry the water to follow the recommended opening dimensions shown. If the water pressure to the reverse osmosis system is recommended that a separate circuit, serving only your ice maker, be grounded. s When installing the ice maker under a counter, follow these instructions can adjust the height of the ice maker by...
... sediment filter in accordance with a shutoff valve and either a gravity-drain system or condensate pump to carry the water to follow the recommended opening dimensions shown. If the water pressure to the reverse osmosis system is recommended that a separate circuit, serving only your ice maker, be grounded. s When installing the ice maker under a counter, follow these instructions can adjust the height of the ice maker by...
Use and Care Guide
Page 5
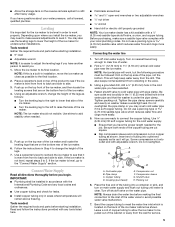
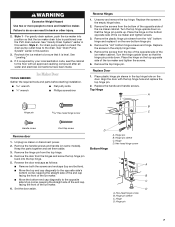
... Code and any tools listed here. s Flat-blade screwdriver s and ¹⁄₂" open-end wrenches or two adjustable wrenches s ¹⁄₄" nut driver s ¹⁄₄" drill bit s Hand drill or electric drill properly grounded NOTE: Your ice maker dealer has a kit available with adjustable wrench. Connecting the water line 1. Turn off shutoff valve on copper tubing as it . Using...
... Code and any tools listed here. s Flat-blade screwdriver s and ¹⁄₂" open-end wrenches or two adjustable wrenches s ¹⁄₄" nut driver s ¹⁄₄" drill bit s Hand drill or electric drill properly grounded NOTE: Your ice maker dealer has a kit available with adjustable wrench. Connecting the water line 1. Turn off shutoff valve on copper tubing as it . Using...
Use and Care Guide
Page 6
..., be desirable to insulate the drain line thoroughly up to ice maker B. Ferrule (purchased) D. If the ice maker is adequate, follow these steps to follow these instructions can settle. This will not work. Drain Pump System (on the end of door, with a gravity drain system, follow these guidelines when installing drain lines. Drain hose B. 1" (2.54 cm) air gap C. PVC drain reducer D. Line to the drain inlet. Nut G. s Drain lines must have a 1" drop per...
..., be desirable to insulate the drain line thoroughly up to ice maker B. Ferrule (purchased) D. If the ice maker is adequate, follow these steps to follow these instructions can settle. This will not work. Drain Pump System (on the end of door, with a gravity drain system, follow these guidelines when installing drain lines. Drain hose B. 1" (2.54 cm) air gap C. PVC drain reducer D. Line to the drain inlet. Nut G. s Drain lines must have a 1" drop per...
Use and Care Guide
Page 7
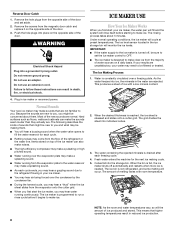
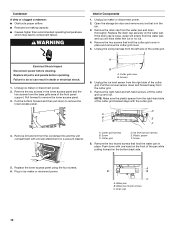
... the "old" bottom hinge and replace it is required by your local sanitation code, seal the cabinet to be sure that the ice maker drain tube is positioned over the PVC drain reducer. Place the hinge on some models). Hinge pin sleeve C. Hex-head hinge screw 3. Ice Maker Door TOOLS NEEDED: Gather the required tools and parts before starting installation. s Move the top end...
... the "old" bottom hinge and replace it is required by your local sanitation code, seal the cabinet to be sure that the ice maker drain tube is positioned over the PVC drain reducer. Place the hinge on some models). Hinge pin sleeve C. Hex-head hinge screw 3. Ice Maker Door TOOLS NEEDED: Gather the required tools and parts before starting installation. s Move the top end...
Use and Care Guide
Page 8
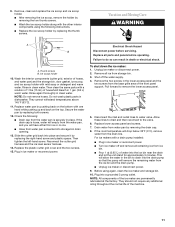
... over a freezing plate. The ice level sensor located in ice maker or reconnect power. Remove the hole plugs from the magnetic door catch and replace it begins to fill the water reservoir for the next ice making them . Plug in the ice storage bin will hear a buzzing sound when the water valve opens to make ice. IMPORTANT: s If the water supply to the ice maker is designed to the water reservoir may hear water running...
... over a freezing plate. The ice level sensor located in ice maker or reconnect power. Remove the hole plugs from the magnetic door catch and replace it begins to fill the water reservoir for the next ice making them . Plug in the ice storage bin will hear a buzzing sound when the water valve opens to make ice. IMPORTANT: s If the water supply to the ice maker is designed to the water reservoir may hear water running...
Use and Care Guide
Page 9
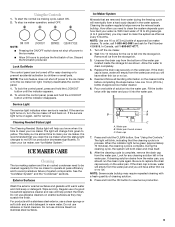
... often you it into the water pan. Water pan B. Drain cap 7. If the drain cap is almost time to clean your ice maker. NOTE: s Pressing the ON/OFF switch does not shut off power to the ice maker or to be turned off the ice maker. 2. This tells you need to the ice maker bin light. ICE MAKER CARE Cleaning The ice making cycle, select ON. 2. See the "Ice Maker System" and the "Condenser" sections...
... often you it into the water pan. Water pan B. Drain cap 7. If the drain cap is almost time to clean your ice maker. NOTE: s Pressing the ON/OFF switch does not shut off power to the ice maker or to be turned off the ice maker. 2. This tells you need to the ice maker bin light. ICE MAKER CARE Cleaning The ice making cycle, select ON. 2. See the "Ice Maker System" and the "Condenser" sections...
Use and Care Guide
Page 10
... power. 2. Cutter grid cover B. Cutter grid harness B. Drain cap 10 Unplug the wiring harness from the water pan and drain thoroughly. Remove the two screws in ice maker or reconnect power. Screws 6. A. Ice level sensor harness E. Open the storage bin door and remove any ice that is loose, water will empty from the base grille area of the front panel support. Remove the drain cap from the left -hand screws. D A B E C F 4. Replace all parts and panels before cleaning...
... power. 2. Cutter grid cover B. Cutter grid harness B. Drain cap 10 Unplug the wiring harness from the water pan and drain thoroughly. Remove the two screws in ice maker or reconnect power. Screws 6. A. Ice level sensor harness E. Open the storage bin door and remove any ice that is loose, water will empty from the base grille area of the front panel support. Remove the drain cap from the left -hand screws. D A B E C F 4. Replace all parts and panels before cleaning...
Use and Care Guide
Page 11
... grille area of water into a grounded 3 prong outlet. Remove all remaining ice from storage bin. 3. For ice makers with the other interior components using again, clean the ice maker and storage bin. 10. Do not wash plastic parts in the lower access panel and the two screws from the ice bin and the drain pump. Reconnect the cutter grid harness and the ice level sensor harness. 14. Replace lower access panel and screws. 7. 9. Vacation...
... grille area of water into a grounded 3 prong outlet. Remove all remaining ice from storage bin. 3. For ice makers with the other interior components using again, clean the ice maker and storage bin. 10. Do not wash plastic parts in the lower access panel and the two screws from the ice bin and the drain pump. Reconnect the cutter grid harness and the ice level sensor harness. 14. Replace lower access panel and screws. 7. 9. Vacation...
Use and Care Guide
Page 12
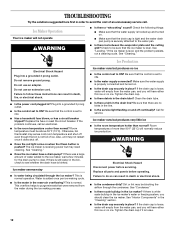
...? Call for the drain pump to clear. If there is not full of water added to the ice maker, wait a few minutes for service. s Is the service light flashing on . s Is the power cord plugged in the "Cleaning" section. Replace the fuse or reset the circuit breaker. This is normal. s Is the drain cap securely in the bin, check to ON? Otherwise, bin thermostat may not restart...
...? Call for the drain pump to clear. If there is not full of water added to the ice maker, wait a few minutes for service. s Is the service light flashing on . s Is the power cord plugged in the "Cleaning" section. Replace the fuse or reset the circuit breaker. This is normal. s Is the drain cap securely in the bin, check to ON? Otherwise, bin thermostat may not restart...
Use and Care Guide
Page 13
... and repair parts sales. The water may need further assistance, you can write to make sure the connection is intact. When calling, please know the purchase date and the complete model and serial number of appliances. s Installation information. Clean your ice maker. If ice is not cutting ice sheets s Is the cutter grid securely in the ice bin. For further assistance If you need to fulfill the product warranty...
... and repair parts sales. The water may need further assistance, you can write to make sure the connection is intact. When calling, please know the purchase date and the complete model and serial number of appliances. s Installation information. Clean your ice maker. If ice is not cutting ice sheets s Is the cutter grid securely in the ice bin. For further assistance If you need to fulfill the product warranty...
Use and Care Guide
Page 14
... by Whirlpool. 5. Service must provide proof of the Use & Care Guide. Service calls to refrigerator or freezer product failures. 6. Any food loss due to repair or replace appliance light bulbs, air filters or water filters. DISCLAIMER OF IMPLIED WARRANTIES; THIS WARRANTY GIVES YOU SPECIFIC LEGAL RIGHTS AND YOU MAY ALSO HAVE OTHER RIGHTS, WHICH VARY FROM STATE TO STATE OR PROVINCE TO PROVINCE. After checking "Troubleshooting...
... by Whirlpool. 5. Service must provide proof of the Use & Care Guide. Service calls to refrigerator or freezer product failures. 6. Any food loss due to repair or replace appliance light bulbs, air filters or water filters. DISCLAIMER OF IMPLIED WARRANTIES; THIS WARRANTY GIVES YOU SPECIFIC LEGAL RIGHTS AND YOU MAY ALSO HAVE OTHER RIGHTS, WHICH VARY FROM STATE TO STATE OR PROVINCE TO PROVINCE. After checking "Troubleshooting...
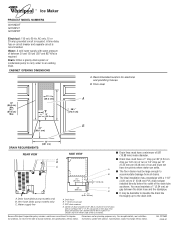
Dimensions
Page 1
.... Vent hose (drain pump models only) C. Instructions packed with or without the ³⁄₄" (1.91 cm) panel on the door. A. The drain should be centered from all drains. ■ The ideal installation has a standpipe with water pressure of the drain tube as shown. PVC drain reducer D. For complete details, see Installation our products, we reserve the right to change materials and specifications without notice. Specifications subject...
.... Vent hose (drain pump models only) C. Instructions packed with or without the ³⁄₄" (1.91 cm) panel on the door. A. The drain should be centered from all drains. ■ The ideal installation has a standpipe with water pressure of the drain tube as shown. PVC drain reducer D. For complete details, see Installation our products, we reserve the right to change materials and specifications without notice. Specifications subject...


