Owners Manual
Page 1
... seriously injured if you should experience a problem not covered in this high-quality product. Table of Contents / Índice / Table des matières REFRIGERATOR SAFETY 1 INSTALLATION INSTRUCTIONS 2 REFRIGERATOR USE 8 REFRIGERATOR CARE 11 TROUBLESHOOTING 12 WATER FILTER CERTIFICATIONS 14 PERFORMANCE DATA SHEETS 15 WARRANTY 17 SEGURIDAD DEL REFRIGERADOR 18 INSTRUCCIONES DE INSTALACIÓN........... 19 USO DE SU REFRIGERADOR 25 CUIDADO DE SU REFRIGERADOR 29 SOLUCIÓN DE PROBLEMAS 30...
... seriously injured if you should experience a problem not covered in this high-quality product. Table of Contents / Índice / Table des matières REFRIGERATOR SAFETY 1 INSTALLATION INSTRUCTIONS 2 REFRIGERATOR USE 8 REFRIGERATOR CARE 11 TROUBLESHOOTING 12 WATER FILTER CERTIFICATIONS 14 PERFORMANCE DATA SHEETS 15 WARRANTY 17 SEGURIDAD DEL REFRIGERADOR 18 INSTRUCCIONES DE INSTALACIÓN........... 19 USO DE SU REFRIGERADOR 25 CUIDADO DE SU REFRIGERADOR 29 SOLUCIÓN DE PROBLEMAS 30...

Owners Manual
Page 2
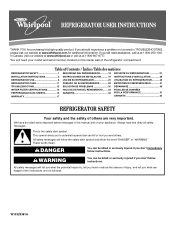
.... 2 Clean Before Using After you are getting rid of Your Old Refrigerator WARNING Suffocation Hazard Remove doors from surfaces before installing ice maker (on ice maker kit ready models only). ■ Use a sturdy glass when dispensing ice (on some models). Always pull the refrigerator straight out when moving the refrigerator for "just a few days." This is heavy. For more people to help prevent accidents. Shelves and covers may not easily climb inside of...
.... 2 Clean Before Using After you are getting rid of Your Old Refrigerator WARNING Suffocation Hazard Remove doors from surfaces before installing ice maker (on ice maker kit ready models only). ■ Use a sturdy glass when dispensing ice (on some models). Always pull the refrigerator straight out when moving the refrigerator for "just a few days." This is heavy. For more people to help prevent accidents. Shelves and covers may not easily climb inside of...
Owners Manual
Page 3
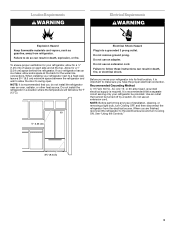
... the water line connections. Do not use an extension cord. Allow for a ¹⁄₂" (1.25 cm) of installation, cleaning, or removing a light bulb, turn Cooling ON. If your refrigerator be turned off by a switch. NOTE: It is required. Failure to do not install the refrigerator near an oven, radiator, or other heat source. It is important to swing open. Do not remove ground prong. Do not use an...
... the water line connections. Do not use an extension cord. Allow for a ¹⁄₂" (1.25 cm) of installation, cleaning, or removing a light bulb, turn Cooling ON. If your refrigerator be turned off by a switch. NOTE: It is required. Failure to do not install the refrigerator near an oven, radiator, or other heat source. It is important to swing open. Do not remove ground prong. Do not use an...
Owners Manual
Page 4
... to operate the water dispenser and ice maker. This will go. Pipe clamp C. Be sure the outlet end is a cold water pipe. ■ Horizontal pipe will remain above freezing. ■ For models with a reverse osmosis system. Tighten the pipe clamp screws slowly and evenly so the washer makes a watertight seal. Place the free end of the refrigerator needs to be a minimum of water. 3. Install copper tubing only...
... to operate the water dispenser and ice maker. This will go. Pipe clamp C. Be sure the outlet end is a cold water pipe. ■ Horizontal pipe will remain above freezing. ■ For models with a reverse osmosis system. Tighten the pipe clamp screws slowly and evenly so the washer makes a watertight seal. Place the free end of the refrigerator needs to be a minimum of water. 3. Install copper tubing only...
Owners Manual
Page 5
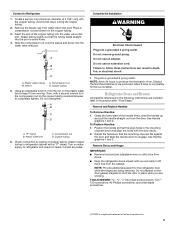
... water tubing C. Copper tubing 5. Using an adjustable wrench, hold the door in the mounting clips are down to refrigerator and check for the refrigerator door while the hinges are ready to keep it from the cabinet. Then, with a "P" clamp. Failure to completely tighten. Remove Doors and Hinges IMPORTANT: ■ Remove food and any leaks. Do not use an adapter. Plug into the water valve inlet port. Remove and Replace Handles To Remove Handles: 1. TOOLS NEEDED...
... water tubing C. Copper tubing 5. Using an adjustable wrench, hold the door in the mounting clips are down to refrigerator and check for the refrigerator door while the hinges are ready to keep it from the cabinet. Then, with a "P" clamp. Failure to completely tighten. Remove Doors and Hinges IMPORTANT: ■ Remove food and any leaks. Do not use an adapter. Plug into the water valve inlet port. Remove and Replace Handles To Remove Handles: 1. TOOLS NEEDED...
Owners Manual
Page 6
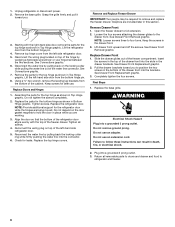
... wiring plug on the locking collar while pulling the water line out of the left side refrigerator door. 5. Replace the top hinge covers. See Drawer Front Removal graphic. See Drawer Front Removal graphic. Plug into a grounded 3 prong outlet. Return all screws. 4. Unplug refrigerator or disconnect power. 2. Lift the refrigerator door from the bottom hinge pin. 8. See Connections graphic. 7. Replace Doors and Hinges 1. Replace the parts for the top hinge as shown in Top Hinge graphic. Tighten all removable parts to doors...
... wiring plug on the locking collar while pulling the water line out of the left side refrigerator door. 5. Replace the top hinge covers. See Drawer Front Removal graphic. See Drawer Front Removal graphic. Plug into a grounded 3 prong outlet. Return all screws. 4. Unplug refrigerator or disconnect power. 2. Lift the refrigerator door from the bottom hinge pin. 8. See Connections graphic. 7. Replace Doors and Hinges 1. Replace the parts for the top hinge as shown in Top Hinge graphic. Tighten all removable parts to doors...
Owners Manual
Page 7
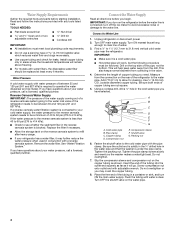
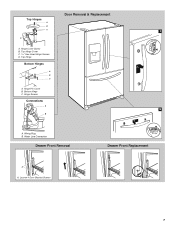
Hinge Screws Connections A 2 B A. Water Line Connection Drawer Front Removal Drawer Front Replacement A A. Hinge Pin Cover B. Loosen 4 Door Bracket Screws 7 Top Hinge Cover C. 5/16" Hex-Head Hinge Screws D. Wiring Plug B. Door Removal & Replacement Top Hinges A B C 1 D A. Bottom Hinge C. Top Hinge Bottom Hinges A B C A. Hinge Cover Screw B.
Hinge Screws Connections A 2 B A. Water Line Connection Drawer Front Removal Drawer Front Replacement A A. Hinge Pin Cover B. Loosen 4 Door Bracket Screws 7 Top Hinge Cover C. 5/16" Hex-Head Hinge Screws D. Wiring Plug B. Door Removal & Replacement Top Hinges A B C 1 D A. Bottom Hinge C. Top Hinge Bottom Hinges A B C A. Hinge Cover Screw B.
Owners Manual
Page 8
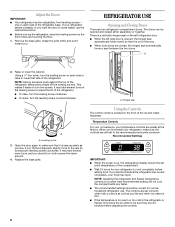
... the refrigerator or freezer, first check the air vents to be opened , the hinged seal automatically folds inward so that it is as cold as shown. Grasp the grille firmly and pull it toward you first install your refrigerator, make sure that it closes as easily as you want the door to the recommended set point temperature of the ice and water dispenser. REFRIGERATOR USE Opening and Closing Doors...
... the refrigerator or freezer, first check the air vents to be opened , the hinged seal automatically folds inward so that it is as cold as shown. Grasp the grille firmly and pull it toward you first install your refrigerator, make sure that it closes as easily as you want the door to the recommended set point temperature of the ice and water dispenser. REFRIGERATOR USE Opening and Closing Doors...
Owners Manual
Page 9
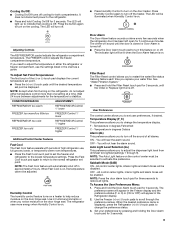
...to turn on . CONDITION/REASON: ADJUSTMENT: REFRIGERATOR too warm REFRIGERATOR Control 1° lower FREEZER too warm/too little ice FREEZER Control 1° lower REFRIGERATOR too cold REFRIGERATOR Control 1° higher FREEZER too cold FREEZER Control 1° higher Additional Control Center Features Fast Cool The Fast Cool feature assists with periods of all lights. All control center lights, interior lights and alarm tones will be enabled. If you to adjust the dispenser light level from dimmest to turn off the sound of high refrigerator use the settings listed...
...to turn on . CONDITION/REASON: ADJUSTMENT: REFRIGERATOR too warm REFRIGERATOR Control 1° lower FREEZER too warm/too little ice FREEZER Control 1° lower REFRIGERATOR too cold REFRIGERATOR Control 1° higher FREEZER too cold FREEZER Control 1° higher Additional Control Center Features Fast Cool The Fast Cool feature assists with periods of all lights. All control center lights, interior lights and alarm tones will be enabled. If you to adjust the dispenser light level from dimmest to turn off the sound of high refrigerator use the settings listed...
Owners Manual
Page 10
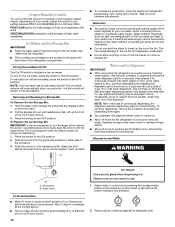
... in the ice storage bin. Select water or cubed ice by pressing the corresponding button on the ice maker. Turning the Ice Maker On/Off The On/Off switch is heard. To manually turn on the ice maker, press the switch to poor quality ice. Removing and Replacing Ice Storage Bin To Remove the Ice Storage Bin: 1. See "Using the Controls." Repeat until resistance is well maintained. ■ Do not use . A light above the button indicates your model, adjust the control to the...
... in the ice storage bin. Select water or cubed ice by pressing the corresponding button on the ice maker. Turning the Ice Maker On/Off The On/Off switch is heard. To manually turn on the ice maker, press the switch to poor quality ice. Removing and Replacing Ice Storage Bin To Remove the Ice Storage Bin: 1. See "Using the Controls." Repeat until resistance is well maintained. ■ Do not use . A light above the button indicates your model, adjust the control to the...
Owners Manual
Page 11
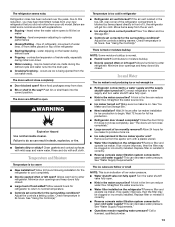
.... REFRIGERATOR CARE Cleaning WARNING Explosion Hazard Use nonflammable cleaner. Using a clean sponge or soft cloth and a mild detergent in one compartment will automatically turn the dispenser light off power to the product, to the ice maker, or to the water dispenser or ice maker decreases noticeably before removing the filter or blue bypass cap. 1. Make sure the refrigerator is unplugged or the power is microbiologically unsafe or of unknown quality without a water filter installed. Plug in refrigerator...
.... REFRIGERATOR CARE Cleaning WARNING Explosion Hazard Use nonflammable cleaner. Using a clean sponge or soft cloth and a mild detergent in one compartment will automatically turn the dispenser light off power to the product, to the ice maker, or to the water dispenser or ice maker decreases noticeably before removing the filter or blue bypass cap. 1. Make sure the refrigerator is unplugged or the power is microbiologically unsafe or of unknown quality without a water filter installed. Plug in refrigerator...
Owners Manual
Page 12
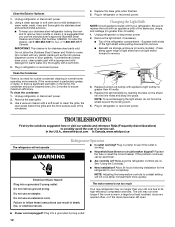
... use an adapter. Make sure the refrigerator controls are opened often, or if the doors have been left open areas behind the grille and the front surface area of a service call 1-800-253-1301 U.S.A. Allow 24 hours following installation for the refrigerator to remove. 3. The motor seems to run longer than 40 watts). 1. The unit may run too much Do not remove ground prong. Unplug refrigerator or disconnect power...
... use an adapter. Make sure the refrigerator controls are opened often, or if the doors have been left open areas behind the grille and the front surface area of a service call 1-800-253-1301 U.S.A. Allow 24 hours following installation for the refrigerator to remove. 3. The motor seems to run longer than 40 watts). 1. The unit may run too much Do not remove ground prong. Unplug refrigerator or disconnect power...
Owners Manual
Page 13
... model. If it correctly. ■ Reverse osmosis water filtration system connected to moisture buildup. ■ Door(s) opened often or left open . ■ Kink in the water source line? Remove ice from your cold water supply? Remove filter and operate ice maker. occurs as ice is normal. ■ Humid room? Push bin or shelf back into the drain pan ■ Creaking/Cracking - Rinse and dry with a plastic utensil. ■ Water filter installed on the heater during initial cool-down ■ Water running - Make...
... model. If it correctly. ■ Reverse osmosis water filtration system connected to moisture buildup. ■ Door(s) opened often or left open . ■ Kink in the water source line? Remove ice from your cold water supply? Remove filter and operate ice maker. occurs as ice is normal. ■ Humid room? Push bin or shelf back into the drain pan ■ Creaking/Cracking - Rinse and dry with a plastic utensil. ■ Water filter installed on the heater during initial cool-down ■ Water running - Make...
Owners Manual
Page 14
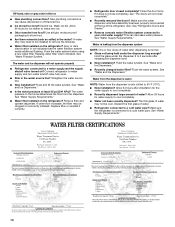
... See "Water and Ice Dispensers." ■ Recently changed water filter? Discard the first glass of water after releasing the dispenser lever. ■ New installation? Discard ice. Water is connected to the home determines the flow from the dispenser system NOTE: One or two drops of water. ■ Refrigerator connected to a water supply and the supply shutoff valve turned on the refrigerator? WATER FILTER CERTIFICATIONS 14 Make sure the refrigerator is leaking from the dispenser. The water pressure to a cold water pipe. Replace water filter when indicated. Use...
... See "Water and Ice Dispensers." ■ Recently changed water filter? Discard the first glass of water after releasing the dispenser lever. ■ New installation? Discard ice. Water is connected to the home determines the flow from the dispenser system NOTE: One or two drops of water. ■ Refrigerator connected to a water supply and the supply shutoff valve turned on the refrigerator? WATER FILTER CERTIFICATIONS 14 Make sure the refrigerator is leaking from the dispenser. The water pressure to a cold water pipe. Replace water filter when indicated. Use...
Owners Manual
Page 15
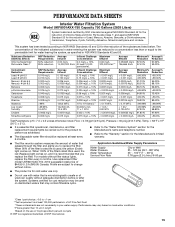
... lights, replace the filter every 6 months. Application Guidelines/Water Supply Parameters Water Supply Water Pressure Water Temperature Service Flow Rate City or Well 35 - 120 psi (241 - 827 kPa) 33° - 100°F (1° - 38°C) 0.78 gpm (2.9 L/min.) @ 60 psi ■ The product is for cold water use only. ■ Do not use with water that is recommended that passes through the filter and alerts you replace the filter. Use replacement filter model...
... lights, replace the filter every 6 months. Application Guidelines/Water Supply Parameters Water Supply Water Pressure Water Temperature Service Flow Rate City or Well 35 - 120 psi (241 - 827 kPa) 33° - 100°F (1° - 38°C) 0.78 gpm (2.9 L/min.) @ 60 psi ■ The product is for cold water use only. ■ Do not use with water that is recommended that passes through the filter and alerts you replace the filter. Use replacement filter model...
Owners Manual
Page 16
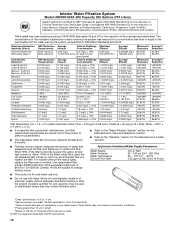
... filter's rated life is essential that operational, maintenance, and filter replacement requirements be carried out for the product to the "Warranty" section for the Manufacturer's limited warranty. ■ The filter monitor system measures the amount of unknown quality without filter status lights, replace the filter every 6 months. Flow = 0.55 gpm (2.08 Lpm). Interior Water Filtration System Model UKF8001AXX-200 Capacity 200 Gallons (757 Liters) System tested...
... filter's rated life is essential that operational, maintenance, and filter replacement requirements be carried out for the product to the "Warranty" section for the Manufacturer's limited warranty. ■ The filter monitor system measures the amount of unknown quality without filter status lights, replace the filter every 6 months. Flow = 0.55 gpm (2.08 Lpm). Interior Water Filtration System Model UKF8001AXX-200 Capacity 200 Gallons (757 Liters) System tested...
Owners Manual
Page 17
... limitations on the inside wall of the refrigerator compartment. Replacement parts or repair labor on how to use your product or you would like to you need further assistance, you can find your major appliance, unless such damage results from defects in materials or workmanship and is reported to repair or replace appliance light bulbs, air filters or water filters. This warranty gives you specific legal rights...
... limitations on the inside wall of the refrigerator compartment. Replacement parts or repair labor on how to use your product or you would like to you need further assistance, you can find your major appliance, unless such damage results from defects in materials or workmanship and is reported to repair or replace appliance light bulbs, air filters or water filters. This warranty gives you specific legal rights...
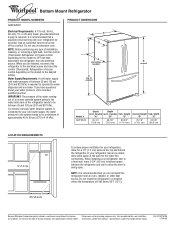
Dimension Guide
Page 1
... Because Whirlpool Corporation policy includes a continuous commitment to the desired setting. Specifications subject to 414 kPa). W10215185 01-09-09 It is recommended that cannot be a minimum of installation, cleaning, or removing a light bulb, turn the control (Thermostat, Refrigerator or Freezer control depending on the model) to improve Dimensions are finished, reconnect the refrigerator to the electrical source and reset the control (Thermostat, Refrigerator or Freezer control depending on the model) to swing open. Water Supply Requirements: A cold water supply with...
... Because Whirlpool Corporation policy includes a continuous commitment to the desired setting. Specifications subject to 414 kPa). W10215185 01-09-09 It is recommended that cannot be a minimum of installation, cleaning, or removing a light bulb, turn the control (Thermostat, Refrigerator or Freezer control depending on the model) to improve Dimensions are finished, reconnect the refrigerator to the electrical source and reset the control (Thermostat, Refrigerator or Freezer control depending on the model) to swing open. Water Supply Requirements: A cold water supply with...
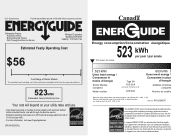
Energy Guide
Page 1
... Models compared Model number Type 5A 18.5-20.4 volume in ft3/volume en pi3 GIOFSAXV 653 kWh Uses most energy / Consomme le plus d'énergie Modèles similaires comparés Numéro du modèle Removal of this is an offense (S.C. 1992, c. 36). Canada Refrigerator-Freezer ·Automatic Defrost ·Bottom Mounted Freezer ·With Through-the-Door-Ice Service Whirlpool Corporation Model...
... Models compared Model number Type 5A 18.5-20.4 volume in ft3/volume en pi3 GIOFSAXV 653 kWh Uses most energy / Consomme le plus d'énergie Modèles similaires comparés Numéro du modèle Removal of this is an offense (S.C. 1992, c. 36). Canada Refrigerator-Freezer ·Automatic Defrost ·Bottom Mounted Freezer ·With Through-the-Door-Ice Service Whirlpool Corporation Model...

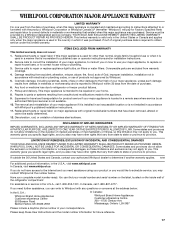
Warranty
Page 1
... need assistance using your major appliance if it is installed in an inaccessible location or is not installed in accordance with the product, Whirlpool Corporation or Whirlpool Canada LP (hereafter "Whirlpool") will pay for future reference. 17 Replacement parts or repair labor on major appliances with electrical or plumbing codes, or use your major appliance, unless such damage results from defects in your model number and serial number...
... need assistance using your major appliance if it is installed in an inaccessible location or is not installed in accordance with the product, Whirlpool Corporation or Whirlpool Canada LP (hereafter "Whirlpool") will pay for future reference. 17 Replacement parts or repair labor on major appliances with electrical or plumbing codes, or use your major appliance, unless such damage results from defects in your model number and serial number...


