
Installation Instructions
Page 2
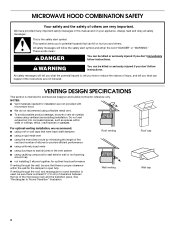
... materials needed for the damper to potential hazards that there is at least 3" (7.6 cm) of clearance between the top of the microwave oven and the transition piece. This symbol alerts you to open fully. Do not vent exhaust air into concealed spaces, such as ... to Round Transition" illustration. This is intended for architectural designer and builder/contractor reference only. All safety messages will follow instructions. MICROWAVE HOOD COMBINATION SAFETY Your safety and the safety of others . VENTING DESIGN SPECIFICATIONS This section is the safety alert symbol. See "...
... materials needed for the damper to potential hazards that there is at least 3" (7.6 cm) of clearance between the top of the microwave oven and the transition piece. This symbol alerts you to open fully. Do not vent exhaust air into concealed spaces, such as ... to Round Transition" illustration. This is intended for architectural designer and builder/contractor reference only. All safety messages will follow instructions. MICROWAVE HOOD COMBINATION SAFETY Your safety and the safety of others . VENTING DESIGN SPECIFICATIONS This section is the safety alert symbol. See "...
Installation Instructions
Page 3
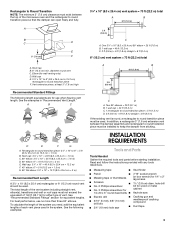
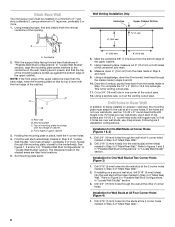
... the existing vent is round, a rectangular to round transition piece F. To calculate the length of the system you need, add the equivalent lengths of the microwave oven and the rectangular to 15.2 cm = 1.5 m) B. Wall cap E. 3¹⁄₄" x 10" to 6" (8.3 x 25.4 cm to 15.2 cm) rectangular to round transition piece must...
... the existing vent is round, a rectangular to round transition piece F. To calculate the length of the system you need, add the equivalent lengths of the microwave oven and the rectangular to 15.2 cm = 1.5 m) B. Wall cap E. 3¹⁄₄" x 10" to 6" (8.3 x 25.4 cm to 15.2 cm) rectangular to round transition piece must...
Installation Instructions
Page 4
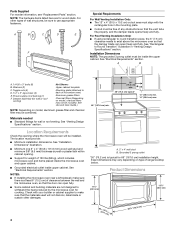
..., the 3" (7.6 cm) clearance needs to use appropriate fasteners. Installation Dimensions NOTE: The grounded 3 prong outlet must be sure to exist above the microwave oven so that the vent tube fits properly, and the damper blade opens freely and fully. Toggle nuts (4) D. 1/4" x 2" lag screws (4)...cabinet. See "Venting Design Specifications" section. The location must provide: ■ Minimum installation dimensions. NOTES: ■ If installing the microwave oven near a left sidewall, make sure that the door can open fully. ■ Some cabinet and building materials are for wall...
..., the 3" (7.6 cm) clearance needs to use appropriate fasteners. Installation Dimensions NOTE: The grounded 3 prong outlet must be sure to exist above the microwave oven so that the vent tube fits properly, and the damper blade opens freely and fully. Toggle nuts (4) D. 1/4" x 2" lag screws (4)...cabinet. See "Venting Design Specifications" section. The location must provide: ■ Minimum installation dimensions. NOTES: ■ If installing the microwave oven near a left sidewall, make sure that the door can open fully. ■ Some cabinet and building materials are for wall...
Installation Instructions
Page 5
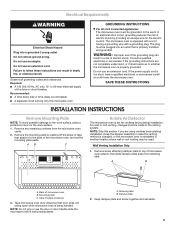
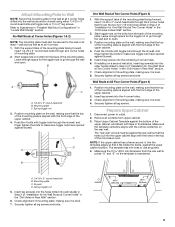
...a grounded 3 prong outlet. SAVE THESE INSTRUCTIONS INSTALLATION INSTRUCTIONS Remove Mounting Plate NOTE: To avoid possible damage to the back of the microwave oven, and set the mounting plate aside. Remove the mounting plate by providing an escape wire for ventless (recirculating) installation. Back ...instructions can result in death, fire, or electrical shock. WARNING: Improper use of the grounding plug can result in a risk of microwave oven B. Tape microwave oven door closed so that attach it to the work surface, place a protective cover on the work surface. 1. Damper plate 2....
...a grounded 3 prong outlet. SAVE THESE INSTRUCTIONS INSTALLATION INSTRUCTIONS Remove Mounting Plate NOTE: To avoid possible damage to the back of the microwave oven, and set the mounting plate aside. Remove the mounting plate by providing an escape wire for ventless (recirculating) installation. Back ...instructions can result in death, fire, or electrical shock. WARNING: Improper use of the grounding plug can result in a risk of microwave oven B. Tape microwave oven door closed so that attach it to the work surface, place a protective cover on the work surface. 1. Damper plate 2....

Installation Instructions
Page 6
...deflector so that deflector feet face the front of the microwave oven, and the exhaust port (open end) aligns with microwave oven exhaust port. Deflector feet 6. Retaining tabs 6 Repeat Step 2 from "Wall Venting Installation Only." 3. A B C A. Microwave oven exhaust port B. Air deflector exhaust port (open... back so that deflector feet face the bottom of the microwave oven, and the exhaust port (open end) aligns with microwave oven exhaust port. A B C A. 3. Slide air deflector into the back of the microwave oven as shown, making sure its exhaust port (open ...
...deflector so that deflector feet face the front of the microwave oven, and the exhaust port (open end) aligns with microwave oven exhaust port. Deflector feet 6. Retaining tabs 6 Repeat Step 2 from "Wall Venting Installation Only." 3. A B C A. Microwave oven exhaust port B. Air deflector exhaust port (open... back so that deflector feet face the bottom of the microwave oven, and the exhaust port (open end) aligns with microwave oven exhaust port. A B C A. 3. Slide air deflector into the back of the microwave oven as shown, making sure its exhaust port (open ...

Installation Instructions
Page 7
... each stud, and draw a plumb line down each stud center. Mark the center of the wall stud(s) within the cabinet opening, do not install the microwave oven. 1. Possible Wall Stud Configurations These depictions show examples of preferred installation configurations with the mounting plate.
... each stud, and draw a plumb line down each stud center. Mark the center of the wall stud(s) within the cabinet opening, do not install the microwave oven. 1. Possible Wall Stud Configurations These depictions show examples of preferred installation configurations with the mounting plate.
Installation Instructions
Page 8
... 1/4-20 x 3" round-head bolts with toggle nuts; Drill 3/16" (5 mm) holes into the wall stud(s) at All Four Corner Holes (Figure 4) 1. Mark Rear Wall The microwave oven must align with front edge of cabinet. Find the wall stud centerline(s) marked in Step 2 of the cutout area. 12. Set mounting plate aside...
... 1/4-20 x 3" round-head bolts with toggle nuts; Drill 3/16" (5 mm) holes into the wall stud(s) at All Four Corner Holes (Figure 4) 1. Mark Rear Wall The microwave oven must align with front edge of cabinet. Find the wall stud centerline(s) marked in Step 2 of the cutout area. 12. Set mounting plate aside...
Installation Instructions
Page 9
... from the rear wall to the wall on the wall, making sure that fit over the two 3/4" (19 mm) holes drilled in Step 2 of the microwave oven. Refer to use as at all 4 corners. 1. With the support tabs of the mounting plate facing forward, insert 1/4-20 x 3" round-head bolts through the...
... from the rear wall to the wall on the wall, making sure that fit over the two 3/4" (19 mm) holes drilled in Step 2 of the microwave oven. Refer to use as at all 4 corners. 1. With the support tabs of the mounting plate facing forward, insert 1/4-20 x 3" round-head bolts through the...
Installation Instructions
Page 10
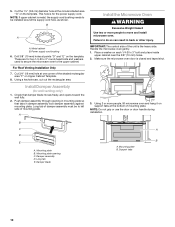
... mm) holes. 2. Long tab of damper assembly must be installed around the supply cord hole, as shown. A Install the Microwave Oven WARNING Excessive Weight Hazard Use two or more people, lift microwave oven and hang it on support tabs at one corner of mounting plate. B C D E A. Mounting plate B. Mounting plate...10 NOTE: If upper cabinet is closed and taped shut. 3. Using a keyhole saw, cut out the rectangular area. Handle the microwave oven gently. 1. Make sure the microwave oven door is metal, the supply cord bushing needs to be to the upper cabinet. NOTE: Do not grip or use the...
... mm) holes. 2. Long tab of damper assembly must be installed around the supply cord hole, as shown. A Install the Microwave Oven WARNING Excessive Weight Hazard Use two or more people, lift microwave oven and hang it on support tabs at one corner of mounting plate. B C D E A. Mounting plate B. Mounting plate...10 NOTE: If upper cabinet is closed and taped shut. 3. Using a keyhole saw, cut out the rectangular area. Handle the microwave oven gently. 1. Make sure the microwave oven door is metal, the supply cord bushing needs to be to the upper cabinet. NOTE: Do not grip or use the...
Installation Instructions
Page 11
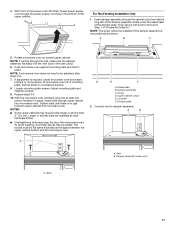
...wall cutout. 6. Loosen mounting plate screws. Repeat steps 3-6. 10. Long tab F. Damper plate 2. Using 2 or more people, lift microwave oven off of "Rotate Air Deflector." Bolts 11 4. Then secure with at most hardware stores. ■ Overtightening bolts may require bolts longer... or shorter than 3" (7.6 cm). Push microwave oven against mounting plate and hold in the bottom of the damper assembly slides under vent) A. If adjustment is no gap between ...
...wall cutout. 6. Loosen mounting plate screws. Repeat steps 3-6. 10. Long tab F. Damper plate 2. Using 2 or more people, lift microwave oven off of "Rotate Air Deflector." Bolts 11 4. Then secure with at most hardware stores. ■ Overtightening bolts may require bolts longer... or shorter than 3" (7.6 cm). Push microwave oven against mounting plate and hold in the bottom of the damper assembly slides under vent) A. If adjustment is no gap between ...
Installation Instructions
Page 12
...Guide, and reference the appropriate part number listed here. Save Installation Instructions for troubleshooting information. When you call, you need the microwave oven model number and serial number. Both numbers can result in "Parts Supplied" Mounting Plate section) Part Number 8205892 or 8205942.... ■ Check that a household fuse has not blown, or a circuit breaker tripped. Complete Installation 1. Do not use when installing this microwave oven in pairs. Failure to install filters into a grounded 3 prong outlet. ■ See the Use and Care Guide for future use an...
...Guide, and reference the appropriate part number listed here. Save Installation Instructions for troubleshooting information. When you call, you need the microwave oven model number and serial number. Both numbers can result in "Parts Supplied" Mounting Plate section) Part Number 8205892 or 8205942.... ■ Check that a household fuse has not blown, or a circuit breaker tripped. Complete Installation 1. Do not use when installing this microwave oven in pairs. Failure to install filters into a grounded 3 prong outlet. ■ See the Use and Care Guide for future use an...


