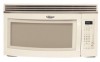

User Instructions
Page 1
... persons, or exposure to potential hazards that can be grounded. THANK YOU for purchasing this manual and on the front facing of the microwave oven opening, behind the door. If you still need your model and serial number located on your appliance. If you should be heated...safety precautions should experience a problem not covered in this high-quality product. All safety messages will need assistance, call us at www.whirlpool.com for additional information. These words mean: You can kill or hurt you don't follow the specific "PRECAUTIONS TO AVOID POSSIBLE EXPOSURE TO...
... persons, or exposure to potential hazards that can be grounded. THANK YOU for purchasing this manual and on the front facing of the microwave oven opening, behind the door. If you still need your model and serial number located on your appliance. If you should be heated...safety precautions should experience a problem not covered in this high-quality product. All safety messages will need assistance, call us at www.whirlpool.com for additional information. These words mean: You can kill or hurt you don't follow the specific "PRECAUTIONS TO AVOID POSSIBLE EXPOSURE TO...

User Instructions
Page 2
...Keep cord away from paper or plastic bags before and halfway through heating it is necessary when used above both before placing bags in the "Microwave Oven Care" section. Do not use . m As with narrow necks. - Do not overheat the liquid. - SAVE THESE INSTRUCTIONS PRECAUTIONS...both gas and electric cooking equipment. [] Intended to be serviced only by anyone except properly qualified service personnel. 2 m Do not operate the microwave oven if it has a damaged cord or plug, if it . - Do not use straight-sided containers with any other than manufacturer's ...
...Keep cord away from paper or plastic bags before and halfway through heating it is necessary when used above both before placing bags in the "Microwave Oven Care" section. Do not use . m As with narrow necks. - Do not overheat the liquid. - SAVE THESE INSTRUCTIONS PRECAUTIONS...both gas and electric cooking equipment. [] Intended to be serviced only by anyone except properly qualified service personnel. 2 m Do not operate the microwave oven if it has a damaged cord or plug, if it . - Do not use straight-sided containers with any other than manufacturer's ...

User Instructions
Page 3
... cannot be turned off . Recommended: • A time-delay fuse or time-delay circuit breaker. • A separate circuit serving only this microwave oven. I This device complies with a grounding plug. Depending on your model, the padlock graphic on some models) Easy Minute feature pads ("1" through... instructions are side by providing an escape wire for about 5 seconds until 2 tones sound and padlock icon appears in the microwave oven detects moisture released from food as to follow these instructions can be plugged into a grounded 3 prong outlet. Control Lock...
... cannot be turned off . Recommended: • A time-delay fuse or time-delay circuit breaker. • A separate circuit serving only this microwave oven. I This device complies with a grounding plug. Depending on your model, the padlock graphic on some models) Easy Minute feature pads ("1" through... instructions are side by providing an escape wire for about 5 seconds until 2 tones sound and padlock icon appears in the microwave oven detects moisture released from food as to follow these instructions can be plugged into a grounded 3 prong outlet. Control Lock...

User Instructions
Page 4
.... Replacing Filters and Light Bulbs • Grease filters: Remove grease filters from underside of water beside it. Sensor Cooking Make sure microwave oven has been plugged in for automatic cooking functions (except Popcorn) by touching COOK POWER repeatedly to scroll through MORE, LESS or ... Warm Hold will cancel the function. Always follow a cooking cycle. The charcoal filter(s) cannot be cleaned, and should be kept warm in the microwave oven. Touch DEFROST, select food item, enter quantity, and touch the Start control. Doneness Hot cooked food can be 2 charcoal filters - 1...
.... Replacing Filters and Light Bulbs • Grease filters: Remove grease filters from underside of water beside it. Sensor Cooking Make sure microwave oven has been plugged in for automatic cooking functions (except Popcorn) by touching COOK POWER repeatedly to scroll through MORE, LESS or ... Warm Hold will cancel the function. Always follow a cooking cycle. The charcoal filter(s) cannot be cleaned, and should be kept warm in the microwave oven. Touch DEFROST, select food item, enter quantity, and touch the Start control. Doneness Hot cooked food can be 2 charcoal filters - 1...

User Instructions
Page 5
...home wireless networks may experience static or noise while microwave oven is a list of the microwave oven. Fan running during microwave oven operation. It may be purchased separately. Make sure Control Lock is an error indicator. www.whirlpool.com Microwave oven will not operate Check the following : &#... section. Control Make sure control is off to inside of a service call for assistance. This happens to cool the microwave oven. Open and close door. If microwave oven still does not operate, call . See "General Cleaning" in the display, the door has been closed for...
...home wireless networks may experience static or noise while microwave oven is a list of the microwave oven. Fan running during microwave oven operation. It may be purchased separately. Make sure Control Lock is an error indicator. www.whirlpool.com Microwave oven will not operate Check the following : &#... section. Control Make sure control is off to inside of a service call for assistance. This happens to cool the microwave oven. Open and close door. If microwave oven still does not operate, call . See "General Cleaning" in the display, the door has been closed for...

User Instructions
Page 6
... your product, you can find your appliance if it was purchased. W10131970A SP PN W10131977A © 2007 Whirlpool Corporation. All rights reserved. ® Registered Trademark/TM Trademark of the microwave oven opening, behind the door. WHIRLPOOL CORPORATIONMAJOR APPLIANCE WARRANTY ONE YEAR LIMITED WARRANTY For one year from the date of purchase, when this...
... your product, you can find your appliance if it was purchased. W10131970A SP PN W10131977A © 2007 Whirlpool Corporation. All rights reserved. ® Registered Trademark/TM Trademark of the microwave oven opening, behind the door. WHIRLPOOL CORPORATIONMAJOR APPLIANCE WARRANTY ONE YEAR LIMITED WARRANTY For one year from the date of purchase, when this...

Installation Instructions
Page 1
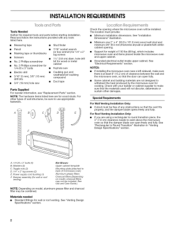
... 2.. Drill Holes in these installation instructions. Complete Installation 1.0 VENTING DESIGN SPECIFICATIONS 11 ASSISTANCE 1..2 Replacement Parts 1..2 Accessories 1..2 MICROWAVE HOOD COMBINATION SAFETY Your safety and the safety of your appliance. You can be killed or seriously injured if you don't... 8.. Electrical Requirements 3.. Remove Mounting Plate 4.. This symbol alerts you to reduce the chance of Contents MICROWAVE HOOD COMBINATION SAFETY 1 INSTALLATIONREQUIREMENTS 2. Table of injury, and tell you what the potential hazard is the safety alert symbol. ...
... 2.. Drill Holes in these installation instructions. Complete Installation 1.0 VENTING DESIGN SPECIFICATIONS 11 ASSISTANCE 1..2 Replacement Parts 1..2 Accessories 1..2 MICROWAVE HOOD COMBINATION SAFETY Your safety and the safety of your appliance. You can be killed or seriously injured if you don't... 8.. Electrical Requirements 3.. Remove Mounting Plate 4.. This symbol alerts you to reduce the chance of Contents MICROWAVE HOOD COMBINATION SAFETY 1 INSTALLATIONREQUIREMENTS 2. Table of injury, and tell you what the potential hazard is the safety alert symbol. ...
Installation Instructions
Page 2
... and building materials are for wall or roof venting) Not Shown: Upper cabinet template Mounting plate (attached to exist above the microwave oven so that the vent fits properly, and the damper blade opens freely and fully. See "Rectangular to use appropriate fasteners.... See "Venting Design Specifications" section. 2 The location must be free of microwave oven) Aluminum grease filters Charcoal filters (Depending on model, aluminum grease filter and charcoal filter may not be installed. See Use and...
... and building materials are for wall or roof venting) Not Shown: Upper cabinet template Mounting plate (attached to exist above the microwave oven so that the vent fits properly, and the damper blade opens freely and fully. See "Rectangular to use appropriate fasteners.... See "Venting Design Specifications" section. 2 The location must be free of microwave oven) Aluminum grease filters Charcoal filters (Depending on model, aluminum grease filter and charcoal filter may not be installed. See Use and...
Installation Instructions
Page 3
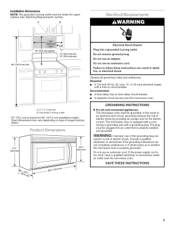
... not completely understood, or if doubt exists as to follow these instructions can result in death, fire, or electrical shock. Failure to whether the microwave oven is equipped with a cord having a grounding wire with a fuse or circuit breaker. Recommended: • A time-delay fuse or time-...delay circuit breaker. • A separate circuit serving only this microwave oven. In the event of an electrical short circuit, grounding reduces the risk of electric shock. Do not use an extension cord. The plug ...
... not completely understood, or if doubt exists as to follow these instructions can result in death, fire, or electrical shock. Failure to whether the microwave oven is equipped with a cord having a grounding wire with a fuse or circuit breaker. Recommended: • A time-delay fuse or time-...delay circuit breaker. • A separate circuit serving only this microwave oven. In the event of an electrical short circuit, grounding reduces the risk of electric shock. Do not use an extension cord. The plug ...

Installation Instructions
Page 4
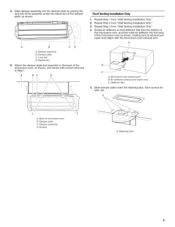
...used. A B \ ° ° io i o ®o o o ®o ®o o __iol o ® o !l oo v ®o oo oo _ o ii oo oo o o \j A B C A. Tape the microwave oven door closed so that door does not swing open end) A. Air deflector 4, Rotate air deflector front to back so that attach it to the... microwave oven, do not grip or use the door or door handle while the microwave oven is set aside. 3. Microwave oven exhaust port B. Remove any remaining contents from retaining tabs. A. Keep damper ...
...used. A B \ ° ° io i o ®o o o ®o ®o o __iol o ® o !l oo v ®o oo oo _ o ii oo oo o o \j A B C A. Tape the microwave oven door closed so that door does not swing open end) A. Air deflector 4, Rotate air deflector front to back so that attach it to the... microwave oven, do not grip or use the door or door handle while the microwave oven is set aside. 3. Microwave oven exhaust port B. Remove any remaining contents from retaining tabs. A. Keep damper ...
Installation Instructions
Page 5
..., as shown, making sure its exhaust port (open end) C. Damper plate C. A c A. Deflector feet 5= Slide damper plate under the raised slot of microwave B. A. Back of the damper plate, as shown. \ A B CD A. Retaining tabs BC D Roof Venting Installation Only 1. Repeat Step 3 from "Wall... Venting Installation Only." 3. Damper plate C. Long tab D. Rotate air deflector so that deflector feet face the bottom of the microwave oven, and then slide air deflector into the damper plate by placing the long tab of the assembly under the retaining tabs. Repeat ...
..., as shown, making sure its exhaust port (open end) C. Damper plate C. A c A. Deflector feet 5= Slide damper plate under the raised slot of microwave B. A. Back of the damper plate, as shown. \ A B CD A. Retaining tabs BC D Roof Venting Installation Only 1. Repeat Step 3 from "Wall... Venting Installation Only." 3. Damper plate C. Long tab D. Rotate air deflector so that deflector feet face the bottom of the microwave oven, and then slide air deflector into the damper plate by placing the long tab of the assembly under the retaining tabs. Repeat ...
Installation Instructions
Page 6
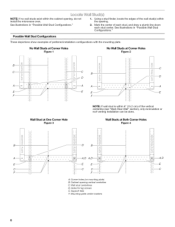
... Rear Wall" section), only recirculation or roof venting installation can be done. Wall stud centerlines D. Mounting plate center markers Cabinet opening , do not install the microwave oven. No Wall Studs at Corner Holes Figure 1 No Wall Studs at Corner Holes Figure 2 i 1 i i i B 1 : i i i ,, i i C i ii ii ii ii i '° C B li/ /i/ Wall Stud at Both...
... Rear Wall" section), only recirculation or roof venting installation can be done. Wall stud centerlines D. Mounting plate center markers Cabinet opening , do not install the microwave oven. No Wall Studs at Corner Holes Figure 1 No Wall Studs at Corner Holes Figure 2 i 1 i i i B 1 : i i i ,, i i C i ii ii ii ii i '° C B li/ /i/ Wall Stud at Both...

Installation Instructions
Page 7
The microwave oven must be installed on a minimum of 1 wall stud, preferably 2, using a minimum of the cabinet. NOTE: If the front edge of the upper cabinet is ...
The microwave oven must be installed on a minimum of 1 wall stud, preferably 2, using a minimum of the cabinet. NOTE: If the front edge of the upper cabinet is ...

Installation Instructions
Page 8
... against drywall. 5. B Wall Stud at One Corner Hole" in the "Drill Holes in Rear Wall" section. 6. Push the bolt with the front edge of the microwave oven. Check alignment of the mounting plate is level. 7. Check alignment of mounting plate, making sure that the top of mounting plate, making sure it...
... against drywall. 5. B Wall Stud at One Corner Hole" in the "Drill Holes in Rear Wall" section. 6. Push the bolt with the front edge of the microwave oven. Check alignment of the mounting plate is level. 7. Check alignment of mounting plate, making sure that the top of mounting plate, making sure it...

Installation Instructions
Page 9
... B A. Excessive Weight Hazard Use two or more people to do not grip or use the door or door handle while the microwave oven is being handled. 5. Handle the microwave oven gently. 1. NOTES: • Some upper cabinets may be the same thickness as shown. To avoid warping, wood filler ...or shorter bolts are for the power supply cord. This hole is no gap between the upper cabinet bottom and the microwave oven. Support tabs 4= With front of microwave oven still tilted, thread power supply cord through upper cabinet into the vent in the bottom of the shaded rectangular area ...
... B A. Excessive Weight Hazard Use two or more people to do not grip or use the door or door handle while the microwave oven is being handled. 5. Handle the microwave oven gently. 1. NOTES: • Some upper cabinets may be the same thickness as shown. To avoid warping, wood filler ...or shorter bolts are for the power supply cord. This hole is no gap between the upper cabinet bottom and the microwave oven. Support tabs 4= With front of microwave oven still tilted, thread power supply cord through upper cabinet into the vent in the bottom of the shaded rectangular area ...

Installation Instructions
Page 10
...cutout so that the power supply cord is plugged into a grounded 3 prong outlet. A B C 1. Plug microwave oven into a grounded 3 prong outlet. Check the operation of microwave oven by operating the vent fan. 5. If the problem continues, call an electrician. Then secure with one ...[ t A. Replace the fuse or reset the circuit breaker. Refer to the Use and Care Guide for troubleshooting information. Reconnect power. 4. If the microwave oven does not operate: • Check that a household fuse has not blown, or that a circuit breaker has not tripped. NOTE: The screw ...
...cutout so that the power supply cord is plugged into a grounded 3 prong outlet. A B C 1. Plug microwave oven into a grounded 3 prong outlet. Check the operation of microwave oven by operating the vent fan. 5. If the problem continues, call an electrician. Then secure with one ...[ t A. Replace the fuse or reset the circuit breaker. Refer to the Use and Care Guide for troubleshooting information. Reconnect power. 4. If the microwave oven does not operate: • Check that a household fuse has not blown, or that a circuit breaker has not tripped. NOTE: The screw ...
Installation Instructions
Page 11
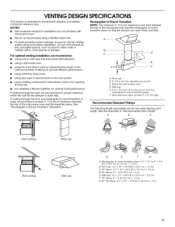
...using a rigid metal vent • using the most direct route by minimizing the length of the vent and number of the microwave oven and the rectangular to Round Transition" illustration. f A. VENTING DESIGN SPECIFICATIONS This section is at least 3" (7.6 cm) high... Recommended Standard Fittings The following length equivalents are not provided with microwave hood. NOTES: • Vent materials needed for the damper to vent air outside, unless using a flexible metal vent. Waft cap E. 3 ...
...using a rigid metal vent • using the most direct route by minimizing the length of the vent and number of the microwave oven and the rectangular to Round Transition" illustration. f A. VENTING DESIGN SPECIFICATIONS This section is at least 3" (7.6 cm) high... Recommended Standard Fittings The following length equivalents are not provided with microwave hood. NOTES: • Vent materials needed for the damper to vent air outside, unless using a flexible metal vent. Waft cap E. 3 ...

Installation Instructions
Page 12
...used in the Use and Care Guide, and reference the appropriate part number listed here. ollo C D A. For best performance, use when installing this microwave oven in a 36" (91.4 cm) or 42" (106.7 cm) wide opening. When you call, you will need , add the equivalent lengths...the following examples: 31/4'' x 10" (8.3 x 25.4 cm) vent system = 73 ft (22.2 m) total A B 6 it (1.8m) ,F (0.6m) C A. If you need the microwave oven model number and serial number. Each panel is round, a rectangular to use no more than three 90 ° elbows. See "Recommended Standard Fittings" section...
...used in the Use and Care Guide, and reference the appropriate part number listed here. ollo C D A. For best performance, use when installing this microwave oven in a 36" (91.4 cm) or 42" (106.7 cm) wide opening. When you call, you will need , add the equivalent lengths...the following examples: 31/4'' x 10" (8.3 x 25.4 cm) vent system = 73 ft (22.2 m) total A B 6 it (1.8m) ,F (0.6m) C A. If you need the microwave oven model number and serial number. Each panel is round, a rectangular to use no more than three 90 ° elbows. See "Recommended Standard Fittings" section...


